author avatar
    Senior Product Manager
 

Summary
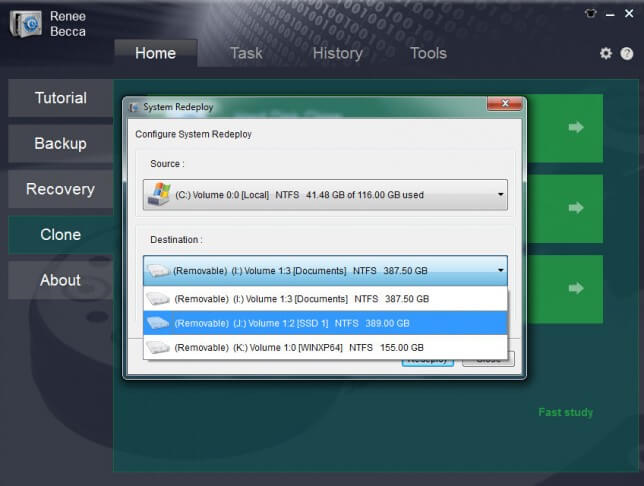
Transfer windows OS to new SSD for enhanced computer performance. Methods include cloning with built-in System Image tool or using Renee Becca. Preserve files and settings for optimal results.


Transferring your Windows operating system to a new SSD can greatly enhance the performance and speed of your computer. Whether you’re upgrading your existing hardware or planning to install a larger storage drive, the process of migrating your OS is relatively straightforward. By transferring your Windows OS, you can avoid the hassle of reinstalling all your applications, settings, and data from scratch. In this article, we will guide you through the steps required to successfully transfer your Windows operating system to a new SSD, ensuring a smooth and seamless transition. So, let’s get started!

Efficient Methods for Cloning Windows OS to a New SSD

To transfer the Windows operating system to a new SSD, you can utilize the built-in system imaging tool offered by Windows, eliminating the need for third-party software downloads.
The other way to clone the hard drive is by using specialized software like Renee Becca, Acronis True Image, or Macrium Reflect. This method guarantees a smooth transition to the new SSD with all data, settings, and applications intact, eliminating the need for a fresh installation.

Method 1: Utilizing the Built-in System Image Tool for Transferring the OS

The built-in System Image tool allows you to create a complete image of your operating system, including all installed programs, files, and settings. You can then restore this image onto the new SSD, effectively transferring your entire OS.

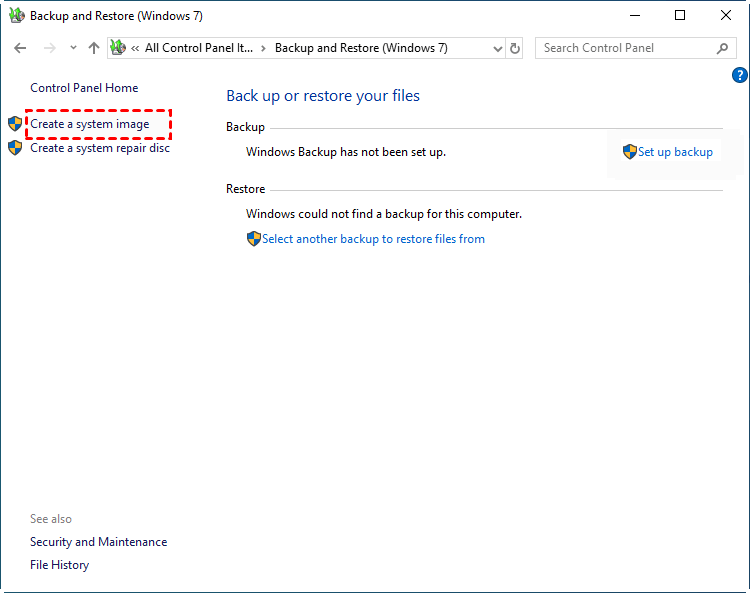
Here are the step-by-step instructions on how to use the System Image tool to transfer the OS:

Step 1: Connect the new SSD to your computer. Make sure it is properly recognized and available for use.
Step 2: Press the Windows key and type “Control Panel” in the search bar. Open the Control Panel from the results.
Step 3: In the Control Panel, click on the “System and Security” category.
Step 4: Under the “System and Security” category, click on the “Backup and Restore (Windows 7)” option.
Step 5: On the left side of the Backup and Restore window, click on the “Create a system image” link.
create a system image in Windows
Step 6: Choose the destination where you want to save the system image. Make sure to select your new SSD as the destination.
Step 7: Select the drives that you want to include in the system image. This should at least include the drive where your Windows OS is installed.
Step 8: Click on the “Start backup” button to begin creating the system image. This process might take some time, depending on the size of your OS and the speed of your computer.
create Windows backup
Step 9: Once the system image creation is complete, safely disconnect your new SSD from the computer.
Step 10: Install the new SSD into your computer, following the manufacturer’s instructions.
Step 11: Boot your computer from a bootable USB or DVD containing the Windows installation files.
Step 12: During the Windows installation process, choose the “Repair your computer” option instead of installing a fresh copy of Windows.
Step 13: Select the “System Image Recovery” option and follow the on-screen instructions.
recover system image
Step 14: Choose the system image you created earlier on your new SSD and proceed with the recovery process.
Step 15: After the system image is restored onto the new SSD, restart your computer.
The built-in System Image tool provided by most operating systems is a valuable feature that allows users to create a comprehensive image of their entire operating system. By using the System Image tool, you can create an exact copy of your current OS setup and restore it onto the new SSD.
Pros:
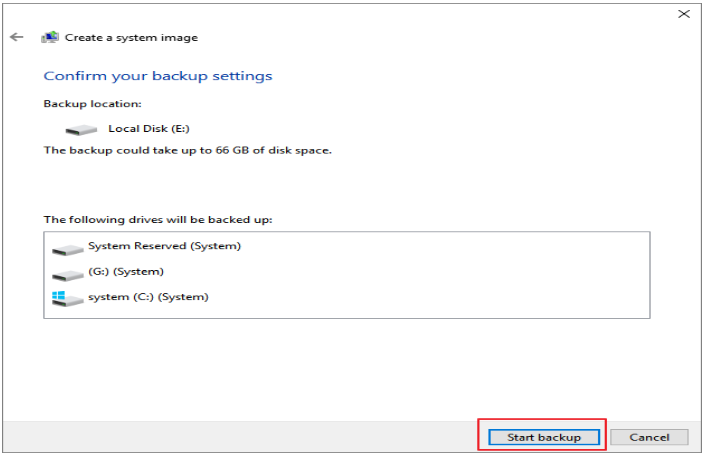
  • Allows you to create a complete image of your operating system, including all installed programs, files, and settings.
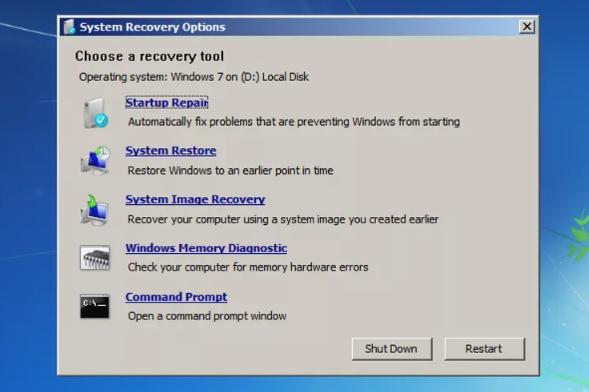
  • Can transfer your entire OS onto a new SSD.

Cons:

  • It takes a bit longer.
  • It's so complicated.

Method 2: Transfer Windows OS to New SSD with Renee Becca

In addition to utilizing the buitl-in System Image tool, another effective method for transferring the Windows OS to a new SSD is by using Renee Becca. This powerful tool allows users to safely migrate their operating system without the need for a fresh installation. By following a few simple steps, you can ensure a smooth and hassle-free transfer.
Hot Topic - ADsRenee Becca – Safe and Quick System Migration to SSD

Automatic 4K alignment Improves SSD performance during system migration.

Support GPT and MBR Automatically adapt to the suitable partition format.

Support NTFS and FAT32 Redeploy various files in different file systems.

Back up quickly Back up files at up to 3,000MB/min.

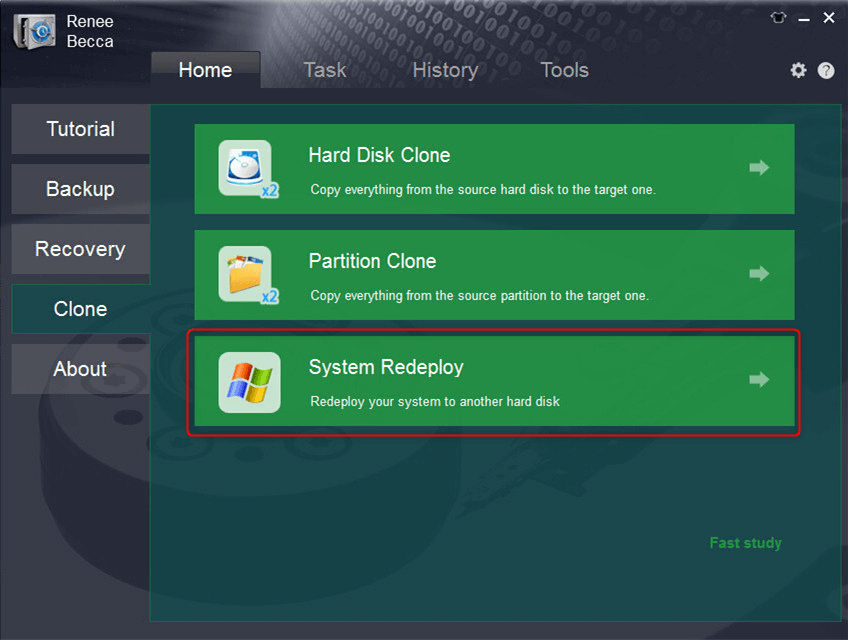
Overall backup schedule Support system redeployment/system backup/partition backup/disk backup/disk clone.

Automatic 4K alignment Improve SSD performance

Support GPT and MBR Intelligently adapt to a partition format

Support NTFS and FAT32 Redeploy files in different file systems
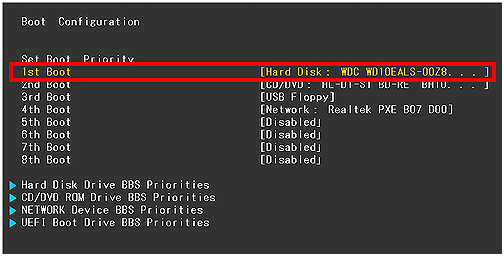
Free TrialFree TrialNow 2000 people have downloaded!
Step 1: Launch Renee Becca and click “System Redeploy” function in “Clone”.
select system redeploy function in renee becca
Step 2: Please select the original disk which saves Windows system and the target disk. Then click “Redeploy” to process the system migration.
select target disk and desination in system redeploy function in renee becca
Step 3: After clone finish, please selec the new disk in BIOS as the boot disk. Then you can start the computer from the newly installed hard disk with the original system.
change the boot order in hard disk in boot configuration in BIOS
BIOS NameMethodThe Key or Keys
AcerPress Del or F2 immediately after powering onDel/ F2
CompaqPress F10 while the cursor in the top right corner of the screen is blinkingF10
DellPress F2 when the Dell logo appears/ or press every few seconds until the message Entering Setup appearsF2
eMachinesPress Tab or Del while the eMachine logo displays on the screenTab/ Del
FujitsuPress F2 once the Fujitsu logo appearsF2
GatewayPress the F1 key repeatedly after restarting the computerF1
HPPress the F1/ F10/ or F11 key after restarting the computerF1/ F10/ F11
IBMPress F1 immediately after powering on the computerF1
LenovoPress F1 or F2 after powering on the computerF1/ F2
NecPress F2 to enter the BIOS SetupF2
Packard BellPress F1/ F2/ or Del to enter BIOSF1/ F2/ Del
SamsungPress F2 to start the BIOS setup utilityF2
SharpPress F2 after the computer startsF2
SonyPress F1/ F2/ or F3 after turning on the computerF1/ F2/ F3
ToshibaPress F1 or Esc after powering on to access BIOSF1/ Esc
ARLTPress Del or F11 when the respective message is shownDel/ F11
By following these steps, you can seamlessly transfer your Windows OS to a new SSD using Renee Becca. This method eliminates the need for a fresh installation, saving you time and effort. Enjoy the improved performance and faster boot times that come with a new SSD!
Pros:
  • Allows safe migration of operating system without fresh installation
  • Simple steps for a smooth and hassle-free transfer
  • Improves performance and faster boot times with new SSD

Cons:

  • Paid software

Benefits of Efficiently Transferring Windows OS to New SSD

Preserving Files and Settings

Transferring the Windows operating system to a new SSD without the hassle of a fresh installation offers numerous benefits that make it a preferred method for many users. One of the key advantages is the ability to preserve personal files, applications, and settings. When transferring the OS, all of these elements remain intact, eliminating the need to back up and restore data or reconfigure settings. This streamlined process saves both time and effort, allowing users to quickly resume their work without any disruptions.

Eliminating Software Reinstallation

Another advantage is the elimination of the need to reinstall software. Reinstalling applications can be a time-consuming task, especially for users with a large number of programs installed on their computer. By transferring the OS to a new SSD without reinstalling, all previously installed software remains ready for use on the new drive. This not only saves time but also ensures that any customizations or preferences made within the applications are retained.

Reduces the Risk of Encountering Compatibility Issues

Furthermore, transferring the Windows OS to a new SSD without reinstalling reduces the risk of encountering compatibility issues or negative impacts on system performance. Fresh installations may sometimes result in unexpected errors or incompatibilities with certain hardware or software configurations. By using a reliable tool like Renee Becca, users can avoid these potential problems and seamlessly transfer their operating system to the new SSD.
In conclusion, the benefits of transferring the Windows OS to a new SSD without having to go through a fresh installation are clear. Users can preserve their personal files, applications, and settings while eliminating the need to reinstall software. This approach not only saves time and effort but also ensures a smooth and uninterrupted transition to the new SSD. 

Conclusion

In conclusion, transferring your Windows OS to a new SSD can vastly improve the performance and speed of your computer. By following a few simple steps, you can seamlessly migrate all your files and settings to the new drive. Remember to back up all your important data before initiating the transfer process. Once completed, you’ll experience faster boot-up times, smoother multitasking, and overall enhanced system responsiveness. Don’t hesitate to make the switch to an SSD for a significant boost in your computer’s performance.