author avatar
    Senior Program Developer
 

Summary
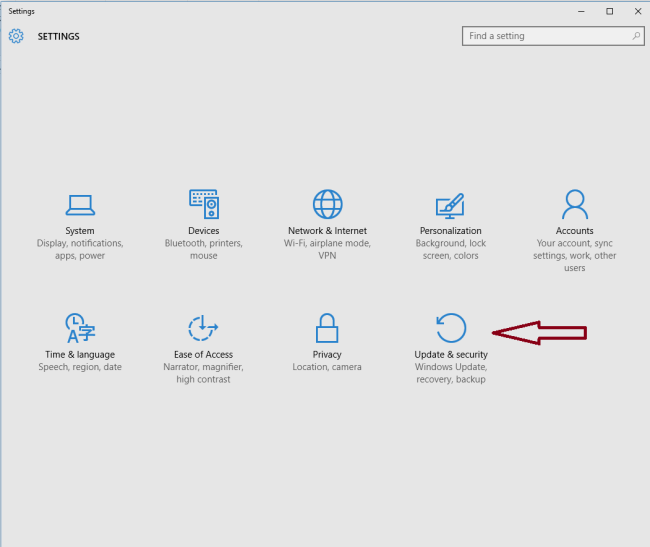
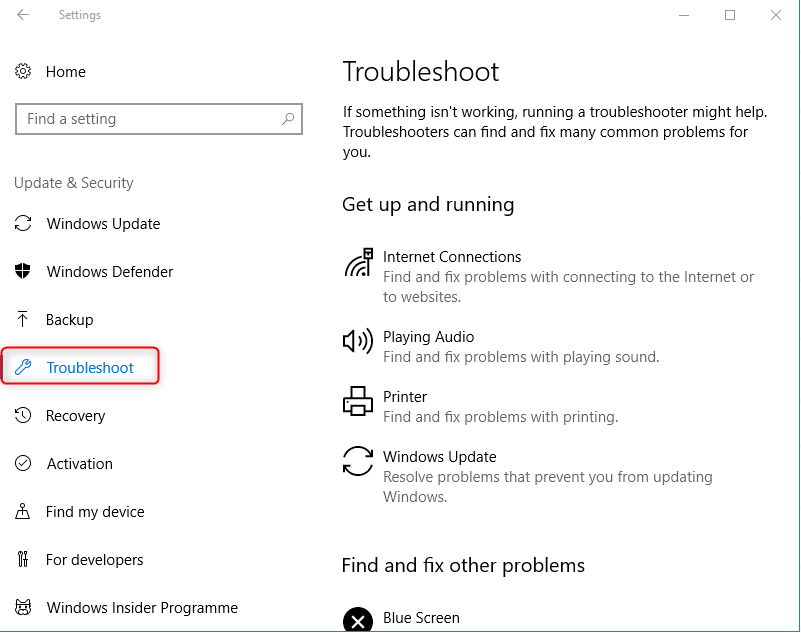
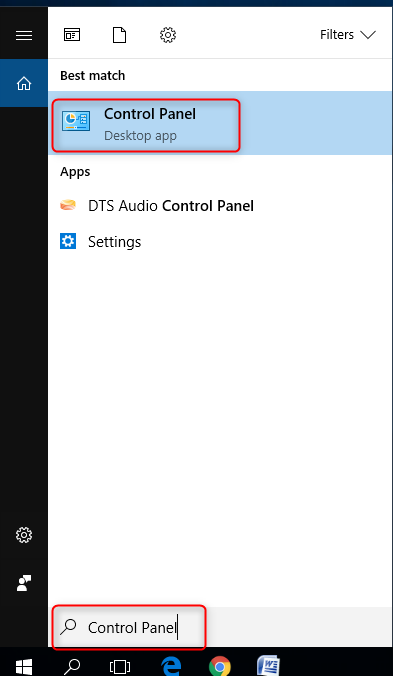
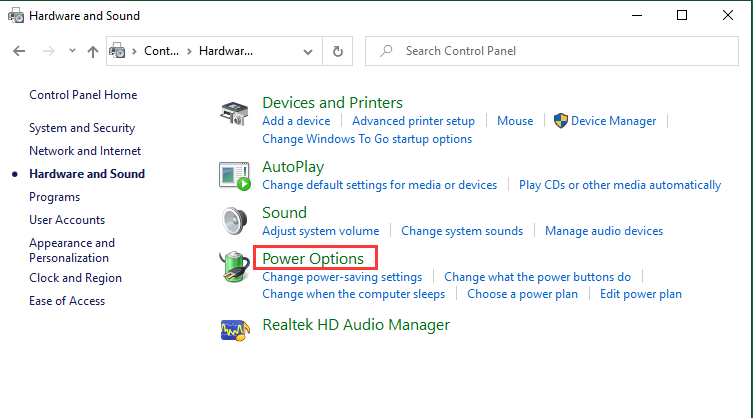
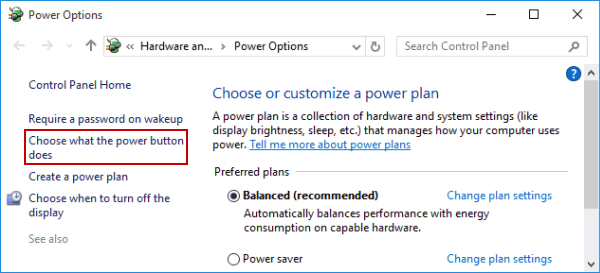
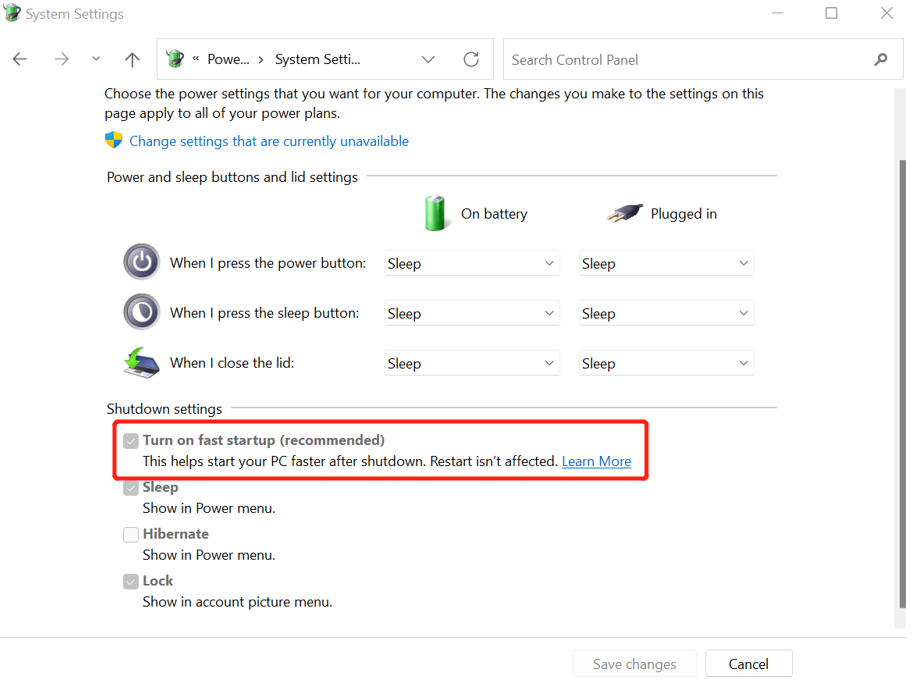
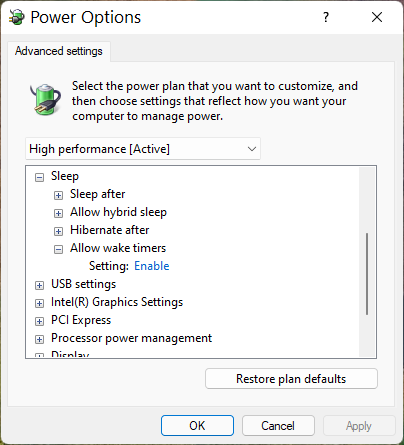
The sleep mode of the computer, as a new energy-saving mode that changes from the working state to the waiting state, provides a lot of convenience for everyone in the daily use process. However, some users have encountered the problem of not being able to wake up the computer normally from sleep mode, which is very distressing. Therefore, this article will focus on the problem that the Windows 10 computer cannot wake up the screen after sleep, and help you sort out several conventional solutions.


windows 10 wont wake from sleep mode

What is sleep mode?

Computer sleep mode is a type of standby mode for computers. It serves the purpose of conserving power by avoiding the lengthy boot process. Additionally, this mode can prolong the lifespan of the computer. Activating sleep mode typically indicates that there are tasks that require temporary attention. For instance, if you need to edit documents or have multiple webpages open on your desktop but need to step away for a short period of time, you can utilize sleep mode to address this issue.

1. Restart the computer

When the computer cannot be woken up normally, you can try to restart the computer through the power button, and then try the following methods.

2. Run the Power Troubleshooter

When your Windows 10 computer won’t wake from sleep, you can use the computer’s built-in power troubleshooting tool Try to fix the current problem. The following is the detailed steps:
Step 1: After restarting the computer, press the (Windows+I) key on the keyboard at the same time to open the Settings interface. Then click on the (Update & security) option.
settings Update And Security
Step 2: Find (Troubleshoot) on the left, then select (Power) on the right. Next, click the (Run the Troubleshooter) button.
select troubleshoot in the left side of windows

3. Disable Fast Startup

You can also disable fast startup from the control panel, which may help solve the problem. The specific steps are as follows:
Step 1: Run the computer, search for (Control Panel) program in the search box and open it.
search windows Control Panel
Step 2: Find and click the (Power Options).
Hardware and Sound
Step 3: Next, click on the (Choose what the power button does) option.
Choose what the power buttons do
Step 4: Click the (Change settings that are currently unavailable) option, uncheck the “Turn on fast startup (recommended)” option, and click on the (Save changes) button.
shutdown settings

4. Uninstall and reinstall the driver

When your display adapter driver is not updated in time, the error may appear. The solution is to reinstall the drivers that cause errors or have not been updated in time. The steps are as follows:
Step 1: Press the (Windows+R) keys at the same time to open the “Run” window. Then enter the command (devmgmt.msc) to open the Device Manager window.
open device manager
Step 2: Next, find (Display adapters) in the device manager, then right-click on it and select the (Uninstall device) option. After that, an uninstall device window will pop up, please check the (Delete the driver software for this device) option, and click the (Uninstall) option.
uninstall device on display adapters
Step 3: Next, locate the appropriate official website to acquire the necessary driver based on the brand of your graphics card. For instance, if you have an NVIDIA graphics card, you can obtain the driver by downloading the GeForce Experience software from the official NVIDIA website. To update your graphics card driver, simply open the GeForce Experience software, create an account, and log in. From the (Drivers) tab, you can view all available updates and proceed to download and install them. Additionally, there are various third-party driver software options, but it is crucial to select a secure and trustworthy website to avoid downloading any harmful software.
nvidia geforce

5. Adjust power settings

When you cannot wake up from sleep mode normally, you can also try to manage the power settings to solve the current problem. The steps are as follows:
Step 1: Run the computer and press the (Windows+R) key at the same time to open the “Run” window. Next, enter command (powercfg.cpl) in the Run search box and click (OK).
Step 2: After that, click on (Change plan settings).
change power plan settings in control panel
Step 3: Next, click the (Change advanced power settings) button.
how to change advanced power settings on windows
Step 4: In the opened “Power Options” interface, navigate to (Sleep)-(Allow wake timers)-(Enable). Next, click the (OK) button and then restart the computer and see if the problem is resolved.
power option allow wake timers
When the computer wakes up from sleep mode and is unable to enter the system, you can use the following method to transfer your data in a timely manner.

Use Renee Passnow to transfer or restore important data when the computer screen is black

1. What is Renee Passnow?

Renee PassNow is a professional system rescue software that can help Windows The user clears the Windows account password, creates a new administrator account; restores disk/memory card data, restores data after hard disk formatting; transfers disk files; erases or scans disk files, etc. In addition, this software also supports repairing Windows system problems, such as: repairing MBR boot records, DBR error parameters, 0xc00000e, Windows system startup failure, and some problems that cause a black screen or blue screen, etc.
Hot Topic - ADsRenee PassNow – 3 Steps to transfer data from the crashed system

Easy to use 3 steps to transfer the files.

Transfer the files Transfer the important files of the computer without system.

Preview the files Preview the files while transferring the data.

Multifuctional Data recovery, Windows password reset, bootable problem recovery can be run without system.

Highly compatible Windows 10/8.1/8/7/XP/Vista. Also supports UEFI boot mode.

Easy to use 3 steps to transfer the files.

Transfer the files Transfer the important files of the computer without system.

Preview the files Preview the files while transferring the data.

Free TrialFree TrialNow 2000 people have downloaded!

2. How to use Renee Passnow to transfer or restore data?

If you are unable to access the Windows system due to a black computer screen, you can use Renee Passnow’s Startup disk to create a new one. This will allow you to start the computer using the disk and utilize the software’s features to transfer or restore data. The following are the step-by-step instructions:
Step 1: Download and install Renee PassNow on another computer that can log in and run normally, then connect the USB disk to the PC.

Please select the (Create a Live USB) option under “Step 1: Select creation method” in the main interface.

Note: Before performing this operation, please make sure that the important files in the USB disk have been saved in other locations because the operation will delete all the data in the USB disk.

Step 2: Next, select (x64) or (x86) according to the system type, and click the (Download Now) button to download the ISO file. After the file is downloaded, click the (Create USB) button and create the USB boot disk. Finally, click the (Eject USB) button.
use renee passnow to create usb to reset passnword
Step 3: To transfer data, connect the boot device you created to the computer. Turn on the computer and wait for the BIOS shortcut key to appear on the screen. This key will only be displayed for a short time, usually just one or two seconds. Continuously click the BIOS shortcut key to access the BIOS settings. From there, set the boot USB as the first option in the boot sequence under Boot Priority. Save the changes and restart the computer to complete the process.
select boot order
Step 4: Wait for a while, after Renee Passnow is loaded, select (Data Transfer). If you need to transfer the entire hard disk, you can select the (Data Backup) option.
data transfer
Step 5: You can easily transfer data to an external disk by clicking on any drive letter (C/D/E/F, etc.). The process is simple and straightforward. For instance, if you want to transfer data from the C drive to the G drive, simply select the C drive on the upper left, then select the G drive on the upper right. Next, choose the files you want to transfer from the C drive and click on the “Copy” button in the middle. This will transfer the data to the external disk effortlessly. If you need to delete a file, you can select it and click on the “Delete” button in the middle. However, please note that this action cannot be undone, so proceed with caution.
data transfer in Renee Passnow
Step 6: If you find that there is data loss, then please select the (Undeleter) option, and click the (Run) button.
data recovery function in Renee Passnow
Step 7: Select (Whole Disk Scan) to scan the target hard disk.
select whole disk scan in renee undeleter
Step 8: Select the file to be restored, and click the (Recover) button to start data recovery. Note: Please save the file on another external disk.
recover files from whole disk scan with renee undeleter