author avatar
    Senior Program Developer
Last update by Olivia Brown at 7 July 2026

Summary
This technical documentation details the operational procedures to suspend bitlocker before cloning encrypted volumes through native Windows utilities and command-line environments. The resource further categorizes software-assisted migration workflows and provides systematic troubleshooting protocols for resolving post-cloning boot authentication errors.


When preparing to clone a system drive protected by BitLocker, it’s essential to suspend BitLocker before cloning to avoid boot failures, recovery key lockouts, and incomplete transfers. This guide walks you through several reliable ways to suspend BitLocker—from the simple Windows Settings method to advanced command-line options. You’ll also find troubleshooting steps for drives that won’t boot after cloning. Read on to ensure your migration is smooth and secure.

Why You Must Suspend BitLocker Before Cloning Your Drive

Upgrading your system drive is usually simple: replace an older or slower disk, install a larger SSD, or move to a faster NVMe drive, then clone your data. However, when BitLocker is enabled, the process can become unexpectedly complicated. Many users run into cloning‑tool errors or, after installing the new drive, are met with a blue BitLocker recovery screen asking for a long recovery key they don’t have.
These issues are especially common when:
- replacing a failing HDD with an SSD,
- upgrading from a 256 GB system disk to a 1 TB model,
- migrating to an NVMe drive for better performance.
The problem isn’t the cloning process itself—it’s how BitLocker protects your system. During startup, Windows verifies that the encrypted drive matches the system’s Trusted Platform Module (TPM). If you clone a disk while BitLocker is fully active, the new drive carries encryption metadata that does not match the TPM on the machine.
This mismatch can cause:
- boot failures,
- repeated prompts for the BitLocker recovery key,
- cloning tools aborting with errors such as “Encrypted source drives cannot be replicated.”
The fix is simple: suspend BitLocker before cloning. Suspending BitLocker keeps your data encrypted but temporarily removes TPM‑based authentication protectors until the next reboot. No data is decrypted, and your drive remains secure. This allows cloning tools to read the disk normally. After cloning, you can resume protection on the original drive or enable encryption on the new one.

When Windows Might Ask for the BitLocker Recovery Key

Below is a table summarizing the most common scenarios that trigger Windows to request the BitLocker recovery key.

⚠️ Common Triggers for BitLocker Recovery Key Prompts

ScenarioWhy It Triggers BitLockerTypical Symptoms

Cloning a BitLocker‑protected drive

TPM detects that the encrypted metadata on the new disk doesn’t match the original hardware.

Blue recovery screen asking for the BitLocker key immediately after boot.

Replacing or upgrading the system disk (HDD → SSD, SATA → NVMe, 256 GB → 1 TB, etc.)

Hardware identifiers change, causing TPM to treat the drive as untrusted.

Windows boots into recovery mode; cloning tools may fail.

Changing BIOS/UEFI settings (Secure Boot, TPM mode, boot order, CSM, RAID/AHCI)

Boot‑path changes break the TPM’s expected security measurements.

Recovery key prompt after firmware changes.

Motherboard replacement or major hardware changes

TPM is tied to the motherboard; replacing it invalidates previous encryption bindings.

Recovery key required on first boot after hardware swap.

TPM reset or firmware update

TPM loses stored protectors, so it cannot validate the encrypted drive.

Windows cannot unlock the drive without the recovery key.

Windows updates affecting boot components

Updates modify boot files, causing TPM to detect unexpected changes.

Occasional recovery key prompts after major updates.

Moving the drive to another PC

TPM on the new machine does not match the encryption metadata.

Drive is locked; recovery key required to unlock.

Phase 1 : Find Your BitLocker Recovery Key

Windows may ask for the BitLocker recovery key after hardware changes, BIOS updates, or drive cloning. To avoid being locked out, make sure you know where to find it before making any modifications.

1. Microsoft Account

Sign in at https://account.microsoft.com/devices, select your PC, and look under BitLocker recovery keys.
Most modern Windows 10/11 devices automatically back up the recovery key to your Microsoft account.
bitlocker recovery keys

2. BitLocker Control Panel

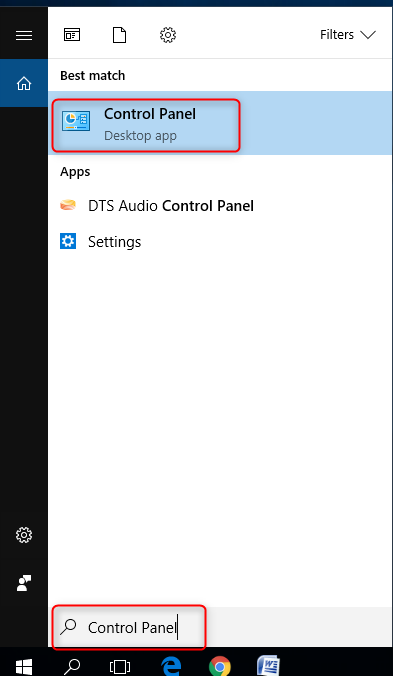
Open Control Panel → System and Security → BitLocker Drive Encryption,
search windows Control Panel
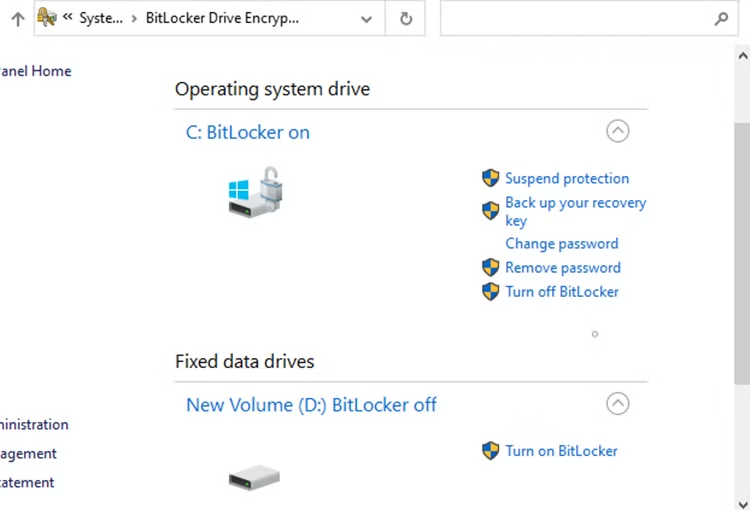
Then click Back up your recovery key. You can save the key to a USB drive, a file, or print a paper copy.
bitlocker protection

3. PC Manufacturer Documentation

Check your computer’s manual or support website. Some OEMs (such as Dell, HP, Lenovo, and Microsoft Surface) provide instructions for locating recovery keys.
This is useful if the key was stored in firmware or provided during setup.

4. Enterprise Environments

For work or school PCs, recovery keys may be stored in Active Directory or Azure AD.
If you cannot locate the key yourself, contact your IT administrator for assistance.

Phase 2 : Suspend BitLocker Protection Before Cloning

No matter which cloning tool you plan to use, your first step should be suspending BitLocker on the source drive.

Steps

Open Control Panel → System and Security → BitLocker Drive Encryption,
Find your operating system drive (usually C:) and look for Suspend protection. Click this button and confirm your choice.
bitlocker protection
Windows will update the status to “Protection is suspended.” The drive remains encrypted, but authentication isn’t required until you restart—exactly what cloning software needs.
Protection resumes automatically after the next reboot. If you plan to test your clone before shutting down, remember that restarting will reactivate BitLocker on the original disk. You can also manually resume protection from the same settings page after cloning.
Renee Becca – Safe and Quick System Migration to SSD

Automatic 4K alignment Improves SSD performance during system migration.

Support GPT and MBR Automatically adapt to the suitable partition format.

Support NTFS and FAT32 Redeploy various files in different file systems.

Back up quickly Back up files at up to 3,000MB/min.

Overall backup schedule Support system redeployment/system backup/partition backup/disk backup/disk clone.

Automatic 4K alignment Improve SSD performance

Support GPT and MBR Intelligently adapt to a partition format

Support NTFS and FAT32 Redeploy files in different file systems
Free TrialFree TrialNow 56337 people have downloaded!

What to Do If the Cloned Drive Fails to Boot or Asks for a Recovery Key

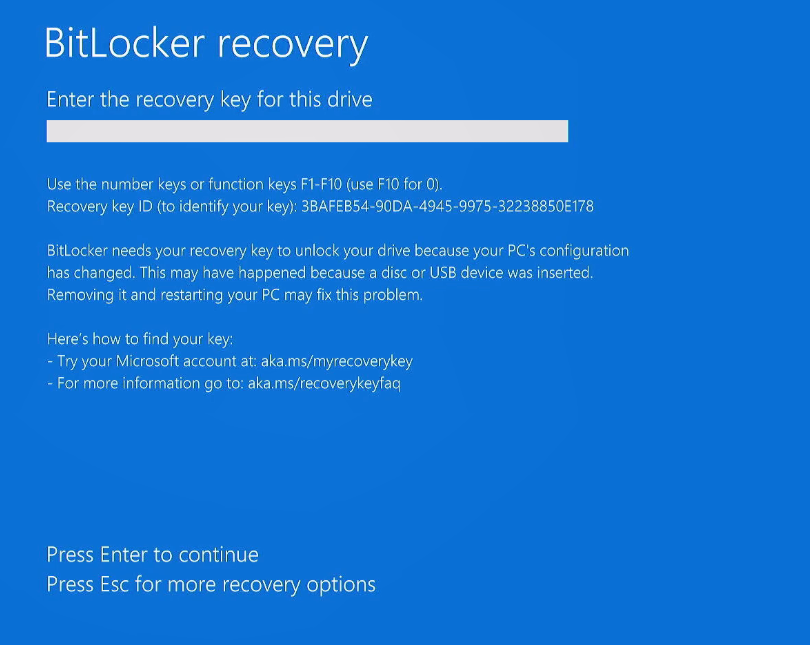
Sometimes, even with preparation, users discover they cloned without suspending BitLocker or that the new machine’s TPM doesn’t match. The result: the cloned drive won’t boot and asks for the BitLocker recovery key. If this happens, don’t panic—there’s still a way forward.
enter bitlocker recovery key
Warning: Always back up your BitLocker recovery key to a separate USB drive or printout before starting any cloning. If you’re locked out after cloning and don’t have the key, your data may be permanently inaccessible.

The following steps assume you have the recovery key. If you don’t, and the drive is locked, data recovery is nearly impossible—hence the warning above.
1. First, access a command prompt using one of these methods to enter the Windows Recovery Environment (WinRE) or boot from installation media:
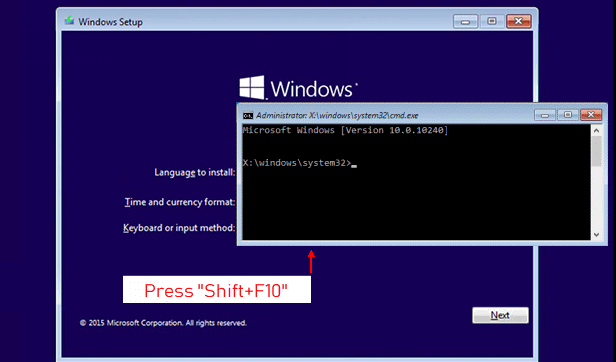
On the language selection screen, press Shift + F10 to open Command Prompt.
Press Shift + F10 to open Command Prompt in Windows installation environment
2. Once you have a command prompt, determine the drive letter of your Windows installation (it may not be C: in this environment). Use diskpart and list volume, or run:

manage-bde -status

This will show which volumes are BitLocker-protected and their lock status. Find the volume marked Locked.
Unlock it with your 48-digit recovery key:

manage-bde -unlock X: -recoverypassword YOUR-RECOVERY-KEY

Replace X: with the correct drive letter and enter your key. After seeing “The password successfully unlocked volume X:”, disable protectors so the system can boot:

manage-bde -protectors -disable X:

Now, restart your computer. The cloned drive should boot into Windows without prompting for the recovery key. Once in Windows, re-enable BitLocker on the new drive (with manage-bde -protectors -enable C: or via Settings) to bind it to the current TPM.
If these steps don’t work—for example, if you can’t unlock the volume—you’ll need to re-clone the original drive after properly suspending BitLocker. In that case, return to the suspension methods and consider using Renee Becca to guide you through the process and avoid manual recovery.

FAQ

What is the difference between suspending BitLocker and turning it off?

Suspending BitLocker temporarily removes authentication protectors (like TPM, PIN, or USB key) but keeps all data encrypted on the drive. Cloning tools can then read the data without being blocked. Turning off BitLocker fully decrypts the drive, converting it to plaintext—a process that can take hours and is unnecessary for cloning. Suspension is fast, reversible, and recommended for cloning.

Can I clone my drive without suspending BitLocker if I use sector-by-sector copy?

Sector-by-sector tools copy every block, including encrypted data. While the copy might succeed, the new drive’s TPM won’t match the encryption metadata, almost always resulting in a recovery key prompt on boot. To avoid this, suspend BitLocker first—even for sector-by-sector clones.

How long does it take to resume BitLocker protection after cloning?

Resuming protection is instant—no re-encryption is needed. The authentication protectors (TPM, PIN, etc.) are simply re-applied to the already encrypted data. A quick restart or running manage-bde -protectors -enable is all it takes. There’s no waiting for an encryption progress bar.

What happens if I forget the recovery key and the cloned drive locks me out?

Without the recovery key, the data on the cloned drive is permanently inaccessible—BitLocker encryption cannot be bypassed or cracked. That’s why it’s absolutely essential to back up the recovery key to a safe location (USB, printout, cloud account) before starting any cloning. If the key is lost, the only option is to wipe the drive and reinstall Windows.
Renee Becca – Safe and Quick System Migration to SSD

Automatic 4K alignment Improves SSD performance during system migration.

Support GPT and MBR Automatically adapt to the suitable partition format.

Support NTFS and FAT32 Redeploy various files in different file systems.

Back up quickly Back up files at up to 3,000MB/min.

Overall backup schedule Support system redeployment/system backup/partition backup/disk backup/disk clone.

Automatic 4K alignment Improve SSD performance

Support GPT and MBR Intelligently adapt to a partition format

Support NTFS and FAT32 Redeploy files in different file systems
Free TrialFree TrialNow 56337 people have downloaded!

User Comments

Page 1

Leave a Comment


Your comment has been submitted and is awaiting moderation.