author avatar
    Senior Product Manager
Last update by William Davis at 7 July 2026

Summary
This comprehensive technical guide outlines the procedures to use bootrec fixmbr rebuildbcd on cloned drive systems to resolve post-migration boot failures. The documentation covers command-line execution within the Windows Recovery Environment, partition diagnostics, and alternative solutions for UEFI architectures.

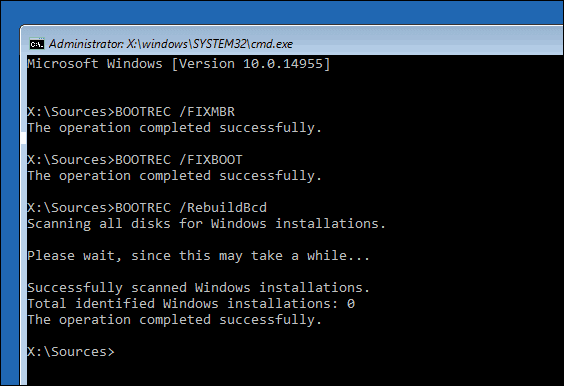
BOOTREC FIXBOOT
You’ve just swapped in your cloned drive, powered on the system, and instead of your desktop, you’re met with a black screen and blinking cursor or a message like “Bootmgr is missing”. Maybe your PC gets stuck in a “Preparing Automatic Repair” loop, or you see a blue Stop 0x7B (INACCESSIBLE_BOOT_DEVICE) error. On dual-boot systems, the OS selection menu might disappear entirely. This sudden silence—right when you expected a smooth transition—can be frustrating.
These symptoms vary depending on your hardware. For example, on a UEFI-based laptop with an NVMe SSD, you might see “Inaccessible Boot Device” if the cloned system lacks the right NVMe driver. On a Legacy BIOS desktop with a SATA drive, you’re more likely to get “Bootmgr is missing” due to a damaged Master Boot Record. Regardless of the specifics, the most important first step is always the same:
Stop using the cloned target drive immediately. Each forced reboot or repeated repair attempt writes to the disk and can make partition damage permanent.

If your original source drive is still available and unchanged, consider whether a clean re-clone with a specialized disk-cloning tool is a safer option than diving into command-line repairs. But if you’re ready for manual troubleshooting—or if the original drive is no longer accessible—the bootrec toolset is your next step.

Common Causes of Boot Failure After Cloning

Cloning should create an exact copy, but boot-critical data often doesn’t transfer cleanly. Cloning tools may misconfigure the Master Boot Record, mishandle the differences between Legacy MBR and UEFI/GPT, copy partition tables incorrectly, or leave behind mismatched driver signatures. The table below matches the most common post-clone errors to their likely causes, helping you focus your repair efforts.
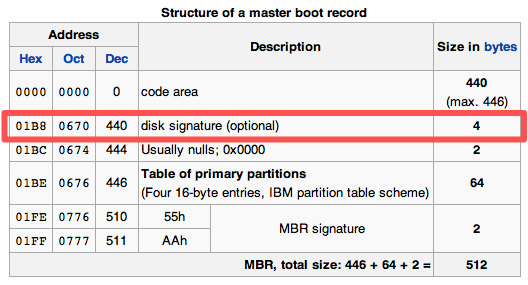
MBR layout with disk signature field highlighted
A disk signature mismatch prevents Windows from booting.
Observed SymptomMost Likely Underlying Cause

“Bootmgr is missing” or black screen with blinking underscore

Corrupted or missing MBR on Legacy BIOS system; missing active partition flag; EFI system partition damage on UEFI

“Inaccessible Boot Device” (0x7B)

Mismatched storage controller driver (e.g., NVMe vs. AHCI); incorrect BCD device entries; missing Intel RST/VMD driver

Automatic repair loop that fails to fix anything

Corrupted BCD store; System Reserved partition written with wrong attributes; missing Windows Boot Manager entry

Dual‑boot menu missing

BCD store either blank or overwritten during clone; cloned drive not recognized as a bootable volume

Windows logo appears briefly then reboots

Driver signature incompatibility; wrong boot mode (Legacy vs. UEFI) selected in firmware; bootrec /fixboot used incorrectly on GPT

Why Boot Repair Is Architecture‑Sensitive

The way bootrec works depends on your system’s firmware and partition scheme. The /fixmbr command repairs the master boot record only on MBR-formatted drives; on UEFI systems, it usually has no effect. Similarly, /fixboot writes a new partition boot sector, but on UEFI/GPT systems, the firmware expects boot files inside the EFI System Partition(ESP), which often leads /fixboot to fail with an “Access Denied” error. That’s why it’s crucial to understand your partition layout before running any boot repair commands.

Step‑by‑Step: Run bootrec /fixmbr and /fixboot

This first stage is for users who want to proceed without third-party tools and are comfortable with the command line. Here, you’ll attempt to repair low-level boot structures, leaving the BCD store for the next stage if necessary. Using native Windows utilities gives you full control, but it requires careful attention to syntax and partition details.
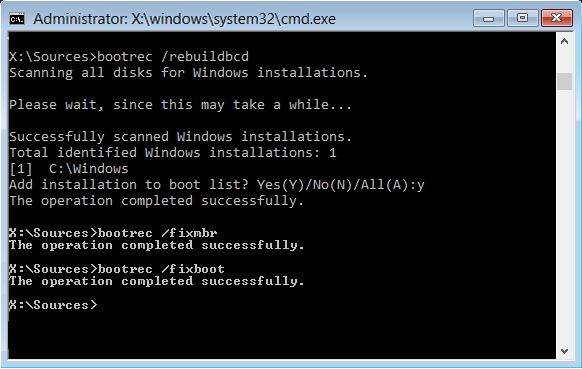
Command Prompt showing execution of bootrec /fixboot command
Advantages:
  • Fixes low-level boot structures directly.
  • No third-party software required.

Disadvantages:

  • Requires command-line familiarity.
  • May fail on UEFI systems without workarounds.
Step 1 : Accessing Windows Recovery Environment (WinRE) Correctly

You can’t run bootrec from a normal Windows desktop—it needs offline access to the cloned drive’s boot records. Enter WinRE using one of these methods:
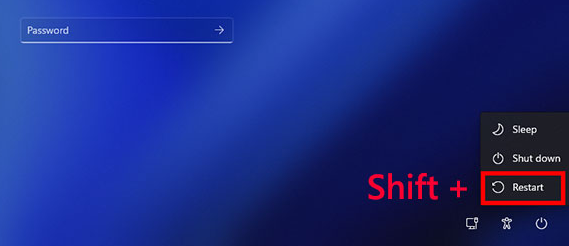
Method 1: Shift + Restart from the cloned drive’s boot failure screen (if available): Hold Shift while clicking Restart,
Windows, shift + restart
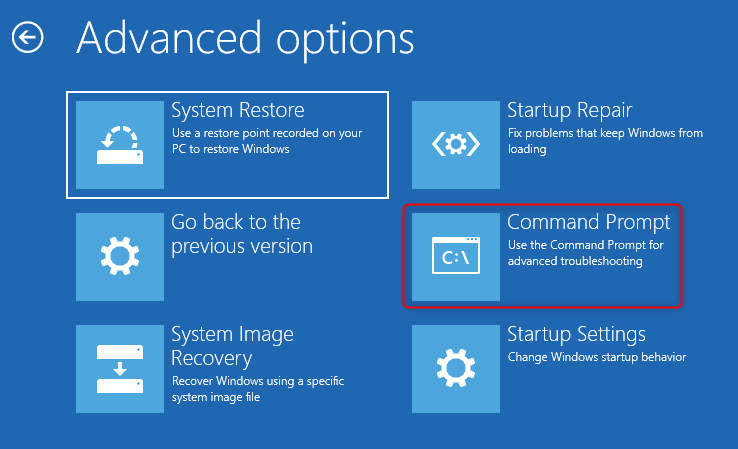
then go to Troubleshoot → Advanced options → Command Prompt.
command prompt
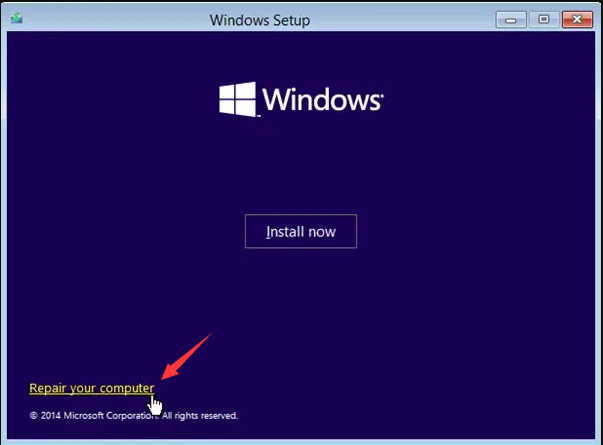
Method 2: Boot from a Windows installation USB/DVD (created with Microsoft’s Media Creation Tool): Insert the media, restart, use your firmware boot menu (usually F12, Esc, or Del), select the USB/DVD, and at the “Install now” screen, choose Repair your computer → Troubleshoot → Advanced options → Command Prompt.
Windows 10: https://www.microsoft.com/software-download/windows10
Windows 11: https://www.microsoft.com/software-download/windows11
Windows Setup – Install now screen with Repair your computer link

Step 2 : Running bootrec /fixmbr: Syntax and Expected Behavior

On a Legacy BIOS/MBR system, open the WinRE Command Prompt and enter:

bootrec /fixmbr

This command writes a new, Windows-compatible master boot record to the disk’s first sector, leaving the partition table intact. If successful, you’ll see “The operation completed successfully”.
If you get “Element not found”, double-check that you’ve selected the correct disk and that the cloned drive is the first disk. On UEFI/GPT hardware, this command may appear to succeed but won’t repair the UEFI boot chain. In that case, proceed to the bcdboot steps below.

Step 3 : Run bootrec /fixboot

Run the following command in the Command Prompt you opened in the previous step:

bootrec /fixboot

This command attempts to repair common Windows boot‑loader issues, especially those caused by corrupted boot files or incomplete updates.

Handling ‘Access Denied’ When Running /fixboot (UEFI Workaround)
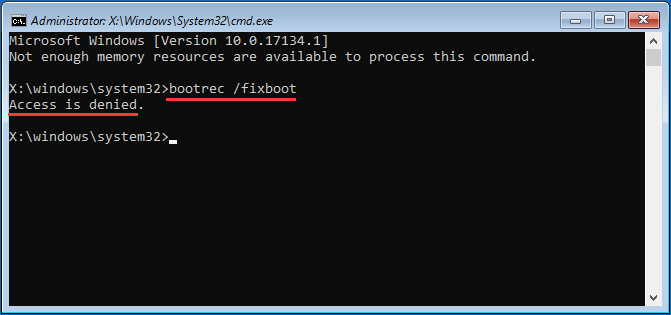
bootrec fixbot access is denied
On UEFI systems, running bootrec /fixboot often results in “Access is denied”. The EFI System Partition is protected by firmware, and WinRE may not be able to write to it without a drive letter. Here’s the workaround:
First, use diskpart to assign a letter (such as S:) to the EFI partition:

diskpart
list volume
select volume 2
assign letter=S
exit
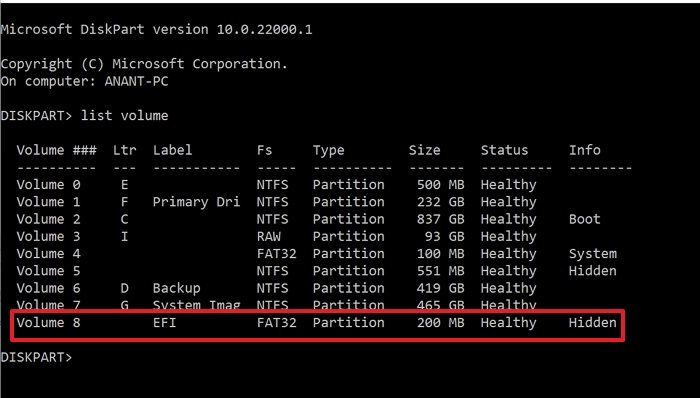
Replace select volume 2 with the volume number that corresponds to your actual EFI System Partition. You can identify it by running the command list volume.
The EFI partition is typically labeled “EFI”, formatted as FAT32, and usually sized between 100 MB and 300 MB. Make sure you select the correct one before continuing. For example, user will change select volume 2 to select volume 8 in the following result.
check EFI partition in diskpart
Now, try the bootrec commands again:

bootrec /fixmbr
bootrec /fixboot

If /fixboot still returns “Access Denied,” stop there—repeated attempts can corrupt the EFI partition. Move on to the bcdboot method, which writes new boot files and a fresh BCD entry directly to the EFI partition.

Step‑by‑Step: Rebuild BCD with bootrec /rebuildbcd and bcdboot

If /fixmbr and /fixboot don’t resolve the issue, your Boot Configuration Data (BCD) store is likely damaged or pointing to the wrong device. This stage rebuilds the BCD, which tells Windows Boot Manager where to find the OS. Rebuilding the BCD often resolves missing boot entries or corrupted system partitions, ensuring your hardware can find and load Windows.
Advantages:
  • Rebuilds the critical BCD store from scratch.
  • Highly effective for UEFI and GPT partitions.

Disadvantages:

  • Can overwrite custom dual-boot configurations.
  • Requires precise drive letter mapping in WinRE.

Executing bootrec /rebuildbcd and Handling “0 Installations”

In the WinRE Command Prompt, run:

bootrec /rebuildbcd

bootrec rebuildbcd
This scans all disks for Windows installations and prompts you to add each one to the BCD. If you see “Total identified Windows installations: 1”, type Y and press Enter.
However, it’s common on cloned drives to see “Total identified Windows installations: 0”. This means the BCD store is missing or corrupted. At this point, you have two options:
/rebuildbcd ResultNext Action

“Total identified Windows installations: 1”

Add the installation; restart and test boot

“Total identified Windows installations: 0”

Rename the BCD folder and rebuild, or skip directly to bcdboot

If you want to try rebuilding with bootrec again, assign a letter to the System Reserved (MBR) or EFI partition using diskpart if you haven’t done so:

assign letter=S

Then:

attrib S:\Boot\BCD -h -r -s
ren S:\Boot\BCD BCD.old
bootrec /rebuildbcd

If this doesn’t work, or if you continue to see “0 installations,” it’s time to use bcdboot.

When to Abandon bootrec and Use bcdboot Instead

bcdboot is Microsoft’s preferred tool for deploying boot files on UEFI/GPT systems and often succeeds where bootrec fails. It copies a fresh set of boot files from the Windows directory to the system partition and generates a new BCD entry.
Use this command format:

bcdboot C:\Windows /s S: /f UEFI

- C:\Windows — Path to the Windows directory on the cloned drive (check the drive letter in WinRE; it may not be C:).
- /s S: — The system partition for boot files (the EFI partition letter, e.g., S:).
- /f UEFI — Firmware type. Use UEFI, BIOS, or ALL as appropriate.
Before running this, confirm the target system partition is clean and formatted. On UEFI systems, the EFI partition should be FAT32. If it’s damaged, you may need to format it (format S: /FS:FAT32), but only if no other OS shares that partition. After formatting, rerun bcdboot.
Note: bcdboot will overwrite any custom dual-boot configurations. It does not affect personal files, but you’ll need to add other OS entries again if you use dual-boot. For most post-clone boot failures on UEFI systems, bcdboot C:\Windows /s S: /f UEFI is the command that finally gets Windows to boot.

Confirming the Repair and Final Troubleshooting

Once you’ve finished repairs, remove the installation media and set the cloned drive as the first boot device in your BIOS/UEFI settings. Boot the system normally.

Post‑Repair Verification Checklist

Use this table to check if your fix worked:
CheckPass/Fail Indicator

Windows loads to login screen without errors

Pass if desktop appears; fail if boot loops or Stop errors recur

No “Preparing Automatic Repair” on first boot

Pass if startup is normal; fail if repair prompt appears

Drive letters in File Explorer match original configuration

Pass if C: is Windows; fail if system disk shows a different letter

Disk Management shows a healthy EFI/System Reserved partition

Pass if partitions look correct; fail if missing or RAW

If the cloned drive boots but the drive letters are wrong, don’t try to change the system drive letter in Disk Management—this can make Windows unbootable. Mismatched drive letters usually result from cloning when the partition mapping changes. In these cases, a re-clone or, if you’re highly experienced, a registry fix is safer.

Persistent Boot Failure: When It’s Time to Re‑Clone

If you’ve followed all the steps and your cloned drive still won’t boot, the issue may be deeper than missing boot records. Driver mismatches—especially for NVMe, Intel RST/VMD, or certain chipsets—can persist even after bcdboot repairs. Partition table corruption or a “sector-by-sector” clone to a smaller drive can also leave the filesystem in a bad state.
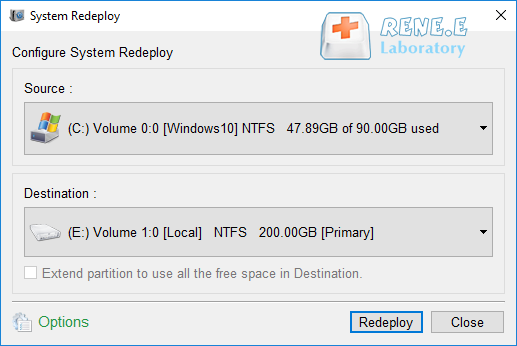
At this point, it’s often best to re-clone using Renee Becca or another advanced disk-cloning tool that handles hardware differences automatically. Such tools rebuild the EFI partition and BCD correctly, inject necessary storage drivers, and adjust the boot configuration for your hardware. This approach can save hours of troubleshooting and reduce the risk of data loss from repeated manual repairs.
Renee Becca system redeploy interface with source and target disks
Renee Becca – Safe and Quick System Migration to SSD

Automatic 4K alignment Improves SSD performance during system migration.

Support GPT and MBR Automatically adapt to the suitable partition format.

Support NTFS and FAT32 Redeploy various files in different file systems.

Back up quickly Back up files at up to 3,000MB/min.

Overall backup schedule Support system redeployment/system backup/partition backup/disk backup/disk clone.

Automatic 4K alignment Improve SSD performance

Support GPT and MBR Intelligently adapt to a partition format

Support NTFS and FAT32 Redeploy files in different file systems

Free TrialFree TrialNow 56337 people have downloaded!

Frequently Asked Questions

Does bootrec /fixmbr work on UEFI systems?

bootrec /fixmbr is designed for Legacy BIOS/MBR disks. It repairs the master boot record in the first sector of the disk. On UEFI/GPT systems, the firmware doesn’t use an MBR to boot—Windows relies on the EFI System Partition. Running /fixmbr on a GPT disk may finish without error but won’t fix UEFI boot issues. For UEFI, use bcdboot or repair the EFI partition with diskpart.

Can I run bootrec commands from within Windows instead of WinRE?

No. bootrec is designed to run offline on a non-running Windows installation. From within Windows, the system’s own boot records and BCD are locked. You must launch the Windows Recovery Environment using installation or recovery media, or the advanced startup options (Shift+Restart), to run these commands safely.

Will running bootrec or bcdboot delete my personal files?

No. Both bootrec and bcdboot only modify boot structures—the MBR, boot sectors, BCD store, and boot loader files. They don’t touch your documents, photos, or installed programs. Still, always back up your important data before making changes, and double-check disk numbers before using diskpart to avoid accidental data loss.
Renee Becca – Safe and Quick System Migration to SSD

Automatic 4K alignment Improves SSD performance during system migration.

Support GPT and MBR Automatically adapt to the suitable partition format.

Support NTFS and FAT32 Redeploy various files in different file systems.

Back up quickly Back up files at up to 3,000MB/min.

Overall backup schedule Support system redeployment/system backup/partition backup/disk backup/disk clone.

Automatic 4K alignment Improve SSD performance

Support GPT and MBR Intelligently adapt to a partition format

Support NTFS and FAT32 Redeploy files in different file systems

Free TrialFree TrialNow 56337 people have downloaded!

User Comments

Page 1

Leave a Comment


Your comment has been submitted and is awaiting moderation.