author avatar
    Senior Program Developer
 

Summary
Discover how to effortlessly clone your HDD to an SSD in Windows 10/11 without the hassle of reinstalling everything. This guide covers essential steps, from selecting your SSD to rebooting your system from the new drive. Upgrade your storage seamlessly today!


Transferring your operating system and data from an HDD to an SSD can significantly boost your computer’s performance without the hassle of a fresh install. Cloning your HDD to an SSD in Windows 10 is a straightforward process, provided you follow the right steps. The first crucial step is to select an SSD with enough storage space to accommodate your current data and future needs.

Step 1: Determining the Optimal Size for Your New SSD

Before you proceed with cloning your HDD to an SSD, it is essential to evaluate your current storage needs. You need an SSD that can accommodate all the data you intend to clone from your existing HDD. This means looking closely at how much storage space your current files, applications, and system data occupy.

Method 1: Using Storage function in Windows

Adaptable Functions: Clone System Only.
To check your current storage usage on Windows 10/11, navigate to:
(1) Click the “Settings” icon
settings in Windows
(2) Choose “System” in settings panel
click System in Windows Settings
(3) select “Storage” option
Windows storage
Here, you can see a breakdown of space consumption by different file types, applications, and system files. This information will help you determine the minimum capacity your new SSD should have.
Tips:Ensure your new SSD maintains at least 20% free space to keep your system in optimal condition.

Method 2: Using Disk Management

Adaptable functions: Clone system only and Clone whole disk.
1. Click Windows Key + R and enter “diskmgmt.msc
windows Key + R
run disk management
2. Sum up the Used space of all the partitions in your original HDD
Open Disk Management, locate your disk bar in right panel. right click each partition, select “properties”. In “General” tab, sum up the space size of “Used space”.
Disk management overview

Anticipating Future Storage Requirements

For general use, an SSD with a capacity of 250GB to 500GB is usually sufficient for the operating system, applications, and some personal files. However, if you are a gamer, designer, or someone who works with large files regularly, consider choosing an SSD with 500GB to 1TB or more of capacity.

Step 2: Gather Necessary Hardware

Before cloning your HDD to an SSD in Windows 10/11, it’s essential to gather the necessary hardware to facilitate the process. This step is crucial to ensure a smooth and hassle-free cloning experience.
Step 1:Ensure Both Drives Can Be Connected Simultaneously
During the cloning process, you need both your current HDD and the new SSD connected to your computer at the same time. If you are using a desktop PC, this can usually be done internally since most desktops have multiple drive bays.
multiple drive bays in desktop PC
However, if you are using a laptop, which typically has only one hard drive slot, you will need an external adapter, dock, or enclosure to connect the SSD via USB.
nvme/m.2/ssd USB Enclosure
Step 2: Ensure Windows has recognized your new SSD
Please open Disk Management, as mentioned in the previous chapter, to check if Windows has detected your new SSD.
If the drive doesn’t appear even in Disk Management, ensure it is properly connected and that any necessary power switches on the enclosure or dock are turned on. Consult troubleshooting guides if the drive still does not show up.
Once the drive has been initialized, it should display as unallocated space in the bottom pane of Disk Management. You are now ready to proceed with the cloning process.
Continue to the next chapter to understand how to choose the right cloning software, with a recommendation for Renee Becca, whether to use the disk clone or system redeploy function.

Step 3: Using Cloning Software like Renee Becca

Choosing the right cloning software is crucial when you want to clone your HDD to an SSD without reinstalling your operating system. For this purpose, we recommend using Renee Becca, a tool specially designed for system and hard disk data backup and restoration. This software supports various cloning methods and offers functionalities like 4K align and cloning from a larger partition to a smaller one.
Here is a step-by-step guide to using Renee Becca effectively:
Step 1:Download and Install the Software
The first step is to download and install Renee Becca on your computer. This software is compatible with Windows operating systems. Once the installation is complete, launch the software and proceed to the next step.
Hot Topic - ADsRenee Becca – Safe and Quick System Migration to SSD

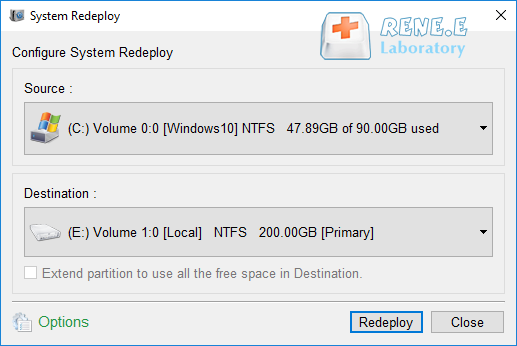
Automatic 4K alignment Improves SSD performance during system migration.

Support GPT and MBR Automatically adapt to the suitable partition format.

Support NTFS and FAT32 Redeploy various files in different file systems.

Back up quickly Back up files at up to 3,000MB/min.

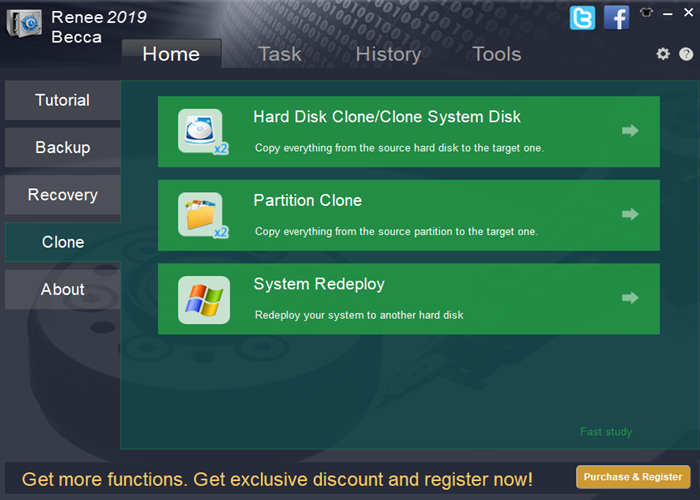
Overall backup schedule Support system redeployment/system backup/partition backup/disk backup/disk clone.

Automatic 4K alignment Improve SSD performance

Support GPT and MBR Intelligently adapt to a partition format

Support NTFS and FAT32 Redeploy files in different file systems
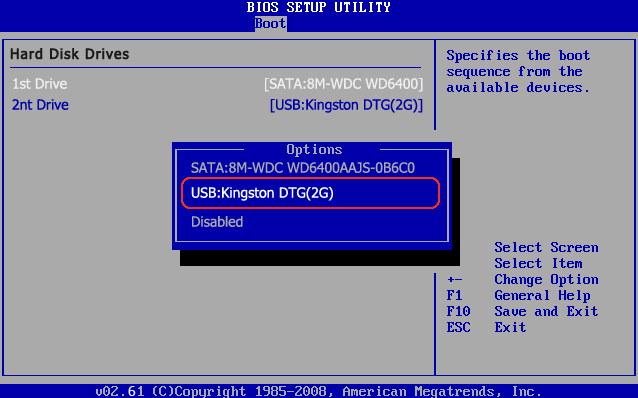
Free TrialFree TrialNow 2000 people have downloaded!
Step 2:Connect the New SSD to Your Computer
Before cloning your OS, ensure that your SSD is recognized by the system. You can refer to the previous chapter for more detailed instructions.
Step 3:Select the Cloning Function
In the Renee Becca interface, click on ‘Clone’ in the menu. Here, you will be given two primary options: Disk Clone and System Redeploy. The choice between these depends on your specific needs:
use the clone function in renee becca
Hard Disk Clone/Clone System Disk: Use this option if you wish to clone the entire HDD, including all partitions, to the SSD. This is suitable for those who want to retain all data, including non-system files, on the new drive.
clone the hard disk
System Redeploy: Opt for this function to clone only the system partitions to the SSD. This is ideal for users who want to move their operating system and primary applications to the faster SSD while keeping other data on the HDD.
select a destination to redeploy system with renee becca
Step 4:Start the Cloning Process
Preview the steps and settings for the target partition. Make any necessary adjustments, and then click ‘Clone’ or ‘Redeploy‘ to begin the cloning process. The software will copy the data from your HDD to the SSD. This may take some time depending on the amount of data being cloned.
After the cloning process is completed, check to ensure that all data has been transferred accurately. You have successfully cloned your HDD to an SSD using Renee Becca without reinstalling the operating system.
In the subsequent chapter, we will discuss how to reboot your computer from the newly cloned SSD, ensuring to change the boot order in BIOS settings. Stay tuned to ensure a smooth transition to your new SSD.

Step 4: Reboot Your Computer from the Newly Cloned SSD

Your next step after cloning your HDD to the SSD using Renee Becca is to reboot your computer from the newly cloned SSD. To do this effectively, you need to change the boot order in the BIOS or UEFI settings to prioritize the SSD. Follow these detailed instructions to complete this process successfully:
Step 1: Restart your computer and enter the BIOS or UEFI setup.
As your computer is booting up, you need to enter the BIOS or UEFI setup. This is typically done by pressing a specific key repeatedly, such as DEL or F2, as soon as you see the manufacturer’s logo on the screen. The exact key to press varies depending on the make and model of your computer, so refer to the list below for common methods:
Common Server to Enter BIOS:
Server TypeEnter boot menu method
DELLPress the F12 key repeatedly before the Dell logo appears on the screen.
HPPress the F9 key multiple times when the HP logo is displayed.
Common Computers to Enter BIOS:
BIOS NameEnter boot menu method
ASRockDEL or F2
ASUSDEL or F2 for PCs, DEL or F2 for Motherboards
AcerDEL or F2
DellF12 or F2
ECSDEL
Gigabyte / AorusDEL or F2
Lenovo (Consumer Laptops)F2 or Fn + F2
Lenovo (Desktops)F1
Lenovo (ThinkPads)Enter then F1
MSIDEL
Microsoft Surface TabletsPress and hold Power and Volume Up buttons
Origin PCF2
SamsungF2
ToshibaF2
ZotacDEL
HPEsc, F9 for "Boot Menu", Esc, F10, Storage tab, Boot Order, Legacy Boot Sources
INTELF10
Please refer to your Computer or laptop manual to find the way to configure the BIOS. If your computer uses Legacy BIOS, change the boot order to set the SSD as the first boot device. If the BIOS mode is UEFI, select the SSD as the boot drive. Save the changes and exit the BIOS screen.
Step 2: Navigate to the boot settings.
Once you are in the BIOS or UEFI setup, look for the boot settings menu. This can usually be found under a tab labeled as Boot, Boot Order, or Boot Sequence. Note that the exact naming and location can vary depending on your computer’s manufacturer.
boot computer from usb bios
Step 3: Change the boot order to prioritize the SSD.
In the boot settings menu, you will see a list of devices from which your computer can boot. Use the arrow keys to navigate and the instructions provided in the BIOS setup to move your SSD to the top of this list. This will set the SSD as the primary boot device.
If your computer uses Legacy BIOS, change the boot order to set the SSD as the first boot device. If the BIOS mode is UEFI, select the SSD as the boot drive.
Step 4: Save the changes and exit the BIOS setup.
After setting the SSD as the primary boot device, navigate to the exit menu or find the option to save changes. This is often labeled as Save and Exit or similar. Confirm the changes and allow your computer to reboot.
Once the computer restarts, it should boot from the SSD, allowing you to experience faster speed and improved performance immediately.

Troubleshooting Tips

1. Data Discrepancies: If you notice missing or corrupted data after cloning, verify that the cloning process was completed successfully. Use reliable cloning software like *Renee Becca*, which offers comprehensive error-checking features. If discrepancies remain, manually compare file structures between the drives and copy missing files as needed.
2. Performance Issues: SSDs may occasionally experience performance drops if they are not properly maintained. Ensure that your SSD is optimized by enabling *TRIM* commands in Windows 10, which help manage unused data blocks. Open a command prompt and type

fsutil behavior query DisableDeleteNotify

A response of *0* indicates that *TRIM* is enabled. If not, enable it by typing

fsutil behavior set DisableDeleteNotify 0

Advantages of Using an SSD Over an HDD

1. Speed and Performance: SSDs offer significantly faster data access speeds compared to HDDs. Boot times are drastically reduced, often taking just a few seconds. Applications load quicker, and overall system responsiveness is enhanced. This speed boost can make a noticeable difference in daily computing tasks and more intensive applications like video editing and gaming.
2. Durability and Reliability: SSDs have no moving parts, making them less susceptible to mechanical failure compared to HDDs, which rely on spinning disks and read/write heads. This translates to better durability, especially in environments subject to physical shocks or vibrations.
3. Power Efficiency: SSDs consume less power than HDDs as they do not require power to spin disks or move read/write heads. This can lead to longer battery life for laptops and lower energy costs for desktops, contributing to energy efficiency.
4. Noise Reduction: The absence of moving parts means that SSDs operate silently, eliminating the noise associated with the spinning and seeking movements of HDDs. This can create a quieter working environment, especially beneficial in home or office settings.
5. Form Factor Flexibility: SSDs come in various form factors, including 2.5-inch SATA drives, M.2 drives, and PCIe NVMe drives, offering more flexibility for different devices and space constraints. This allows for easier upgrades and better utilization of internal space, especially in compact systems like ultrabooks and mini PCs.

Conclusion

In conclusion, transitioning from an HDD to an SSD in Windows 10 without reinstalling everything involves selecting a suitable SSD, gathering the necessary hardware, choosing reliable cloning software like Renee Becca, and rebooting from the new drive. By following these steps, you can enjoy faster performance and enhanced reliability, with tips to troubleshoot common issues ensuring a smooth upgrade process.