author avatar
    Specialist of Customer Service Dept.
Last update by William Davis at 17 July 2026

Summary
The provided content details technical procedures to copy hard drive data, distinguishing between file-level transfers and sector-by-sector cloning. It outlines pre-migration checks, software utilization, and troubleshooting protocols for maintaining Windows bootability during drive replacements.

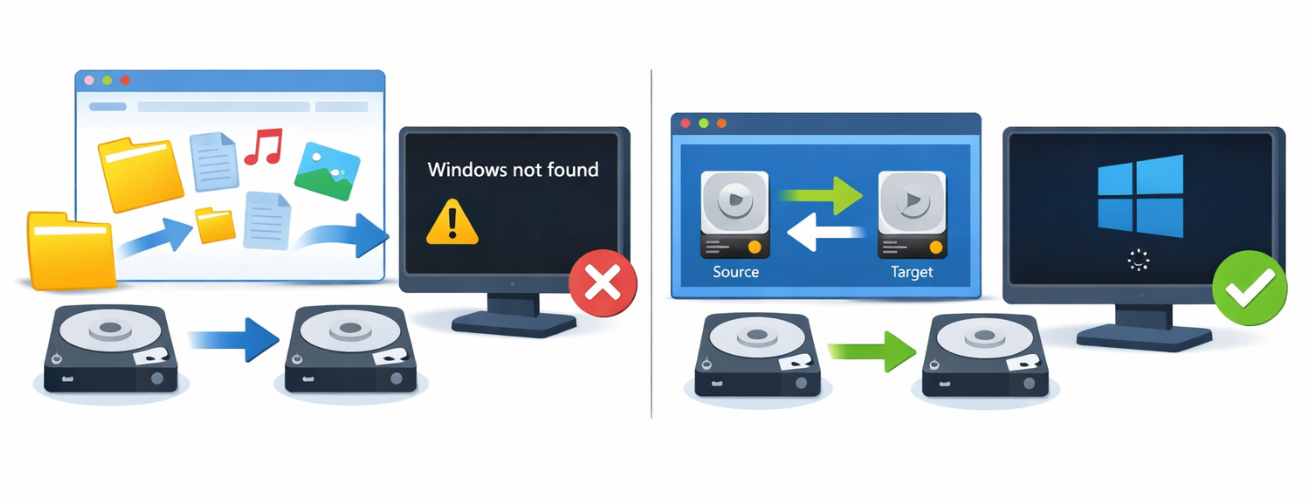
Maybe your computer is slowing down, your hard drive is making strange noises, or you’ve just purchased a new SSD/HDD and want to transfer everything over. The first instinct is often to “copy hard drive”—perhaps by selecting all your files and dragging them to the new disk. While this sounds simple, it almost always results in a non-bootable system.
file level copy vs disk clone
The key distinction is between file-level copying and disk cloning. Copying files with Windows Explorer only moves your documents, photos, and personal folders. It does not duplicate hidden boot partitions, the master boot record, or the system-reserved areas that tell your computer how to start Windows. When replacing a system drive, you need an exact sector-by-sector copy—or at least a clone that preserves the OS, applications, and partition layout. In reality, most people searching “copy hard drive” actually need disk cloning—the only method that creates a true bootable replacement.

Key checks before you start

Before you connect any cables or launch cloning software, there are a few technical details that will determine whether your cloned drive boots properly. Overlooking any of these can turn a simple upgrade into a black screen and a frantic search for recovery media. The table below summarizes the most critical checks.

Common hardware and firmware checks before cloning

1. Device Mode in BIOS

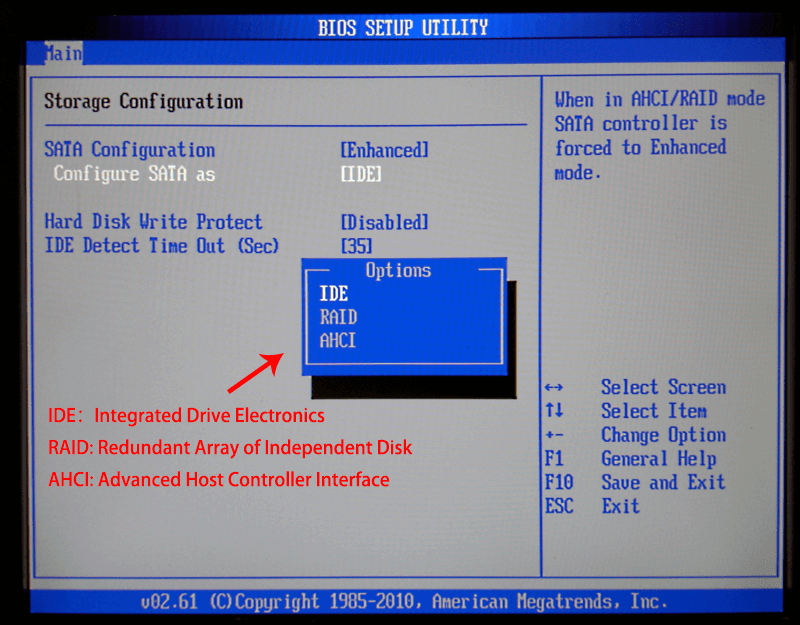
Whether a drive is correctly recognized in BIOS/UEFI depends on whether the motherboard controller mode matches the drive’s interface protocol. If they don’t align, common issues include the new drive not being detected at all, or Windows failing to boot after cloning.
ModeApplicable DevicesRequired ProtocolPotential Issues After Cloning

IDE

Legacy mechanical hard drives

ATA / Parallel transfer

Cloning to an SSD (SATA or NVMe) may cause Windows to fail to boot, since SSDs require at least the AHCI protocol.

AHCI

SATA SSDs and mechanical drives

AHCI / Serial transfer

If the source system was running in IDE mode and AHCI drivers are not enabled, Windows will fail to boot after cloning.

NVMe

M.2 NVMe SSDs

PCIe lanes + NVMe protocol, requires UEFI boot

If BIOS does not enable UEFI or NVMe support, the drive will not be recognized and Windows will fail to boot after cloning.

three modes of sata controller
Therefore, before starting the cloning process, always confirm that the target drive is visible in BIOS/UEFI and that the current system supports the drive’s interface protocol. If BIOS cannot detect the drive, no cloning software will be able to access it.

2. Partition Table Style

Partition table style is just as important. If you clone an MBR disk onto a system that boots in UEFI and expects GPT, the machine will stall early in the boot process. Conversely, a GPT clone won’t be recognized as bootable on a legacy BIOS system. This mismatch is one of the most common reasons a cloned drive refuses to start.
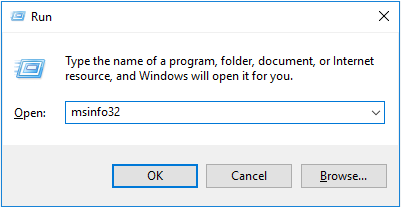
1. Press Win + R and type msinfo32.
type msinfo32
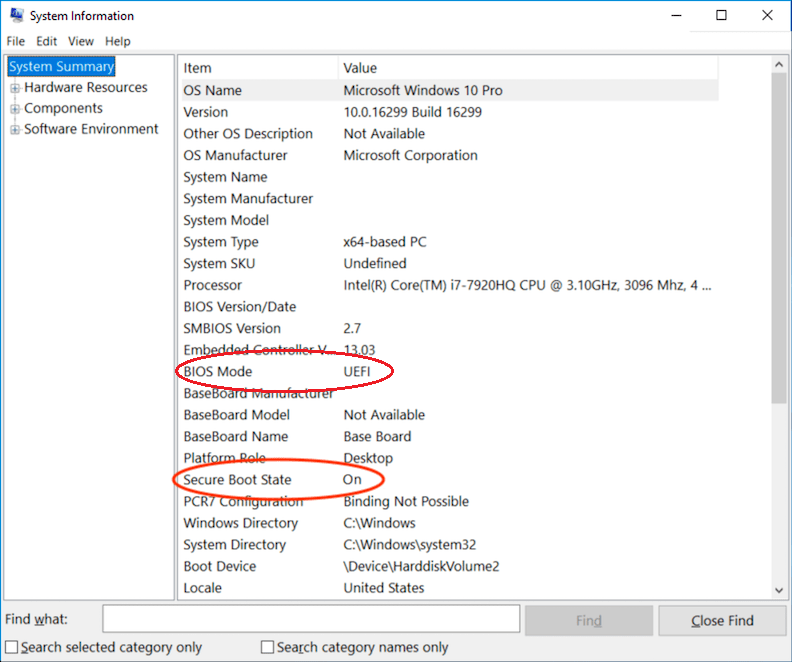
2. Check BIOS Mode and Secure Boot State to confirm whether your system is running in Legacy or UEFI mode.
msinfo32 uefi and secure boot

3. Fix Potential File System Issues

Before cloning, run the following command on your source C: or D: volume to repair any file system errors. Otherwise, those issues may be copied directly onto the new drive. To run the check:
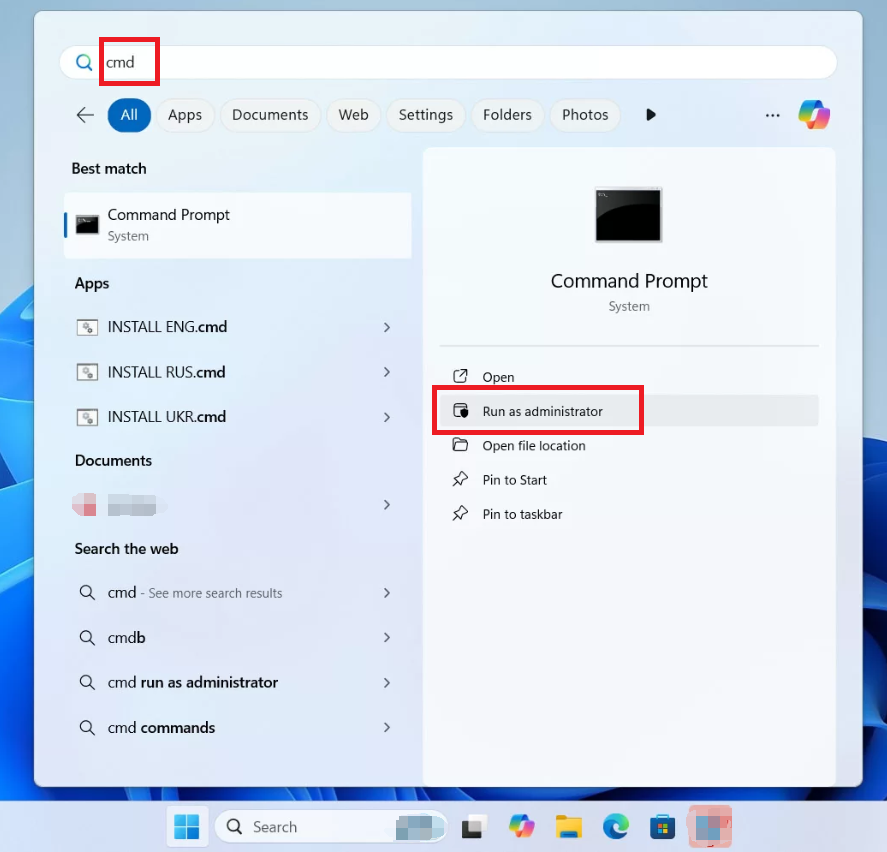
1. Open the Start menu, type cmd, then right‑click Command Prompt and select Run as administrator
Windows 11, run cmd as administrator
2. In the Command Prompt window, enter the following command. Windows may ask you to restart so it can complete the scan:

chkdsk /f /r

What you must handle for modern Windows startup

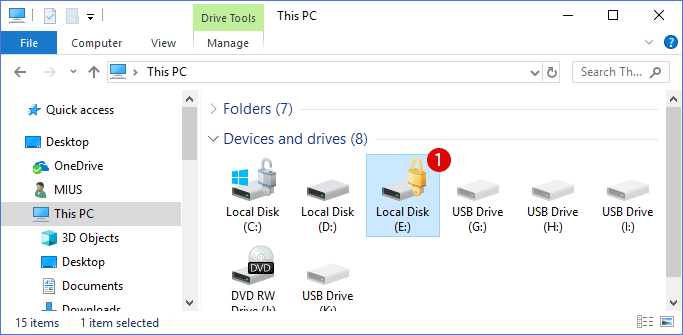
You must check whether your Windows installation is protected by BitLocker. As shown below, a BitLocker‑protected system drive displays a lock icon (locked or unlocked). If encryption is enabled, you must complete the required steps before cloning the disk.
Roughly half of all new Windows 11 devices ship with encryption enabled, either through BitLocker or Device Encryption.
how to unlock bitlocker without password and recovery key

Suspend BitLocker before cloning

Secure Boot rarely interferes with cloning itself, but it can block the cloned drive from booting if the boot signature changes. Temporarily disabling Secure Boot in your UEFI firmware is a safe troubleshooting step and can be re-enabled afterward.
The step you must not skip is suspending BitLocker protection:
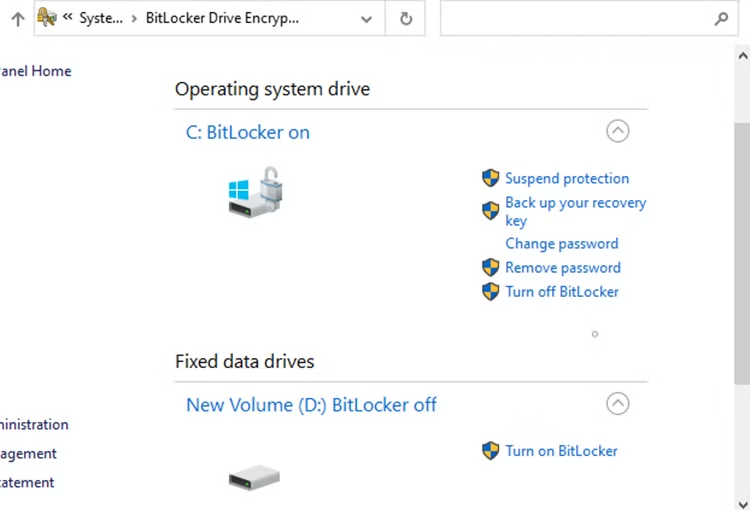
- Open Control Panel → System and Security → BitLocker Drive Encryption.
- Next to your system drive (usually C:), click Suspend protection and confirm with Yes.

Important: Do not reboot before cloning. A reboot may automatically resume BitLocker protection.

If your PC already fails to boot and you need to clone a failing drive, refer to the What to do if the cloned drive won’t boot section for recovery‑focused instructions.
Suspend BitLocker protection button in Control Panel

Important : Back up your BitLocker recovery key
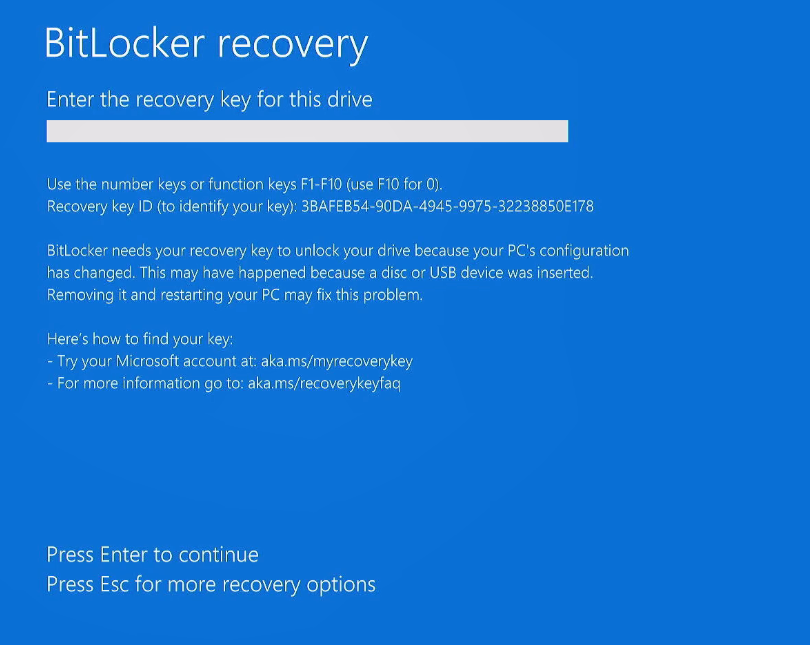
It’s also wise to click Back up your recovery key (also in “BitLocker Drive Encryption” dialog). When Windows detects that the operating system has been moved to a different disk, BitLocker may require the recovery key during the first boot.
enter bitlocker recovery key

If you skip this step and BitLocker requests the key later, you may be locked out of your system entirely. Backing it up now ensures you can unlock the drive if Windows triggers additional protection mechanisms after cloning.

3 Common ways to copy a hard drive

There are three main methods to “copy hard drive,” each suited to different scenarios:
MethodBest Use CasesCopies OS & Installed AppsBootableKey Characteristics

Simple File Copy

Moving documents, photos, videos, game libraries between data drives

❌ No

❌ No

Easiest method; drag‑and‑drop only; suitable only for drives that will never need to boot Windows

Disk Cloning

System migration, HDD‑to‑SSD upgrades, replacing a failing drive, moving Windows to a new PC

✔️ Yes

✔️ Yes

Creates a full, byte‑for‑byte duplicate including partitions and boot records; supports sector‑by‑sector or intelligent cloning; recommended for most system upgrades

Backup Image + Restore

Regular full‑system backups, restoring to a new drive later

✔️ Yes

✔️ Yes (may require manual fixes)

Creates a compressed image first, then restores it; flexible but slower; some Windows tools require manual boot repair after restoration

Free and built-in Windows utilities often can’t automatically resize partitions, don’t handle mismatched drive sizes well, or require manual boot repair. Cloning with dedicated software streamlines these tasks. Renee Becca combines disk cloning, system migration, and robust backup options in a single interface, making it a practical all-in-one choice for a safe, bootable copy.

Why use Renee Becca to copy a hard drive safely

Renee Becca is purpose-built for the challenges that file-copying and limited built-in tools can’t handle. It offers disk cloning and system migration with intelligent sector handling, so you don’t need to worry about resizing partitions or repairing the boot manager afterward. Its backup engine provides five flexible modes—version chain, single version, overall, incremental, and differential—giving you control over your data both before and after cloning.
Download Renee Becca for Safe Hard Drive Cloning and System Migration

Intelligent sector handling Skips bad sectors and ensures a fully bootable copy.

Support GPT and MBR Automatically adapt to the suitable partition format.

Support NTFS and FAT32 Redeploy various files in different file systems.

Back up quickly Back up files at up to 3,000MB/min.

Overall backup schedule Support system redeployment/system backup/partition backup/disk backup/disk clone.

Automatic 4K alignment Improve SSD performance

Support GPT and MBR Intelligently adapt to a partition format

Support NTFS and FAT32 Redeploy files in different file systems

Free TrialFree TrialNow 56337 people have downloaded!
Advantages of using Renee Becca:
  • Intelligent sector handling
  • automatic partition resizing for different drive sizes
  • supports 5 flexible backup schemes
  • a user-friendly interface for both HDD-to-SSD upgrades
  • failing-drive replacements.

Disadvantages to consider:

  • Requires downloading and installing third-party software
  • some advanced cloning or migration features may require a licensed version.
How to copy a hard drive with Renee Becca step by step

Preparation: Download, install, and connect your drives

Start by downloading and installing Renee Becca on a working Windows PC. The computer you use for cloning should be stable and able to connect both the source and target drives at the same time. For OS migration, it’s best to run the software from your current Windows environment, ensuring all drivers are active.
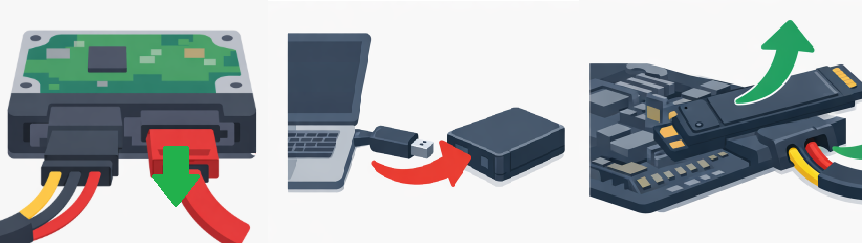
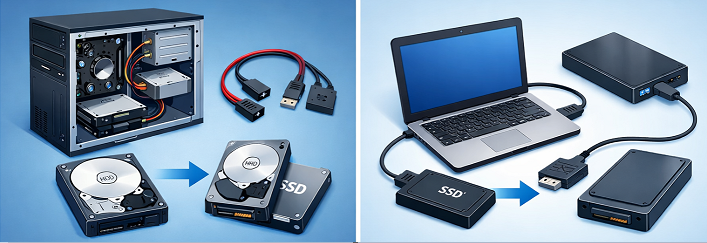
Before opening Renee Becca, suspend BitLocker on the source system drive (see earlier guidance). Physically connect the target hard disk—via SATA, USB enclosure, or NVMe adapter—and make sure Windows recognizes it in Disk Management. If the disk appears as “unallocated” or “offline,” that’s fine; the cloning tool will handle the layout.
Desktop and laptop internal drive connection examples

1. Launch Renee Becca and select the cloning/backup function

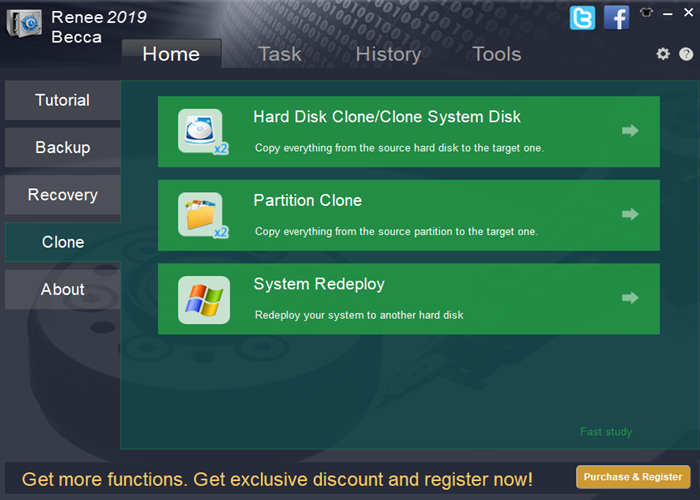
Open Renee Becca. In the main interface, locate the Clone column. Select Hard Disk Clone/Clone System Disk to create an exact copy of the entire chosen disk, including all system and data partitions.
use the clone function in renee becca

2. Choose source hard disk and target destination

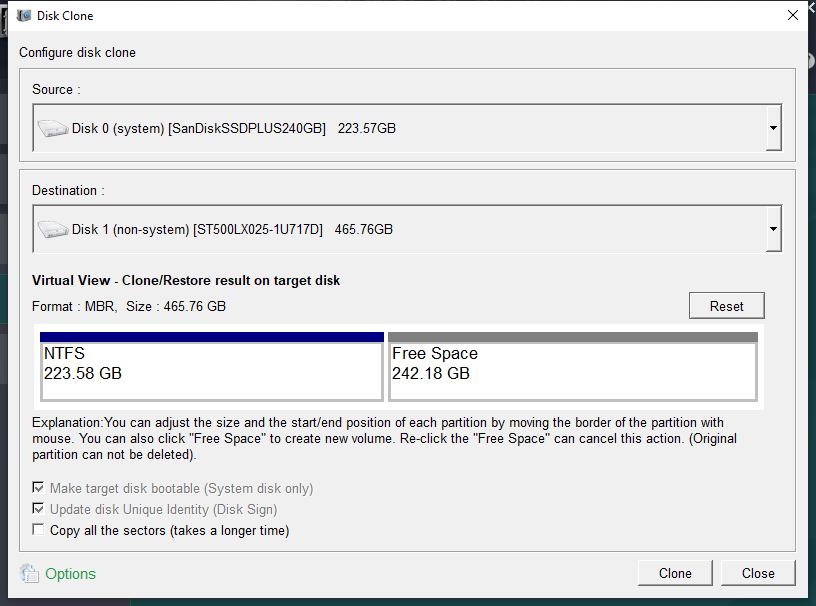
After selecting the clone option, a pop-up will prompt you to pick the source (the disk you want to copy) and the destination (the disk that will receive the clone). Double-check model numbers and capacities to avoid overwriting the wrong drive.
clone the hard disk
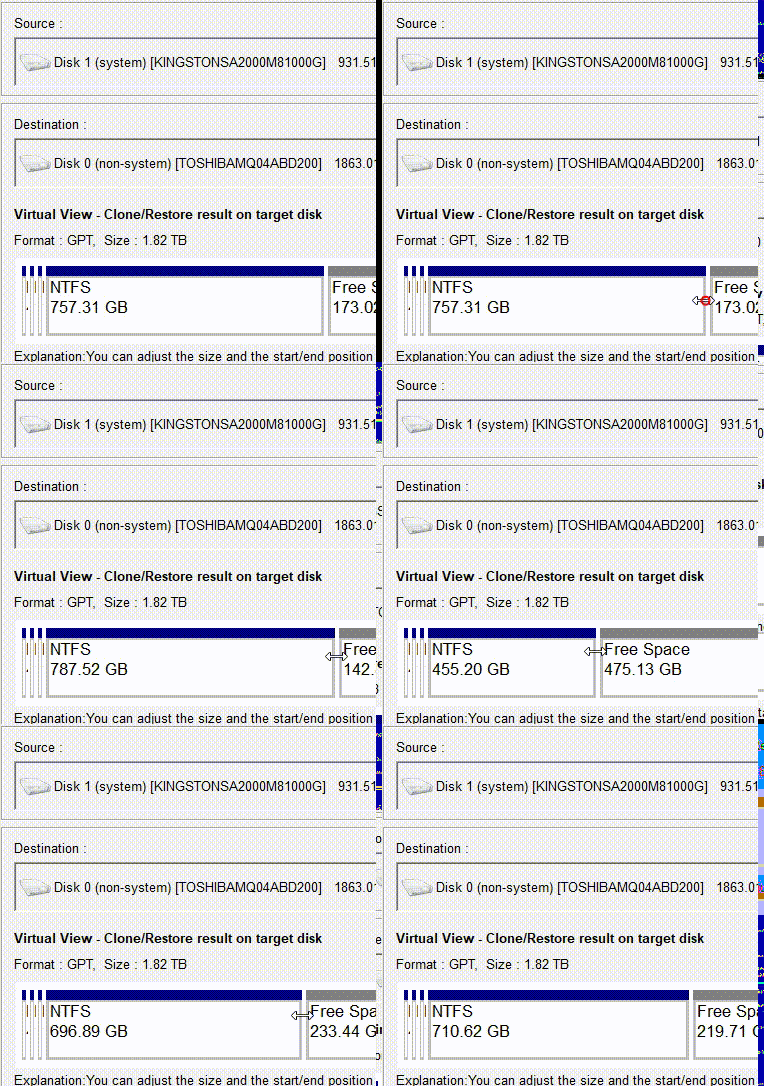
If the target drive is larger than the source, you can resize partitions during the clone. Simply drag the partition boundary with your mouse before starting—this is perfect for making full use of a larger SSD.
adjust partitions
If your source drive has bad sectors, enable the “Ignore bad data blocks” option if available, so the clone won’t stall. For an exact forensic copy (including hidden license areas), select Copy all sectors; otherwise, the default intelligent copy is faster and sufficient for most migrations.

3. Execute the clone and complete the process

Once your settings are ready, click the Clone button. Watch the progress bar and wait until it completes—interrupting the process can leave the target disk in an inconsistent state.
When the clone is finished, shut down the PC completely. Disconnect the old source drive (or swap drives in a laptop), and make sure the cloned disk is connected as the primary boot device. Power on, enter BIOS/UEFI, and set the cloned drive as the first boot option. Save and exit.
Unplugging SATA cable from a hard drive
Once Windows starts from the cloned drive, immediately return to Control Panel → System and Security → BitLocker Drive Encryption and click Resume protection to re-enable encryption.
If Windows prompts for a BitLocker recovery key, use the key you saved when BitLocker was first activated. If no key is requested, simply re-enable BitLocker as normal.

Cloned drive boot issues: Summary Table

Even with careful cloning, boot failures can occur. The table below helps you identify problems from their symptoms and quickly find the right fix.
Please backup your bitlocker recovery key before cloning disk.
SymptomsPossible causesPotential BSOD codesTypical fixes

System halts during early boot, showing a device-related blue screen

Incorrect boot mode (UEFI vs Legacy) or missing storage drivers

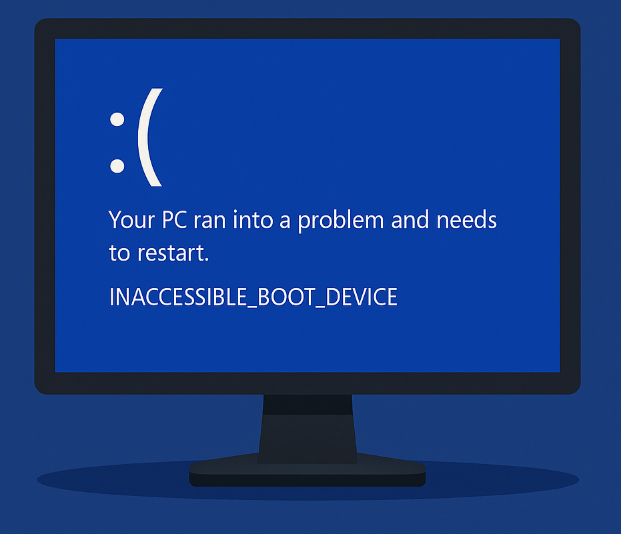
INACCESSIBLE_BOOT_DEVICE

Enter BIOS and toggle UEFI/CSM; rebuild BCD from Windows recovery environment

Black screen with “Bootmgr is missing” or “Reboot and Select proper Boot device”

Missing active partition, corrupted MBR/Boot manager, or boot flag not set

(no BSOD)

Mark the system partition as active, run bootrec /fixmbr and bootrec /fixboot from installation media

Blue screen right after Windows logo appears

Storage controller driver mismatch (e.g., AHCI vs RAID, or NVMe driver missing)

CRITICAL_PROCESS_DIED, DRIVER_IRQL_NOT_LESS_OR_EQUAL

Change SATA operation mode in BIOS (AHCI), inject Intel/NVMe drivers offline, or let Windows Startup Repair auto-configure

Windows starts but constantly displays a BitLocker recovery prompt

BitLocker was not suspended before cloning, or boot signature changed

(no BSOD)

Enter the 48-digit recovery key, then disable and re-enable BitLocker

Cloned drive not listed in boot menu

The target disk is not marked as bootable or firmware does not support its file system

(no BSOD)

Use a partition tool to confirm EFI partition presence; rebuild boot configuration with bcdboot

What to do if the cloned drive won’t boot

Start with the basics: disconnect the original drive if you haven’t already. Having two identical drives attached can confuse the boot manager. Next, reset your BIOS/UEFI settings to default, then set the new drive as the only boot option.
INACCESSIBLE BOOT DEVICE error
If your system still won’t boot, use the Windows Recovery Environment (WinRE) or boot from Windows installation media to repair boot files. Here’s how:
1. On a working PC, download the Media Creation Tool for Windows 10 or 11 from Microsoft’s official website.
2. Run the tool, select Create installation media for another PC, and choose a USB flash drive (at least 8 GB).
3. Once finished, safely eject the USB and insert it into the problematic computer.
4. Restart and enter the boot menu (usually F12, Esc, or F2). Select the USB as the boot device.
5. At the setup screen, choose your language and click Next, then select Repair your computer.
6. Go to Troubleshoot → Advanced options → Command Prompt.
7. Enter these commands one by one:

bootrec /fixmbr
bootrec /fixboot
bootrec /scanos
bootrec /rebuildbcd
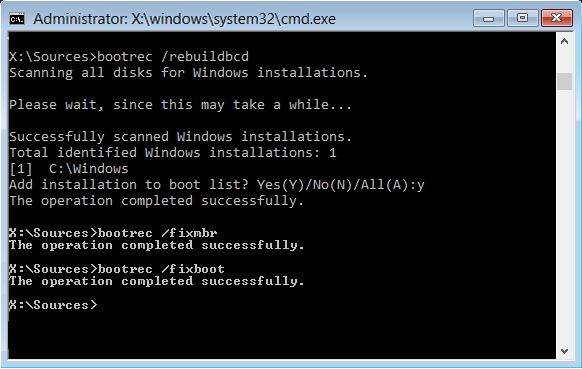
8. Close the command prompt and restart, removing the USB.
If the BCD is missing or corrupt, rebuilding it with bcdboot C:\Windows /s S: (where S: is the EFI system partition) can restore bootability. Afterward, re-enable Secure Boot and resume BitLocker if you had disabled them.
Command prompt output of bootrec /rebuildbcd with zero Windows installations found
Get Renee Becca for Reliable System Migration and Cloning

Bootable Clone Guarantee Ensures the cloned drive is immediately bootable

Support GPT and MBR Automatically adapt to the suitable partition format.

Support NTFS and FAT32 Redeploy various files in different file systems.

Back up quickly Back up files at up to 3,000MB/min.

Overall backup schedule Support system redeployment/system backup/partition backup/disk backup/disk clone.

Automatic 4K alignment Improve SSD performance

Support GPT and MBR Intelligently adapt to a partition format

Support NTFS and FAT32 Redeploy files in different file systems

Free TrialFree TrialNow 56337 people have downloaded!

How to confirm the cloned drive works and what to optimize afterward

Once the clone boots after you copy a hard drive, run a few quick checks to ensure everything migrated correctly. Open several applications and files to confirm they load without errors. Check Windows activation status; sometimes a hardware change can prompt reactivation, but a digital license linked to your Microsoft account typically reactivates automatically.

Open the Start menu, type diskmgmt.msc, and press Enter to launch Disk Management.

Open Disk Management (diskmgmt.msc) to verify that all expected partitions are present: an EFI system partition (if UEFI), a recovery partition, and the main C: drive. If the target drive is larger than the source, you may see unallocated space at the end—right-click the C: partition and select Extend Volume to use the extra space.
For SSDs, Use command prompt to check that TRIM is enabled. Open an elevated command prompt and run:

fsutil behavior query DisableDeleteNotify
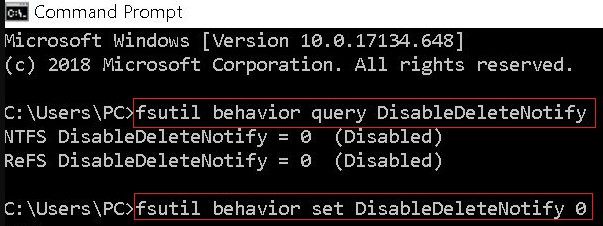
Command Prompt window showing output of fsutil behavior query DisableDeleteNotify, with result 0 indicating TRIM is enabled.
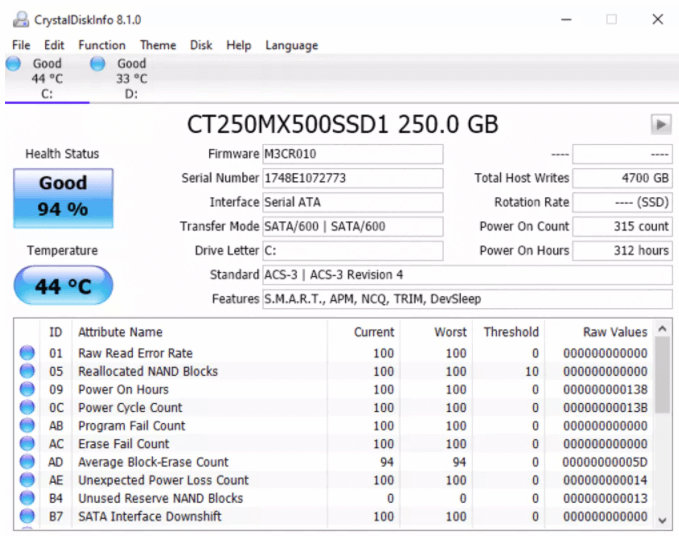
A result of 0 means TRIM is active. Partition alignment is usually handled automatically during cloning, but if you suspect issues, use CrystalDiskInfo to check the disk’s health and performance status. It’s wise to keep your old drive intact for a few days as a fallback while you verify the new drive’s stability.
how to check ssd health with crystaldiskinfo

FAQ

Can I clone a larger hard drive to a smaller SSD, and what are the requirements?

Yes, but only if the total used data on the source drive fits within the smaller SSD. Sector‑by‑sector cloning requires equal or larger capacity, while intelligent cloning tools can shrink partitions and skip unused sectors. Always confirm your cloning software supports automatic partition resizing before attempting this.

Can I clone a drive that already has bad sectors, and what precautions should I take?

Yes, but you should enable the cloning tool’s option to ignore bad data blocks. This prevents the process from stalling. For forensic or exact copies, use sector‑by‑sector mode, but expect longer times. Always run chkdsk /f /r beforehand to repair file system errors that could be replicated.

Why does my cloned drive show the wrong capacity after the process?

If the target drive is larger, the extra space may appear as unallocated. Open Disk Management, right‑click the main partition (usually C:), and select Extend Volume to use the full capacity. If the target is smaller, ensure intelligent cloning was used; otherwise, the clone may fail or misreport size.

What if my PC does not recognize the new drive in the BIOS after swapping?

This usually indicates a connection or firmware mismatch. Check that:
- The drive is properly connected (SATA/NVMe/USB enclosure).
- BIOS/UEFI is set to the correct mode (AHCI for SATA, UEFI for NVMe).
- The partition style (GPT vs. MBR) matches your system’s boot mode.If the drive still isn’t listed, try another port or adapter—no software can help if the BIOS doesn’t detect the hardware.
Renee Becca – Safe and Quick System Migration to SSD

Automatic 4K alignment Improves SSD performance during system migration.

Support GPT and MBR Automatically adapt to the suitable partition format.

Support NTFS and FAT32 Redeploy various files in different file systems.

Back up quickly Back up files at up to 3,000MB/min.

Overall backup schedule Support system redeployment/system backup/partition backup/disk backup/disk clone.

Automatic 4K alignment Improve SSD performance

Support GPT and MBR Intelligently adapt to a partition format

Support NTFS and FAT32 Redeploy files in different file systems

Free TrialFree TrialNow 56337 people have downloaded!

User Comments

Page 1

Leave a Comment


Your comment has been submitted and is awaiting moderation.