author avatar
    Senior Product Manager
Last update by Emma Johnson at 15 July 2026

Summary
This resource details the standard procedures to test cloned drive before swapping, ensuring bootability and data integrity during hardware upgrades. It covers hardware connection methods, BIOS configuration steps, and post-boot verification checklists for seamless system migration.


Imagine you’ve just spent 45 minutes cloning your aging hard drive to a speedy new SSD. The software says “100% complete,” and you’re ready to install the new drive, close up your laptop, and enjoy the performance boost. But here’s the reality: a clone that appears perfect can still fail to boot, be missing partitions, or load Windows with critical errors. If you swap out the original drive without testing first, you lose your one guaranteed safety net.
Leaving the original drive completely untouched while you verify the clone is the single most important rule in disk migration. Once you wipe the old drive or remove the wrong hardware, rolling back becomes difficult—often requiring a full reinstall or complicated recovery. Every boot-failure scenario is reversible only while the original drive still works exactly as it did before you started.
This guide keeps its focus tight: it’s about how to test a cloned drive before swapping, not how to choose a cloning tool or perform the clone itself. We assume you already have a clone (made with any reliable software) on a drive that’s ready to test.
Always create a separate, verified backup of your original drive before you begin any boot testing—a successful boot test does not replace a proper backup copy.

The safest ways to test a cloned drive without breaking the original setup

Once your clone is ready, there are four practical ways to verify it. Each has its own risk level, hardware requirements, and degree of separation from your current system. The table below compares your options; choose the one that fits both your comfort level and available hardware.
MethodRisk to original setupTypical hardware requiredBest for

1. One-time boot menu selection

Very low—overrides boot order only for this session

Desktop or laptop with a BIOS/UEFI boot menu key

Quick, reversible “test and forget”

2. Temporary BIOS boot-order change

Low—you must remember to restore the order

Access to firmware settings; suitable for desktop or laptop

Users wanting to test multiple reboots without holding a key

3. Testing with the original drive physically disconnected

Almost none—the clone is the only OS drive during the test

Desktop (easy cable removal) or laptop with single bay and external enclosure/caddy

The most independent verification

4. External USB enclosure test

Minimal—the clone stays isolated as a USB device

USB-to-SATA enclosure or adapter (for 2.5”/3.5” drives); works on any laptop or PC

Ideal when you have no spare internal slot

These methods are listed from least disruptive to most thorough. Method 1 lets you quickly check if the clone boots, while Method 4 gives a complete, isolated test with zero risk to the original. For most laptop HDD-to-SSD upgrades, using an external USB enclosure (Method 4) offers the best mix of safety and convenience.
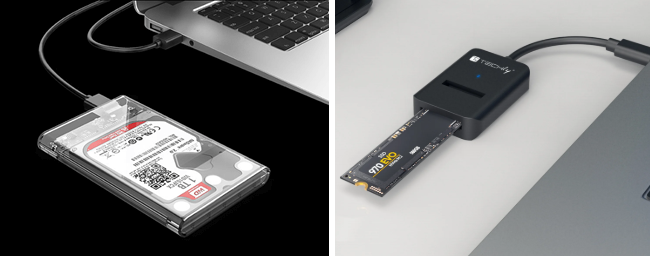
M.2 SSD USB enclosure for external cloning adapter
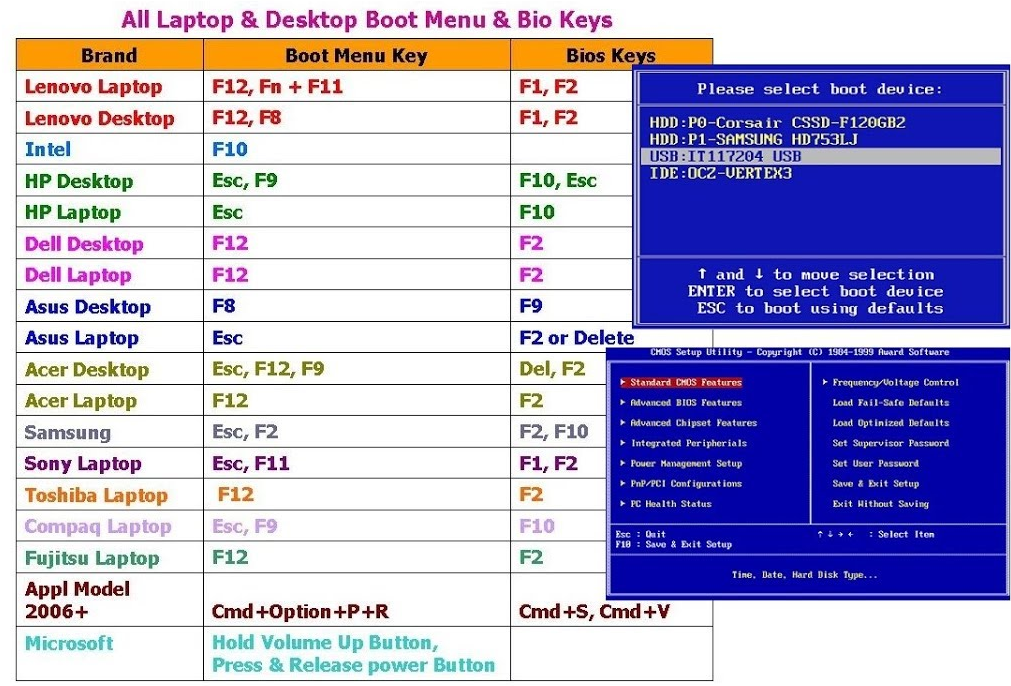
A quick reference for BIOS boot menu keys (data sourced from manufacturers’ official support pages; keys may vary by model):
- Dell: F12
- HP: F9
- Lenovo: F12 (or Novo button)
- ASUS: F8
- Acer: F12
- Gigabyte: F12
- MSI: F11
- Intel NUC: F10

How to boot from the cloned drive before swapping: step-by-step

Follow this workflow to move from connecting your clone to returning safely to your familiar Windows environment. Go through each phase in order—skipping steps can lead to signature collisions that confuse the operating system.

1. Preparation: connect the clone and note the current state

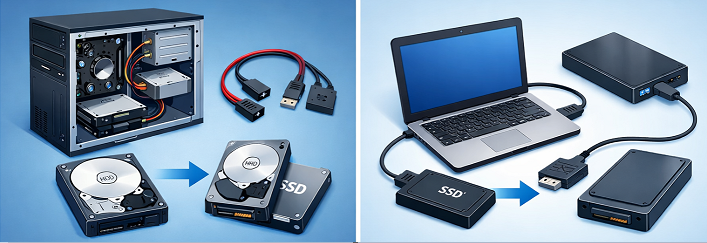
Desktop and laptop drive connection methods
1. Power off the PC completely. Don’t use sleep or hibernate—shut down fully and unplug the power cord if you’re opening a desktop.
2. Connect the cloned drive.
- For internal testing: attach the clone to an empty SATA port and power connector in a desktop, or install it in the second drive bay of a laptop if supported.
- For USB enclosure testing: place the drive in the enclosure and plug it into a USB port directly on the motherboard (rear ports are often more reliable for booting).
3. Boot into the original Windows. Power on as normal. The clone should appear as an extra disk, not as the boot drive.
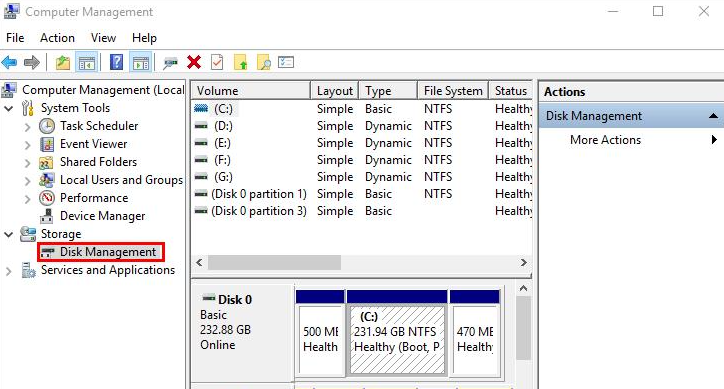
4. Open Disk Management (right-click Start or press Windows+X and select “Disk Management”). Take note of:
- The disk number of your original system drive (usually Disk 0) and its partitions.
- The disk number assigned to the clone.
- Any drive letters automatically assigned to the clone’s partitions—write these down to recognize them later.
5. Disconnect all unnecessary external drives (USB sticks, memory cards, backup disks). Having only the original boot drive and the clone connected reduces the risk of confusion in the boot menu.
A careful inventory now helps you avoid misidentifying drives when you see a boot menu full of generic names.
Windows Disk Management tool showing drive list and partitions

2. Accessing the boot menu or BIOS/UEFI

Most modern PCs offer a one-time boot override key that won’t change any permanent settings. This is the safest way to test a clone.
boot meny key or BIOS keys
- Restart your computer. As soon as the manufacturer logo appears, repeatedly press the appropriate key (see the table above). Common keys include F12, Esc, F9, F2, or Del.
- If unsure, look for a message at the bottom of the screen—many systems display “Press F12 for boot menu” during POST.
- On some laptops, you may need to hold the Fn key while pressing the function key.
- Avoid entering the full BIOS/UEFI setup if you see only a boot-order list; the boot menu is a separate, simpler screen listing available devices.
The goal is to use the one-time boot override, not to change the permanent boot order. If your system doesn’t have a dedicated boot menu, you can temporarily move the cloned drive to the top of the list in BIOS/UEFI(method 2)—just remember to reverse this afterward.

3. Performing a one-time boot from the clone

1. In the boot menu, highlight the cloned drive (it may show as “UEFI: [brand/model]” or just the drive’s name). Use the arrow keys and press Enter.
2. Watch the screen. A successful first boot from the clone may:
- Show the Windows logo and spinner.
- Display “Getting devices ready” for a few minutes (especially if the hardware profile has changed).
- Prompt you to log in with your usual credentials.
3. If the system boots back into the original Windows instead of the clone, the boot menu selection likely didn’t register. Restart and try again, making sure you pressed the correct key early enough.
4. If the cloned drive does not appear in the boot menu, check:
- That the data and power cables (or USB connection) are firmly connected.
- The clone was created correctly and the destination drive isn’t blank.
- You aren’t using an older Legacy BIOS system with two drives carrying the same disk signature—this can cause a collision that hides one drive. (Cloning tools like Renee Becca generally handle signature conflicts automatically, but it’s worth checking if you’re on legacy hardware.)
Renee Becca – Safe and Quick System Migration to SSD

Automatic 4K alignment Improves SSD performance during system migration.

Support GPT and MBR Automatically adapt to the suitable partition format.

Support NTFS and FAT32 Redeploy various files in different file systems.

Back up quickly Back up files at up to 3,000MB/min.

Overall backup schedule Support system redeployment/system backup/partition backup/disk backup/disk clone.

Automatic 4K alignment Improve SSD performance

Support GPT and MBR Intelligently adapt to a partition format

Support NTFS and FAT32 Redeploy files in different file systems

Free TrialFree TrialNow 56337 people have downloaded!
5. Once Windows loads from the clone, sign in and spend a few minutes confirming the desktop looks as expected. Don’t move or delete files yet—you’re still in test mode.

Never boot two drives with identical signatures at the same time on a Legacy BIOS machine—the system may randomly pick one or become confused. Modern UEFI systems handle this much better, but it’s still best to keep only one bootable OS drive active at a time.

4. Returning to the original drive safely

After confirming the clone boots, it’s time to return to your original setup.
1. Shut down Windows completely from the clone. Don’t use Restart, which might loop you back to the clone.
2. For one-time boot menu users: there’s nothing to change. On your next power-on, simply let the system boot without pressing the override key, and it will use the original drive.
3. If you changed the permanent boot order in BIOS/UEFI:
- Restart and press the key to enter Setup (usually F2, Del, or Esc).
- Go to the “Boot” tab and restore the original drive as the top priority.
- Save and exit. The system will now boot from the original drive.
4. Once you’re back in your original Windows, open Disk Management again and verify the cloned drive is still listed as a secondary disk (its partitions may show “Healthy” but are not the C: drive). Your original files remain untouched.
5. If you connected the clone internally, you can now disconnect it (after shutting down) if you plan to keep it aside for the final swap. For external enclosure tests, simply eject the USB drive safely and unplug it.

How to confirm the clone is fully working after it boots

Booting is just the first checkpoint. A usable clone must run your everyday applications, display all your files, and keep Windows activated. Go through this checklist while booted into the clone:
- Sign in and check your desktop and start menu. Your shortcuts should be present and working. Missing icons may indicate a partition alignment problem or incomplete clone.
- Open several core applications. Launch your browser, a productivity suite (Word, Excel), and any specialist programs you use. If these open without errors and can access recent files, your clone is in good shape.
- Verify personal files. Navigate to C:\Users\ [ YourName ] and confirm Documents, Pictures, Desktop, and Downloads contain the expected folders and files. A quick size comparison with the original drive can catch silent omissions.
- Inspect partition layout in Disk Management. Make sure all expected partitions (EFI system, recovery, main data) are present and sized as intended. Unallocated space or a missing recovery partition may mean the clone tool didn’t extend the target drive correctly.
- Run a quick Windows Update check and note activation status. Go to Settings > Update & Security > Windows Update, then Activation. Windows should report “Windows is activated with a digital license.” Don’t start large updates yet—just confirm the system can reach update servers.
- Check Device Manager for driver issues. Look for yellow exclamation marks. If the clone boots on different hardware (e.g., from an Intel desktop to an AMD laptop), you may see some missing drivers; these are usually resolved after the swap.

Decision rule: If the clone passes all these checks—boots, runs apps, shows files, and stays activated—it’s safe to swap. If you encounter any issues (blue screens, activation watermark, wrong drive letters, or missing files), consider re-cloning after checking the source disk’s health (chkdsk), verifying partition alignment, or using a cloning tool that handles signature collisions and UEFI boot entries smoothly. Renee Becca, for example, includes a post-clone data-integrity check that can catch issues before you ever reach the boot menu.

Renee Becca – Safe and Quick System Migration to SSD

Automatic 4K alignment Improves SSD performance during system migration.

Support GPT and MBR Automatically adapt to the suitable partition format.

Support NTFS and FAT32 Redeploy various files in different file systems.

Back up quickly Back up files at up to 3,000MB/min.

Overall backup schedule Support system redeployment/system backup/partition backup/disk backup/disk clone.

Automatic 4K alignment Improve SSD performance

Support GPT and MBR Intelligently adapt to a partition format

Support NTFS and FAT32 Redeploy files in different file systems

Free TrialFree TrialNow 56337 people have downloaded!
Windows Disk Management: cloned disk offline due to signature collision
IssueDescription / Fix

Incorrect drive letters

Open Disk Management and manually reassign the drive letters. A proper clone normally preserves the original letters, but Windows may temporarily assign different ones during the first test boot.

Activation watermark

Run the Windows Activation Troubleshooter. Hardware changes—such as replacing a drive—can trigger a license recheck, which often resolves automatically once the device connects to the internet.

Missing drivers

Download essential chipset and network drivers from the system or motherboard manufacturer before swapping the drive. You can also keep the original drive available to copy any missing drivers over.

FAQ

Can I test the clone while both the old and new drives are connected?

Yes—that’s exactly what the boot menu method and the external enclosure method described above are designed for. As long as you use a one-time boot override and avoid booting both drives at once under Legacy BIOS, your original drive remains safe. Just be sure you know which drive you’re booting from, and don’t accidentally mix them up.

Will booting from an external USB enclosure give a reliable test result?

Absolutely. A modern USB 3.0 enclosure provides enough speed for Windows to run just as it would on an internal connection. Booting from USB lets you verify applications, network access, and drivers as you would internally. The only minor difference is that some older USB-to-SATA chips may slow disk I/O, but this doesn’t affect functionality. It remains the safest way to test a clone without opening your PC.

Why doesn’t the cloned drive show up in the BIOS boot menu?

This can happen for several reasons. The most common are a loose data or power cable, a USB port that isn’t powered adequately, or the clone being blank because the cloning process didn’t finish. On older Legacy BIOS systems, two drives with the same disk signature can cause one to be hidden; modern UEFI systems are less prone to this but may still require enabling “Launch CSM” or “Legacy Boot” if the clone was made from an MBR disk and your motherboard expects UEFI. If none of these apply, try recreating the clone with software that aligns partitions correctly (Renee Becca’s partition-alignment option can help prevent such issues).
Renee Becca – Safe and Quick System Migration to SSD

Automatic 4K alignment Improves SSD performance during system migration.

Support GPT and MBR Automatically adapt to the suitable partition format.

Support NTFS and FAT32 Redeploy various files in different file systems.

Back up quickly Back up files at up to 3,000MB/min.

Overall backup schedule Support system redeployment/system backup/partition backup/disk backup/disk clone.

Automatic 4K alignment Improve SSD performance

Support GPT and MBR Intelligently adapt to a partition format

Support NTFS and FAT32 Redeploy files in different file systems

Free TrialFree TrialNow 56337 people have downloaded!

User Comments

Page 1

Leave a Comment


Your comment has been submitted and is awaiting moderation.