author avatar
    Senior Program Developer
 

Summary
Learn how to solve most computer problems with the built-in "Last Known Good Configuration" function on Windows. Recover or transfer important data when the system crashes.


last known good configuration

I. About the last known good configuration of Windows

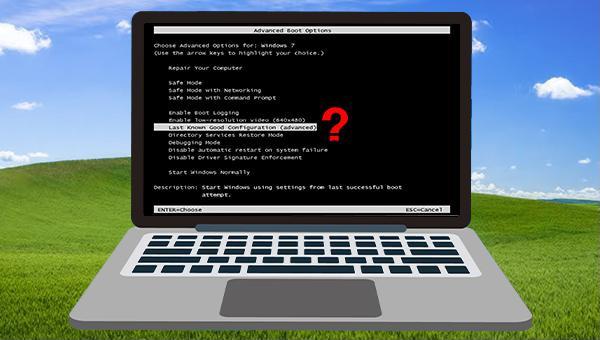
“Last Known Good Configuration” is a built-in recovery feature for Windows devices. It allows you to start your computer using the most recent working settings. This function restores the valid registry information and driver settings from the last successful startup. In other words, if you make changes to your computer that prevent it from starting properly, or if you are concerned that certain actions may disrupt the system’s functionality, you can use this feature to restore the system to its previous state.
In addition, there are the following situations that can be solved by using the “Last Known Good Configuration” function.
Improperly installed drivers: When the drivers are installed incorrectly, a blue screen of death can appear when starting up the device, preventing the computer from loading properly.
Virus or Malware Infection: This issue prevents you from safely accessing your computer.
An error occurred in Windows update: the system could not be updated normally, and a power failure occurred during the update, etc.
Newly installed programs and components are not compatible: The problem that the system cannot start normally due to this situation can also be resolved with the help of the “Last Known Good Configuration” function.
Please note that the “Last Known Good Configuration” feature has been removed in Windows 10. However, there are alternative options available in the Windows recovery environment that can serve the same purpose. For example, you can enter safe mode through the recovery environment to troubleshoot any failures, or use the System Restore feature to revert the system back to a previous functioning state. Here is a detailed guide on how to perform these actions.

II. How to use the last known good configuration of Windows in Windows?

1. Windows 7 uses the last known good configuration method

It is very simple to enable the last known good configuration in Windows 7. The steps are as follows:
Step 1: Shut down the computer, and make sure that all external devices (such as USB disk, DVD, CD drive) are disconnected.
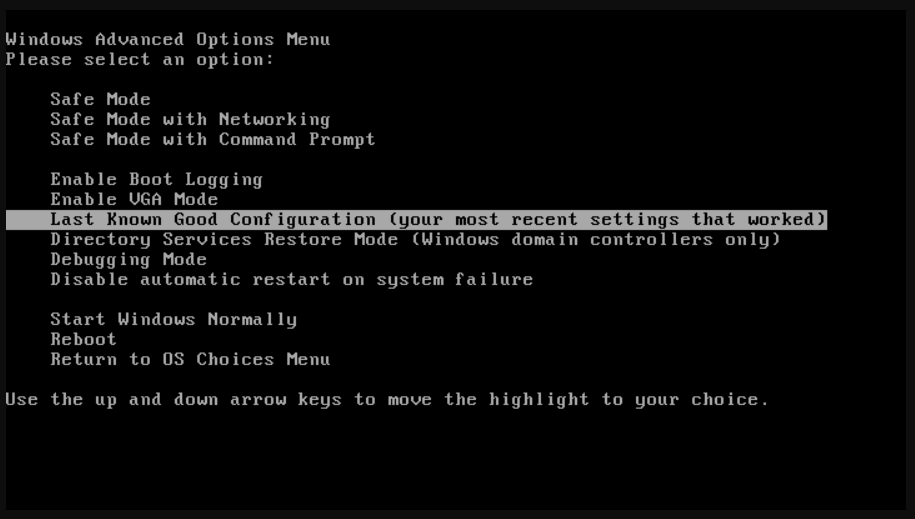
Step 2: Start the computer, wait for the logo of the computer brand to disappear, and immediately press the (F8) key on the keyboard continuously (you need to hold down the (Fn) key at the same time for some laptops) to enter the “Windows Advanced Options menu ” or “Advanced Boot Options” interface. Then use the up or down arrow keys on the keyboard to move the selected item until the “Last Known Good Configuration” option is selected and press the (Enter) key to start it.
last known good configuration

2. Windows 10 uses the function of Windows Recovery Environment instead

A. Enter safe mode through Windows recovery environment to troubleshoot
Safe Mode is a diagnostic mode of Windows. In Safe Mode, you can fix some system-related problems by uninstalling, updating incompatible software and drivers, deleting problematic files, cleaning viruses, and more. The steps are as follows:
Step 1: Insert the Windows installation disk (DVD or USB disk) into the computer. Continuously press F2, F10, DEL or ESC shortcut keys (varies with the computer brand) to enter the BIOS setting interface when starting up, then set the Windows installation disk as the first boot sequence. Finally, save the settings and restart the computer to make the computer start from the installation disk.

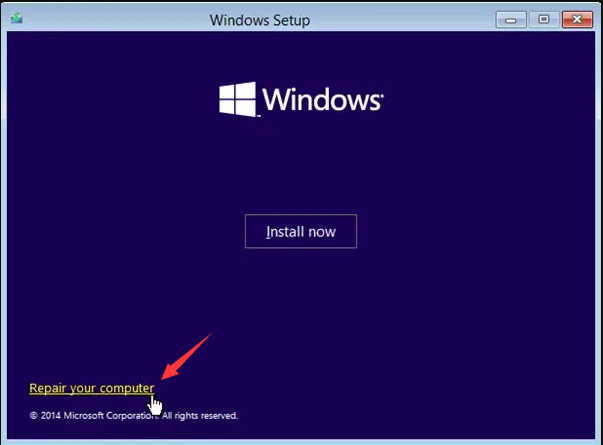
Next, select the (Repair Your Computer) option on the Windows Installer “Install Now” screen to enter the recovery environment.

windows installation repair your computer
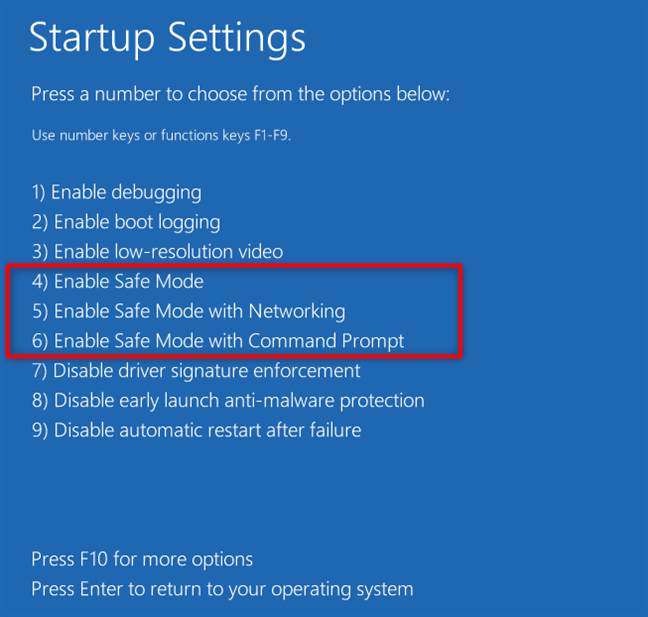
Step 2: After entering the recovery environment, select (Troubleshoot)>(Advanced Options)>(Startup Settings). When the computer restarts, you can choose the desired safe mode by pressing the corresponding key.
startup settings windows 10 safe mode
Step 3: After the computer enters the safe mode, you can perform the repair on the computer.
If you are unsure of how to troubleshoot or if your system is experiencing significant issues, you can utilize the system restore function in the Windows recovery environment to restore your system. However, it is important to note that you must create a restore point beforehand. Here is a step-by-step guide on how to do so. If you have not created a restore point and are unable to resolve the issue, you can also consider reinstalling the system.
B. Enable the system restore function in the Windows recovery environment
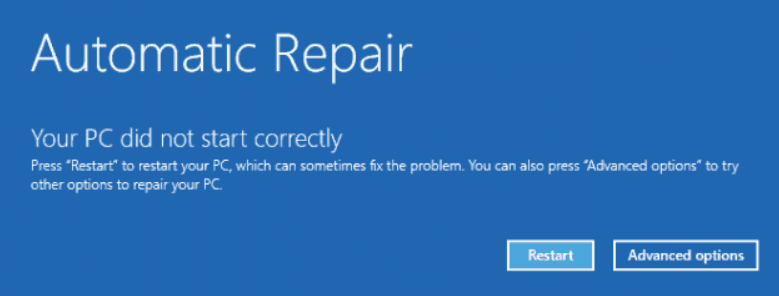
Step 1: When you turn on the computer, wait for the brand logo to appear. Then, press and hold the power button to force a shutdown. Repeat this process at least 3 times. Once done, allow the computer to fully start and go to the “Advanced Options” in the “Auto Repair” interface. This will take you to the Windows recovery environment.
your pc did not start correctly
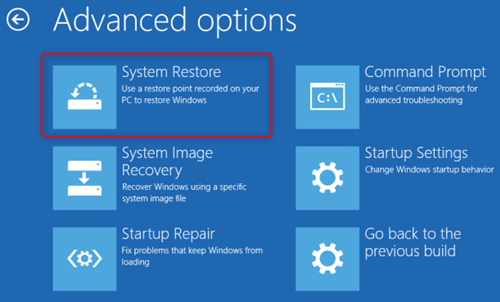
Step 2: Navigate to (Troubleshoot) – (Advanced Options) – (System Restore).
select system restore in windows system to fix windows 10 error
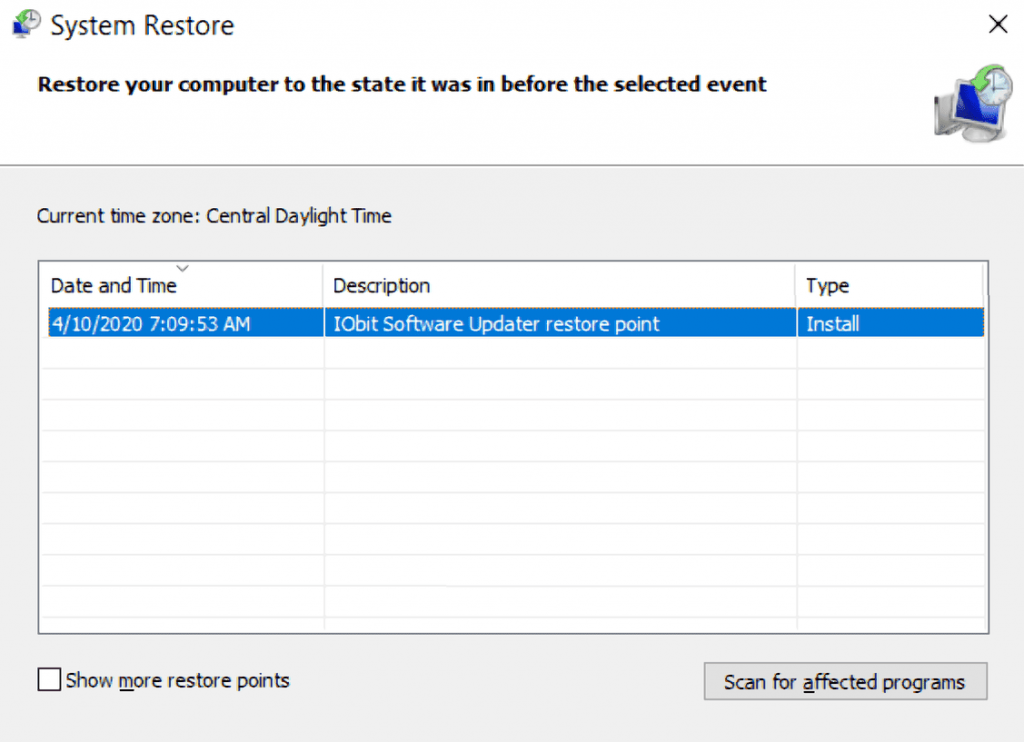
Step 3: Then, select a recent restore point before the error occurred, and click (Next).
system restore point
In this guide, we will discuss the use of Windows “Last Known Good Configuration” feature in situations where the system crashes and you cannot access it normally. If you find yourself in this situation, there are methods you can use to transfer or restore important files and data from your device. Our recommended solution is using Renee PassNow for this task.

III. Use Renee PassNow to transfer or recover files when the system crashes

1. What is Renee PassNow?

Renee PassNow is a professional system rescue software, which can help Windows users clear Windows account passwords, create new administrator accounts; restore disk/memory card data, recover data after hard disk formatting; transfer disk files; erase or scan Disk files, etc. In addition, this software also supports repairing Windows system problems, such as: repairing MBR boot records, DBR error parameters, 0xc00000e, Windows system startup failure, and some problems that cause black screen or blue screen, etc. As a system rescue tool with various functions, it is perfectly compatible with multiple systems including Windows 10/8.1/8/7/XP/Vista, and can meet the system rescue needs of different users.
Hot Topic - ADsRenee PassNow – 3 Steps to transfer data from the crashed system

Easy to use 3 steps to transfer the files.

Transfer the files Transfer the important files of the computer without system.

Preview the files Preview the files while transferring the data.

Multifuctional Data recovery, Windows password reset, bootable problem recovery can be run without system.

Highly compatible Windows 10/8.1/8/7/XP/Vista. Also supports UEFI boot mode.

Easy to use 3 steps to transfer the files.

Transfer the files Transfer the important files of the computer without system.

Preview the files Preview the files while transferring the data.

Free TrialFree TrialNow 2000 people have downloaded!

2. How to use Renee PassNow to transfer or recover data?

If your Windows system crashes and prevents you from accessing it normally, don’t panic. With Renee PassNow, you can easily create a startup disk to boot up your computer. Once you’re in, take advantage of the software’s features to transfer or restore your important files. The process is simple – here’s how:
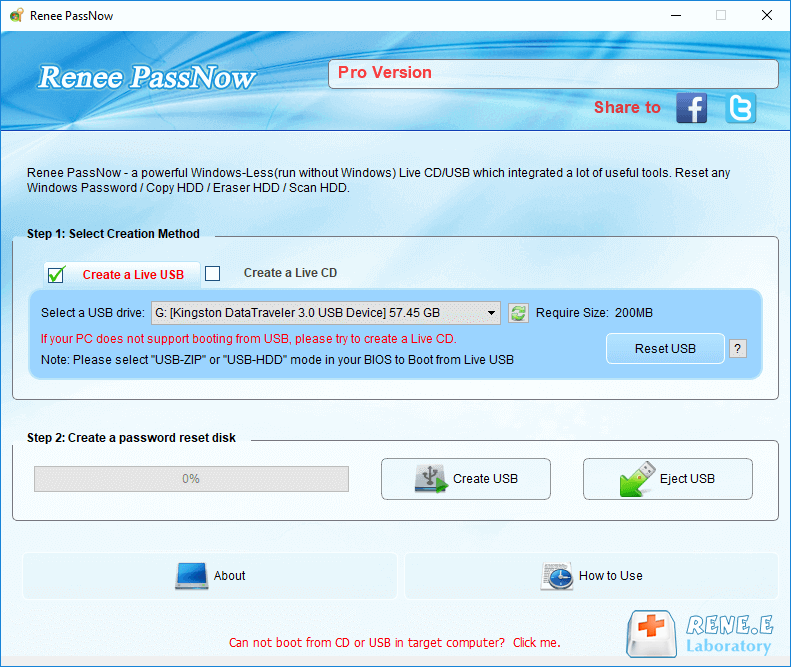
Step 1: Download and install Renee PassNow on another computer that can log in and run normally, then connect the USB disk to the PC.

Please select the (Create a Live USB) option under “Step 1: Select creation method” in the main interface.

Note: Before performing this operation, please make sure that the important files in the USB disk have been saved in other locations because the operation will delete all the data in the USB disk.
create a boot media with renee passnow
Step 2: Next, select (x64) or (x86) according to the system type, click the (Download Now) button to download the ISO file, then click the (Create USB) button. After the file is downloaded, click the (Eject USB) button.
use renee passnow to create usb to reset passnword
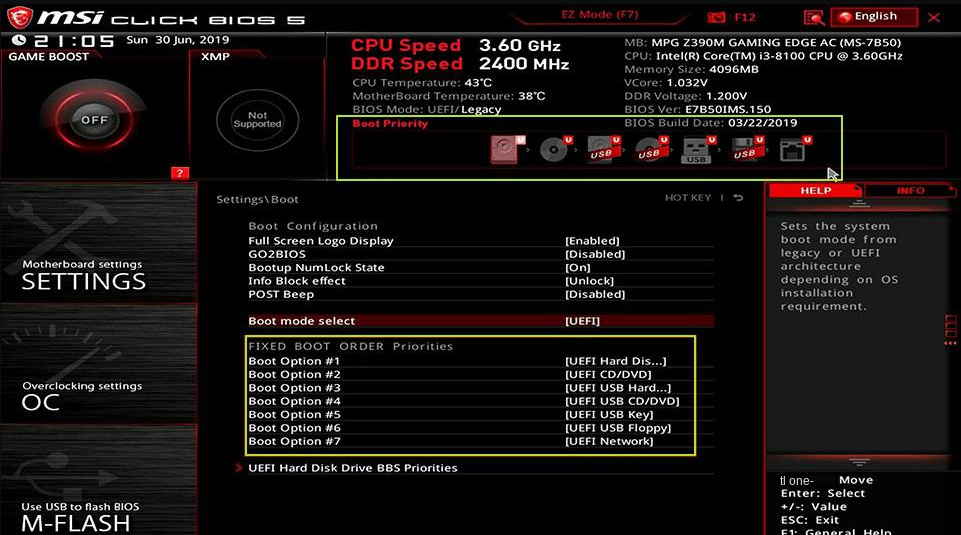
Step 3: Connect the created boot device to the computer that needs to transfer data, and turn on the computer. Then use the shortcut key to enter the BIOS setting interface, set the boot USB drive as the first in the boot sequence, save the settings, and restart the computer.
select boot order
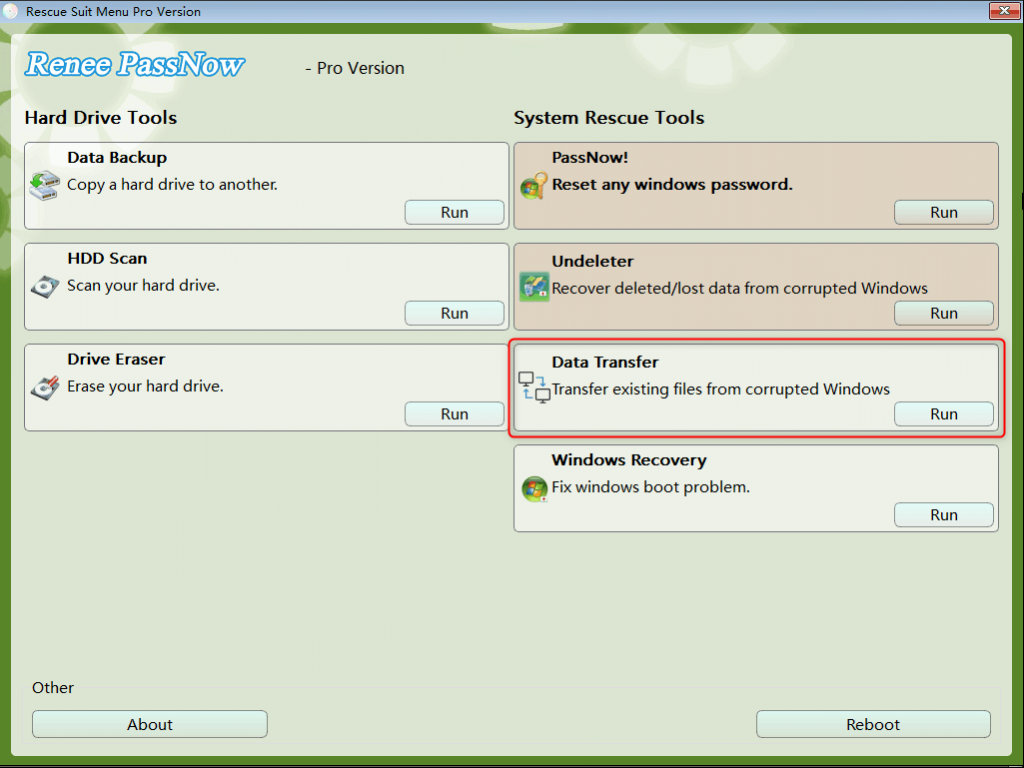
Step 4: Wait for a while, after Renee PassNow is loaded, select (Data Transfer). If you need to transfer the data of the entire hard disk, you can select the (data backup) option.
data transfer function in Renee Passnow
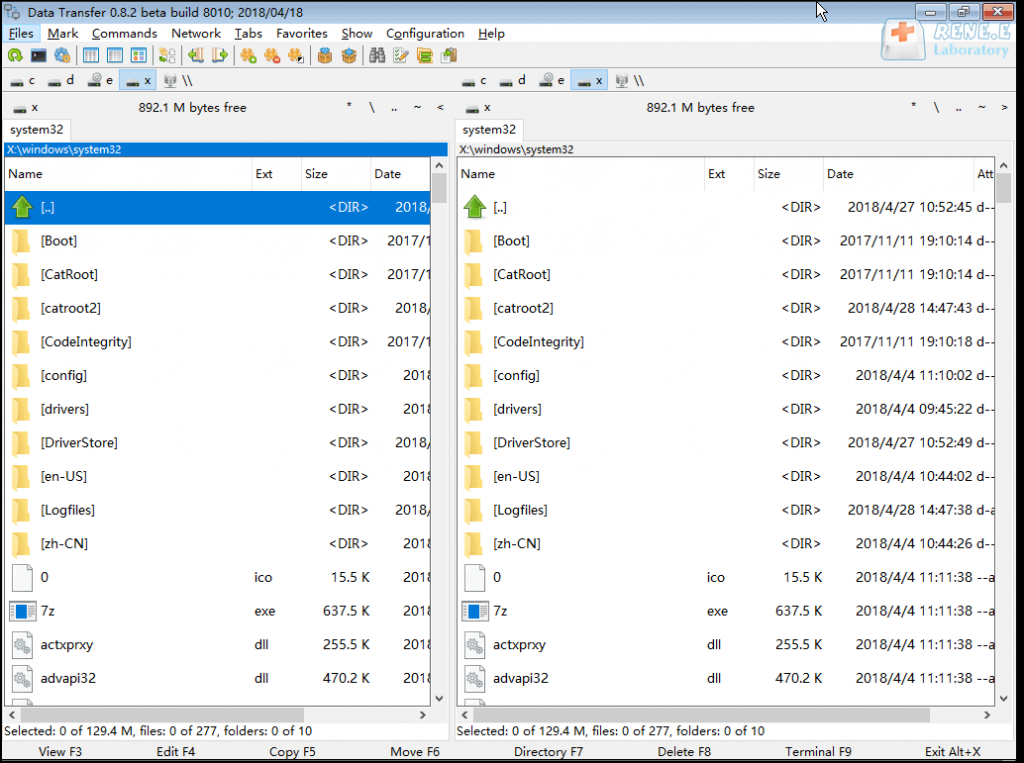
Step 5: You can click on each disk drive letter (C/D/E/F, etc.) to check whether important files are lost. If not, it is recommended that you transfer them to an external disk.

For example, if you want to transfer the data from the C drive to the G drive, you can first select the C drive on the upper left, and then select the G drive on the upper right. Next, select the target files in the C drive, click the Copy function button in the middle, and the selected data will be easily transferred.

If there is a file you want to delete, you can click the (Delete) button in the middle after selecting the file. Please note that the deleted files can’t be restored, please operate with caution.

data transfer in Renee Passnow
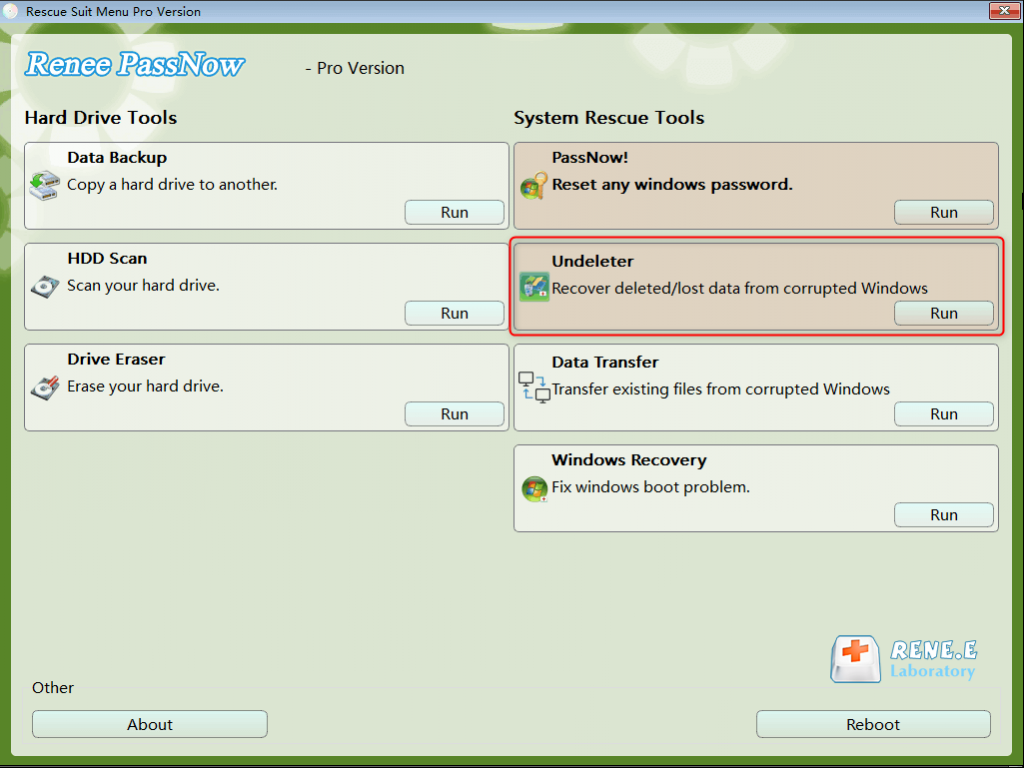
Step 6: If you find that there is data loss, please select the (Undeleter) option on the main interface, and click the (Run) button.
data recovery function in Renee Passnow
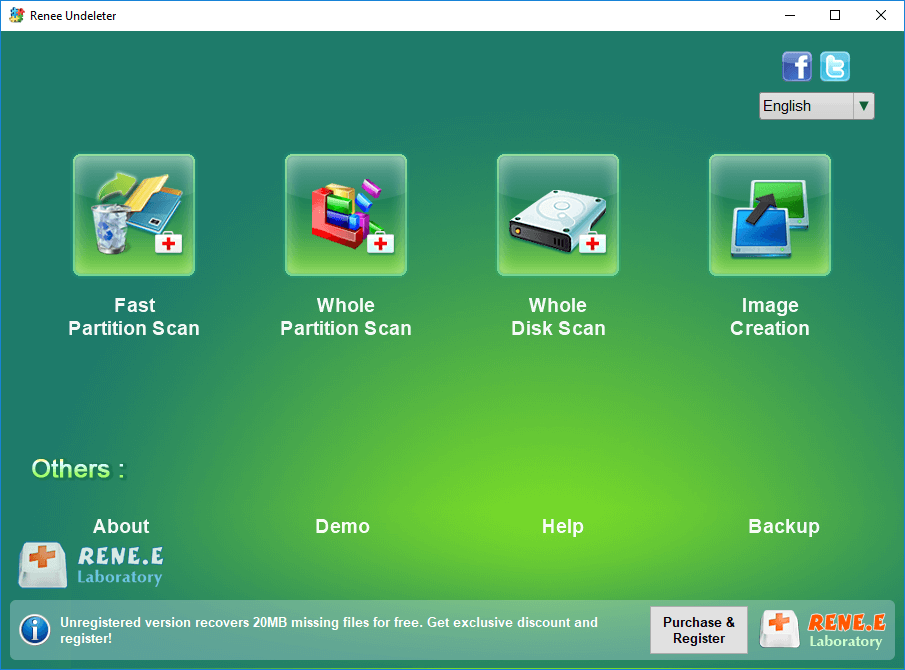
Step 7: Select the (Whole Disk Scan) option to scan the target hard disk.
select whole disk scan in renee undeleter
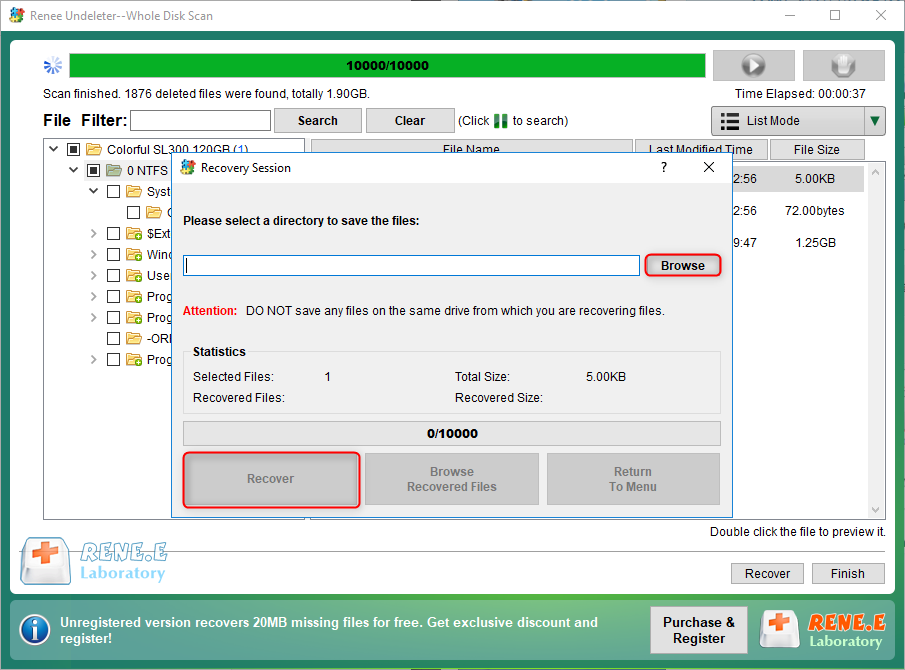
Step 8: After the scan is complete, select the file to be recovered, and click the (Recover) button. Please save the file in another external disk.
recover files from whole disk scan with renee undeleter