author avatar
    Technology Manager of Test Dept.
Last update by Emma Johnson at 10 July 2025

Summary
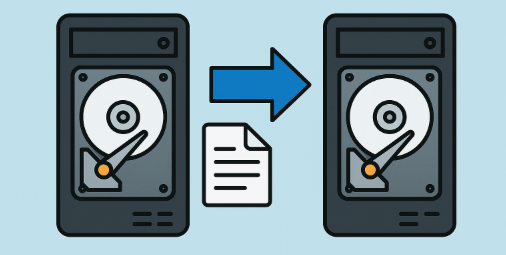
Learn how to transfer data from one internal hard drive to another efficiently, whether you’re upgrading your storage or recovering after a crash. This guide outlines proven methods suitable for users in the United States, India, and beyond.


When your PC runs low on storage or crashes, knowing how to transfer data between internal drives becomes essential. Whether you’re upgrading to a larger drive or just organizing files, it’s important to understand that copying duplicates your data while transferring moves it completely. The methods in this guide work across all versions of Windows—even if your system won’t boot.
transfer data between internal drives
This comprehensive guide presents 4 proven approaches to transfer data from one internal hard drive to another efficiently and safely. Each method offers different advantages depending on your specific needs and technical comfort level.

Why You Need to Transfer Data from One Internal Hard Drive to Another

Many users find themselves in situations where they need to transfer data from one internal hard drive to another. A common scenario involves upgrading from a smaller drive to a larger one when storage space becomes limited. For instance, if your current drive is nearly full with 200GB of data, the traditional copy-paste method might seem risky and time-consuming.
Modern internal hard drives with expanded storage capacity can significantly boost your computer’s performance and give your system a fresh start. When your existing drive reaches capacity, transferring data to a larger internal hard drive becomes not just convenient, but necessary. Upgrading to a larger hard drive—not just expanding free space—can dramatically improve system performance. Switching to an internal solid-state drive, especially a 2025 M.2 SSD with the latest Gen 4 NVMe protocol, delivers a noticeable boost in speed and responsiveness.
Additionally, if your Windows system crashes with a blue screen error and won’t boot, transferring data becomes critical for recovery. In these cases, specialized tools or bootable environments may be needed to access and preserve your files before reinstalling or upgrading the operating system.
ScenarioReason for TransferBenefits

Upgrading from smaller to larger drive

Running out of storage

More space, better performance

System crashed (e.g., blue screen)

OS won’t start; need to recover files

Fast Partition Scan, backup before reinstall

Improving overall system speed

Older drive slowing down performance

Faster boot times, smoother operation

Starting fresh with new storage hardware

Avoid clutter or issues from aging hardware

Clean setup, improved reliability

The question many users ask is: how can I transfer data from one internal hard drive to another at optimal speed while maintaining data integrity? Whether you’re dealing with large files, system data, or personal documents, finding an efficient method to transfer data from one internal hard drive to another is essential for maintaining productivity and ensuring data safety.
The methods presented below are arranged in order of recommendation, with the most secure and efficient solutions listed first. This organization helps you choose the best approach to transfer data from one internal hard drive to another based on your specific requirements.

Method 1. Clone Data and Transfer from One Internal Hard Drive to Another Using Professional Software

Ideal for migrating partition data or cloning entire internal disks on Windows 11/10/8/7
Professional disk cloning software represents the most reliable method to transfer data from one internal hard drive to another. This approach ensures data integrity while providing advanced features that manual methods cannot match. Modern cloning tools like Renee Becca offer comprehensive solutions for users who need to transfer data from one internal hard drive to another efficiently.
Renee Becca – Safe and Quick System Migration to SSD

Automatic 4K alignment Improves SSD performance during system migration.

Support GPT and MBR Automatically adapt to the suitable partition format.

Support NTFS and FAT32 Redeploy various files in different file systems.

Back up quickly Back up files at up to 3,000MB/min.

Overall backup schedule Support system redeployment/system backup/partition backup/disk backup/disk clone.

Automatic 4K alignment Improve SSD performance

Support GPT and MBR Intelligently adapt to a partition format

Support NTFS and FAT32 Redeploy files in different file systems

Free TrialFree TrialNow 56337 people have downloaded!
Key advantages of using professional software to transfer data from one internal hard drive to another include:
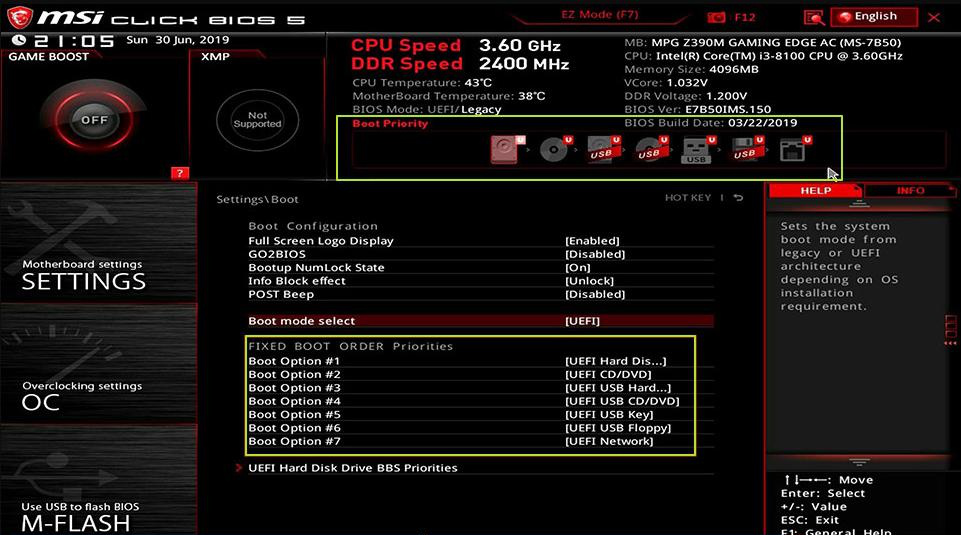
  • Creating bootable recovery media for complete system transfers
  • Performing sector-by-sector cloning that guarantees identical data reproduction
  • Seamlessly transferring entire Windows installations between drives
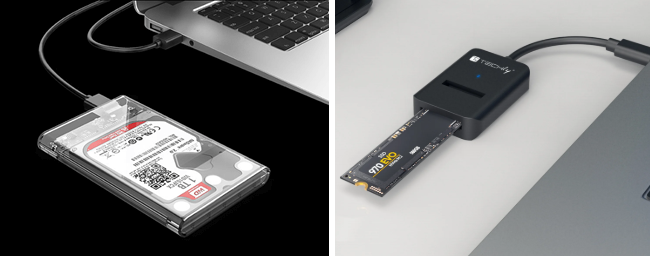
  • Supporting various drive types including SSDs and traditional HDDs
When preparing to transfer data from one internal hard drive to another, proper hardware setup is crucial. If you’re installing a new SSD/Hard drive, insert the drive at a 30-degree angle, then press down and secure with the provided screw.
How to Install an M.2 SSD 
For temporary connections during the cloning process, you can use a USB-to-M.2 adapter or external enclosure to connect your new SSD/Hard drive via USB when you need to transfer data from one internal hard drive to another.
usb ssd / disk enclosure 
For complete SSD upgrades involving system migration, Renee Becca provides the most reliable and efficient solution when you need to transfer data from one internal hard drive to another. This professional-grade software makes it incredibly convenient to migrate your Windows system to a new hard disk, transforming it into a fully functional system drive.

Complete Hard Drive Cloning to Transfer Data from One Internal Hard Drive to Another

When you need to upgrade your entire system by moving everything to a larger drive, complete disk cloning is the optimal way to transfer data from one internal hard drive to another.

Step 1: Download and Install Renee Becca

Begin by downloading and installing Renee Becca on your PC or laptop to prepare for the process to transfer data from one internal hard drive to another.
download Renee Becca

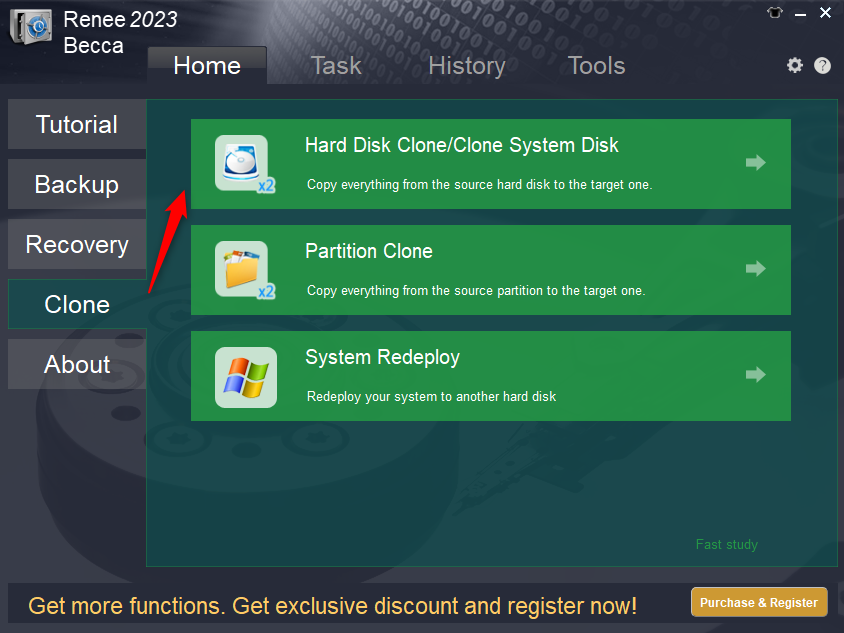
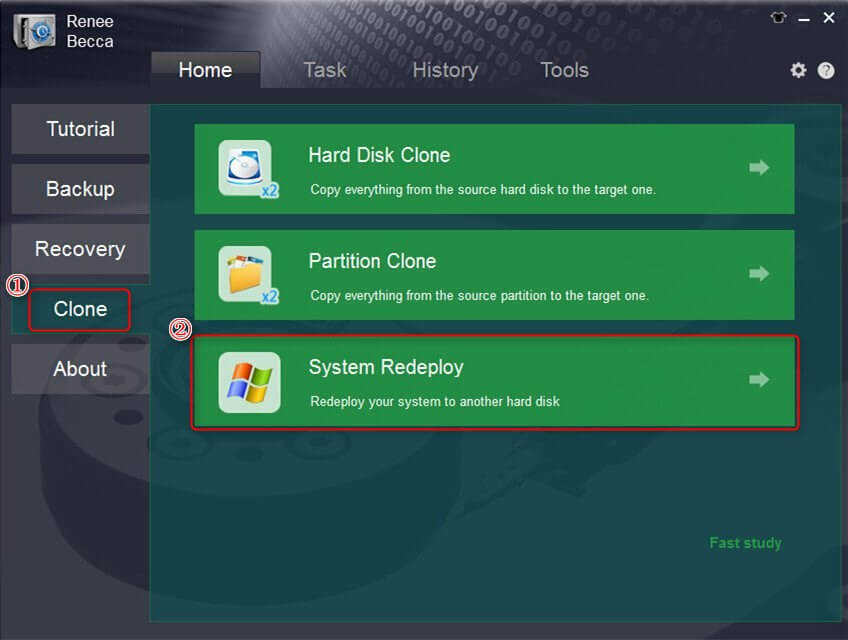
Step 2: Choose the Appropriate Function to Transfer Data from One Internal Hard Drive to Another

Renee Becca offers two main functions for transferring data, each designed for different scenarios:
Function NameFeatureSuitable For

Hard Disk Clone/Clone System Disk

Creates an exact copy of the selected disk, supports adjusting partition size by moving the partition boundary with the mouse, and enables starting the cloned hard disk.

Complete SSD Replacement

System Redeploy

Support to only migrate the Windows system partition to another hard disk.

Dual-Drive Configuration, HDD-to-SSD Migration

Option 1: Clone the Entire Drive Using the ‘Hard Disk Clone’ Feature
If your original drive contains both system and data partitions, you can use the “Hard Disk Clone/Clone System Disk” option found under the “Clone” section of the main interface. This feature copies all partitions and volumes—including both system and user data—to your new target drive when you need to transfer data from one internal hard drive to another in full.
renee becca disk clone 
1. Configure Source and Destination Drives
Next, select the original disk to be cloned and the pre-replaced hard disk in the (source) and (Destination) pop-up window of “hard disk clone.” Choose your laptop’s internal hard drive as the source and your connected external USB drive or another drive as the target location. This step is crucial for ensuring the clone hard drive process targets the correct devices when you transfer data from one internal hard drive to another.
clone the hard disk 
2. Configure Advanced Settings and Begin Cloning
Before starting the clone operation to transfer data from one internal hard drive to another, Renee Becca provides customization options through these advanced features:
- ‘Copy all the sectors’ capability
This feature allows you to copy all sectors from the source disk to the target disk, including reserved areas and unused space. In some cases, software may store license information in reserved sectors, which are usually skipped during a standard cloning process—this option ensures even those areas are included when you transfer data from one internal hard drive to another.
- Universal disk type compatibility
Renee Becca maintains compatibility with diverse HDDs, SSDs, and USB devices. Regardless of your specific hard drive and USB combination, you can successfully transfer data from one internal hard drive to another.
- Customizable disk layout configuration
You can resize the partition by clicking and dragging its edge with your mouse based on your specific requirements when you transfer data from one internal hard drive to another.
adjust partitions 
Finally, once you’ve configured your preferred settings, click the “Clone” button to begin the cloning process and transfer data from one internal hard drive to another.
Option 2: For System-Only Migration, Use the ‘System Redeploy’ Function
Launch the application and select the “System Redeploy” option in the main interface under the “Clone” column. This feature is specifically designed for migrating your entire Windows system when you need to transfer data from one internal hard drive to another efficiently.
select system redeploy function in clone 
Choose your new SSD as the target location and select your current system partition as the source.
This step is crucial for a successful system redeploy process to transfer data from one internal hard drive to another, so double-check your selections to avoid any data loss.
select a destination to redeploy system with renee becca 
Click the Redeploy button to initiate the cloning process
The software will begin transferring your entire system, including the operating system, applications, settings, and personal files to the new SSD/HDD when you transfer data from one internal hard drive to another. Monitor the progress carefully during this critical phase of your upgrade.

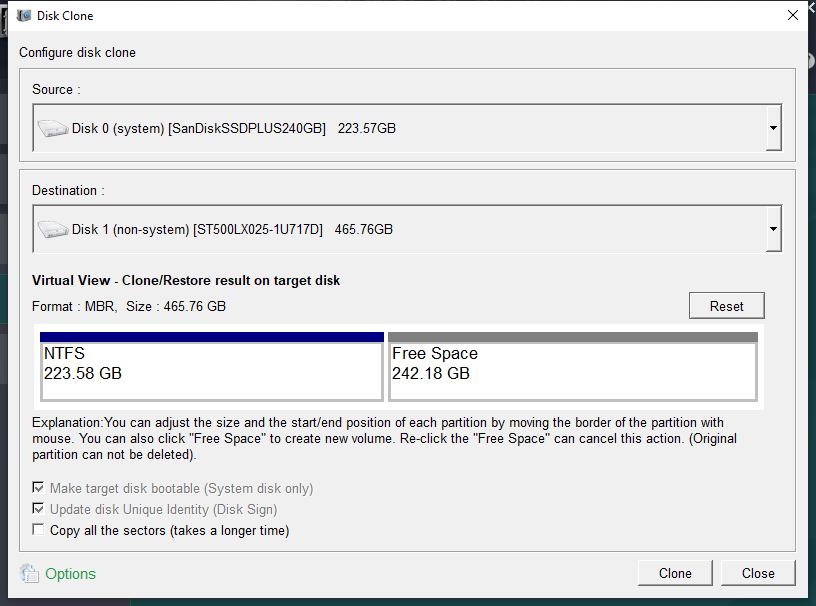
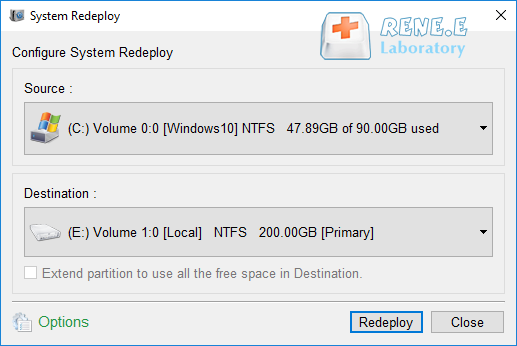
Step 3: Wait for Complete Migration

The duration depends on your source disk’s data volume, typically ranging from 30 minutes to several hours. Once completed, your new SSD/HDD will contain an exact copy of your original system, ready for use after you successfully transfer data from one internal hard drive to another.
Important Note: The total capacity of the new drive needs to be greater than the size of the system being migrated. Since all data on the target disk will be erased during the system migration, please verify that you’ve selected the correct target drive and backup any important data beforehand. If you want to migrate all data from the original system drive (not just the system partition) to the new drive, you can choose the hard disk clone function instead.

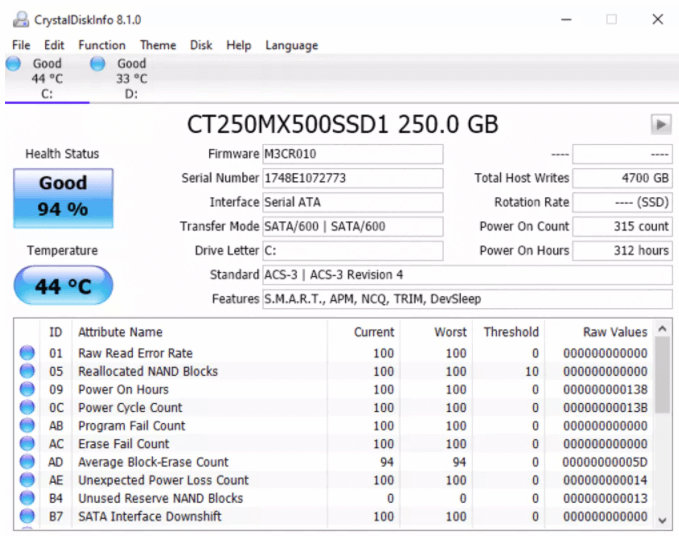
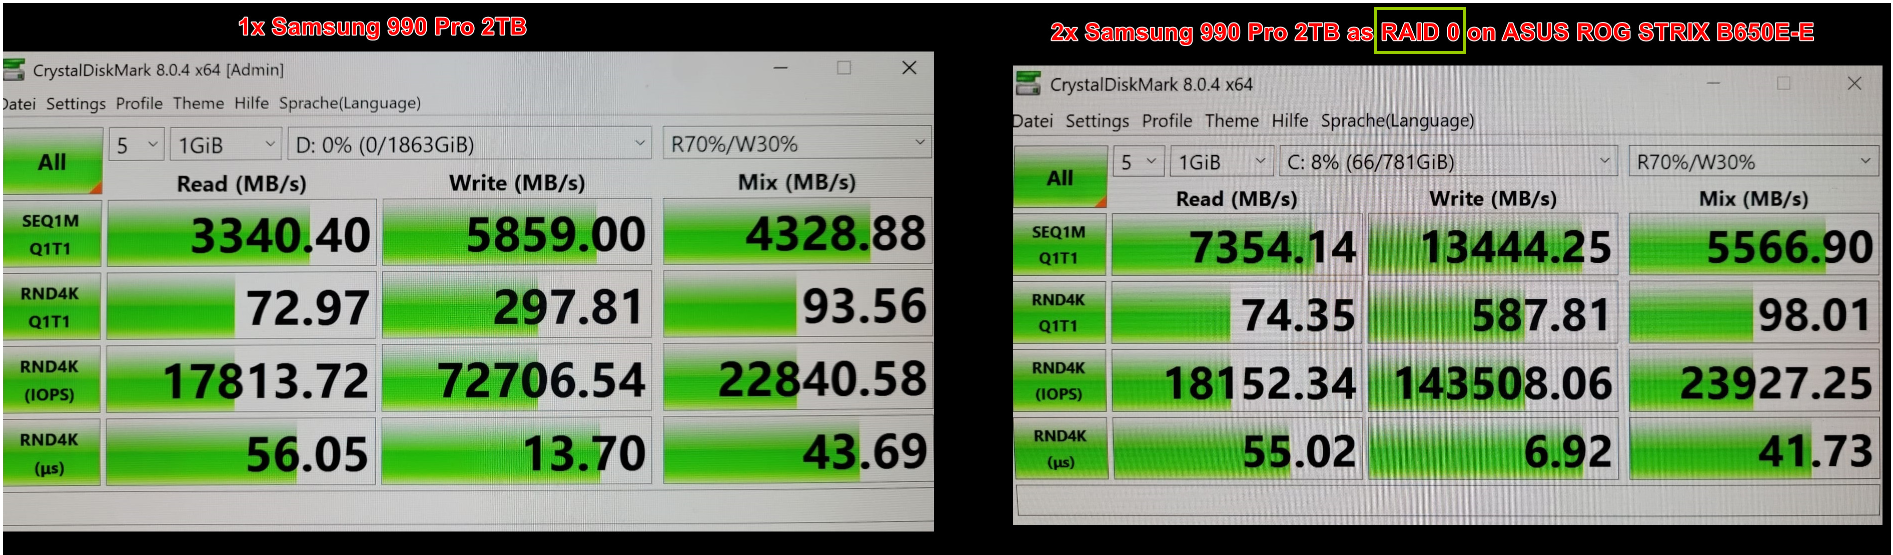
Step 4: Verify Your New Drive Status

After you transfer data from one internal hard drive to another, use software like CrystalDiskInfo to verify your new drive status.
CrystalDiskInfo – Monitors the health and status of your hard drives and SSDs using S.M.A.R.T. (Self-Monitoring, Analysis, and Reporting Technology) data. In a word, it helps users quickly identify second-hand or fake SSDs.
how to check ssd health with crystaldiskinfo 
CrystalDiskMark – Measures the read/write speed of storage devices to evaluate performance. It helps you confirm your SSD/HDD configuration is correct after you transfer data from one internal hard drive to another.
raid 0 speed
After successfully using this method to transfer data from one internal hard drive to another, you can safely delete the original data to free up storage space and optimize your system’s performance.

Method 2. Manual Copy and Paste to Transfer Data from One Internal Hard Drive to Another

Suitable for transferring small files individually, though interruptions may cause data loss
While professional cloning software offers the most robust solution, you can also transfer data from one internal hard drive to another using the traditional copy-paste method. This approach works best when you need to transfer data from one internal hard drive to another for smaller amounts of information, typically under 30GB.
The manual method to transfer data from one internal hard drive to another is free and straightforward, but it comes with limitations. Large file transfers can be time-consuming and prone to errors, and any interruption during the process might result in incomplete data transfer.
Step 1: Prepare the destination drive for data transfer.
Navigate to your new internal hard drive and either select an empty partition or create a new one specifically for the data you’re planning to transfer from one internal hard drive to another.
Step 2: Select the data you want to transfer.
Open your source internal hard drive and choose the files you need to move. You can press Ctrl + A to select everything or choose specific files and folders to transfer data from one internal hard drive to another selectively.
To see hidden files in Windows File Explorer, make sure your settings are configured to display them. In File Explorer,go to View > Options > Show hidden files

file explorer hidden items

Step 3: Execute the copy operation.
Right-click on your selected files and choose “Copy” to begin the process of preparing to transfer data from one internal hard drive to another.
Step 4: Complete the transfer process.
Navigate to your destination drive and right-click in the target location, then select “Paste” to finalize the transfer of data from one internal hard drive to another.
The main challenge with this method is verification. After you transfer data from one internal hard drive to another manually, you’ll need to check each file individually to ensure the transfer was successful, which can be extremely time-consuming for large amounts of data.

Method 3. Windows Easy Transfer for Internal Hard Drive Data Migration

Compatible with Windows 8/7 for transferring data from internal hard drives to external drives
Windows Easy Transfer was a built-in tool for older Windows versions (8 and 7) to transfer data to external drives. It is no longer supported in Windows 10 and 11. For modern systems, use professional cloning software or manual transfer via an external drive. (ref: https://support.microsoft.com/en-us/windows/move-your-files-to-a-new-windows-pc-using-an-external-storage-device-dd139b2e-bc73-4431-8e6e-c96e10dffdf5)
Windows Easy Transfer provides a built-in solution for users who want to transfer data from one internal hard drive to another, particularly when moving data to external storage. This tool was designed specifically to help users migrate their files and settings, though it’s important to note that this feature is only available on Windows 7 and 8 systems.
Ensure an external USB drive with sufficient space is connected.
How to use the Windows Easy Transfer feature to transfer files and settings
This method works exceptionally well when you need to transfer data from one internal hard drive to another external drive, freeing up space on your internal storage while maintaining access to your files.
Step 1: Access Windows Easy Transfer.
Click the Start button and type “Windows Easy Transfer” in the search box. Launch the application to begin the process of transferring data from one internal hard drive to another location.
Step 2: Configure the transfer destination.
Select your external hard drive as the target location where you want to transfer data from one internal hard drive to another storage device.
Step 3: Set up the transfer parameters.
Choose “No” when asked if this is your new computer, as you’re setting up the external drive to receive data from your internal hard drive.
Windows Easy Transfer will automatically handle the process to transfer data from one internal hard drive to another storage location, including your personal files, settings, and user accounts.

Method 4. Use Renee PassNow to transfer or recover data if system fails

You’ll need a working computer to create the bootable USB.

If your Windows system fails to boot due to a blue screen, bootable data recovery software is essential. Tools like Renee PassNow, Disk Drill, and R-Studio Emergency allow you to create a bootable USB or CD/DVD to access and recover data. Boot your computer from this disk and utilize the software’s features to transfer or restore files.
In this chapter, we will take Renee PassNow as an example to show you how to trasnsfer data if system failed. Follow these steps:
Step 1: Install Renee PassNow on a functioning computer. Connect a USB drive to this PC, launch Renee PassNow, and select “Create a Live USB” in “Step 1: Choose the creation method”. Ensure all important USB drive files are backed up elsewhere, as this process will erase its contents.
Renee Passnow – Professional Windows Password Remover

Remove Windows Login Password 3 steps for whole password remove process.

Recover the files Recover the deleted files without Windows system.

Transfer the data Transfer the important files of the computer with system.

Multifuctional Data transfer, data recovery, bootable problem recovery can be run without system.

Highly compatible Windows 11/10/8.1/8/7/XP/Vista. UEFI boot.

Remove Login Password Support Windows 11/10/8.1/8/7/XP/Vista. UEFI boot.

Recover the files Recover the deleted files without Windows system.

Transfer the data Transfer the important files of the computer with system.

Free TrialFree TrialNow 2000 people have downloaded!
Step 2: Next, select (x64) or (x86) according to the system type, click the (Download Now) button to download the ISO file, click the (Create USB) button after the file is downloaded, and click the (Eject USB) button.
use renee passnow to create usb to reset passnword 
Step 3: Insert the boot device into the target computer, power it on, and immediately press the BIOS access key shown on-screen (note: the prompt may only appear for 1-2 seconds). Continuously tap this key to enter the BIOS settings. In the Boot Priority menu, set the USB drive as the primary boot device, save the changes, and reboot the computer.
select boot order 
Step 4: Wait for a while, after Renee PassNow is loaded, select (Data Transfer). If you need to transfer or backup the data of the entire hard disk, you can select the (Data backup) option.
data transfer
Step 5: Click on each disk drive letter (C/D/E/F, etc.) to verify no important files are missing. If all files are accounted for, transfer them to an external disk for safety. To move data, select the source drive (e.g., C) on the upper left, then the destination drive (e.g.,\ G) on the upper right. Choose the files from the source drive and click the “Copy” button in the middle to start the transfer. To delete a file, select it and press the “Delete” button, but remember this action is irreversible, so proceed with caution.
transfer data interface
Step 6: If you find that there is data loss, please select the (Undeleter) option on the main interface of the function, and click the (Run) button.
data recovery function in Renee PassNow 
Step 7: Select (Whole Disk Scan) to scan the target hard disk.
scan the whole partition with renee passnow recovery function to reinstall windows 7 
Step 8: After the scan completes, select the desired file for recovery and click “Recover” to start the restoration. Ensure to save the recovered file on a different external disk. Following a successful recovery, safely eject the\ U\ disk before continuing with further computer repairs.
preview before recovery 
After transferring or restoring the important data in the computer equipment, you can rest assured to repair or re-install your system.

Making the Right Choice to Transfer Data from One Internal Hard Drive to Another

This guide has presented 4 distinct approaches to transfer data from one internal hard drive to another, each suited to different scenarios and user needs.
MethodKey FeaturesCostBest Use Case
Professional Cloning SoftwareFull disk or partition transfer, data integrity, minimal riskPaid (varies by software)Comprehensive migrations between internal drives; large datasets
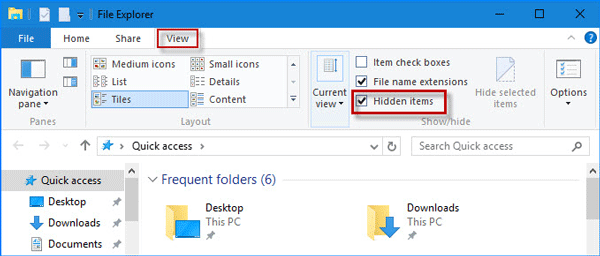
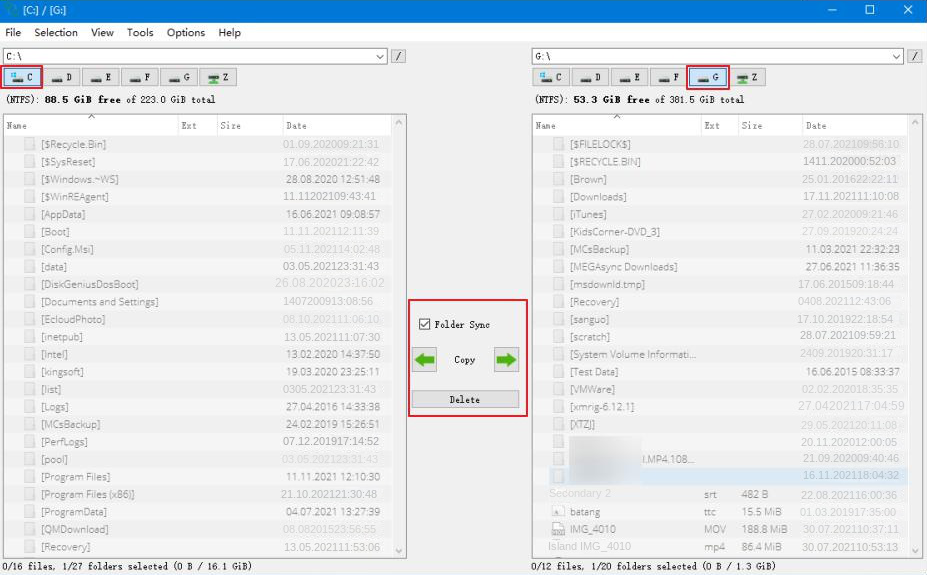
Manual Copy and PasteSimple and free; transfers selected files and foldersFreeSmall file transfers (total file size ≤ 30GB); quick one-off copies
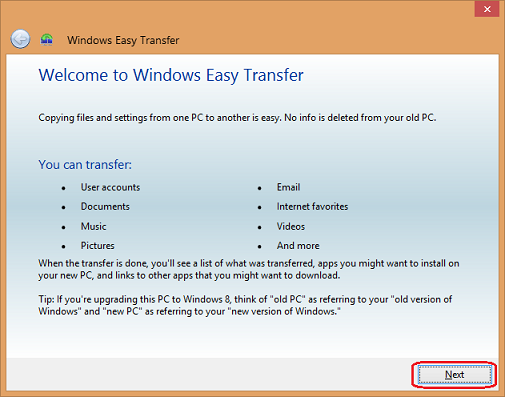
Windows Easy TransferBuilt-in tool for older Windows versions; external device transfer only; Only support Windows 7/8Free (built-in)Migrating user data on legacy systems; transferring to external drives
Renee PassNowAccess and recover data even if Windows system failsPaidEmergency recovery from non-bootable systems; data rescue scenarios
Professional Cloning Software stands out as the most comprehensive solution to transfer data from one internal hard drive to another. It provides complete data integrity, supports both full disk and partition-specific transfers, and eliminates the risk of data loss during the process.
Manual Copy and Paste offers a cost-free method to transfer data from one internal hard drive to another, but it’s best reserved for smaller amounts of data. The risk of interruption and the time required for large transfers make this method less suitable for comprehensive data migration.
Windows Easy Transfer serves as a reliable built-in option for older Windows systems, particularly when you need to transfer data from one internal hard drive to another external storage device.
Renee PassNow help you to transfer important data event Windows system is failed.
For users seeking the most reliable and efficient way to transfer data from one internal hard drive to another, professional cloning software provides the optimal balance of speed, security, and comprehensive features.

Frequently Asked Questions

How can I transfer my Windows 10/11 installation from HDD to SSD without losing data?
The most effective method to transfer data from one internal hard drive to another while moving Windows 10/11 is using professional cloning software. This approach ensures your SSD remains bootable after the transfer and preserves all your system settings and applications.
What’s the best way to transfer data from an old hard drive to a new SSD?
Complete disk cloning represents the optimal solution to transfer data from one internal hard drive to another, especially when migrating to an SSD. This method moves your entire operating system, applications, and settings, eliminating the need for reinstallation while ensuring your new SSD is immediately bootable.
How do I move files from my C drive to D drive?
You can transfer data from one internal hard drive to another drive partition by selecting files, right-clicking to copy or cut them, then navigating to the D drive and pasting. However, for system files and large amounts of data, cloning provides a more reliable method to transfer data from one internal hard drive to another without risking data loss or requiring Windows reinstallation.
Renee Becca – Safe and Quick System Migration to SSD

Automatic 4K alignment Improves SSD performance during system migration.

Support GPT and MBR Automatically adapt to the suitable partition format.

Support NTFS and FAT32 Redeploy various files in different file systems.

Back up quickly Back up files at up to 3,000MB/min.

Overall backup schedule Support system redeployment/system backup/partition backup/disk backup/disk clone.

Automatic 4K alignment Improve SSD performance

Support GPT and MBR Intelligently adapt to a partition format

Support NTFS and FAT32 Redeploy files in different file systems

Free TrialFree TrialNow 56337 people have downloaded!