author avatar
    Senior Program Developer
 

Summary
Upgrade your computer's performance by transitioning from Mechanical HDD to SSD. This article will guide you through the process, from preparation steps to adjusting boot priority and optimizing SSD performance. Learn how to transfer hard drive to ssd for both Windows and MacOS with ease.


Upgrading your computer’s hard drive to a solid state drive (SSD) can significantly improve its performance and speed. With no moving parts and lightning-fast read/write speeds, SSDs have become the go-to choice for many computer users. However, making the switch from a traditional hard drive to an SSD can be intimidating, especially when it comes to transferring all your data and operating system. In this chapter, we will guide you through the process of verifying the SSD’s capacity to ensure that it can accommodate all your important data and operating systems for both Windows and Mac OS. Let’s dive in and make your transition to an SSD seamless and hassle-free.

Verifying SSD Capacity

Before transferring your hard drive data to an SSD, it is important to ensure that the SSD has enough capacity to accommodate your data and operating system. This will help prevent any potential issues during the transfer process and ensure that your new SSD is able to function properly.
Step 1: Check the capacity of your current hard drive by opening “This PC” on your Windows computer or “About This Mac” on your Mac computer. This will give you an idea of how much space your current hard drive is using.
Step 2: Determine the capacity of the SSD that you plan to transfer your data to. You can check this by opening the “Properties” or “Info” tab for the SSD.
select Properties to view the used space
Step 3: Compare the capacity of your hard drive with the capacity of the SSD. It is important to note that the capacity of the SSD must be larger than the space currently being used on your hard drive. This will ensure that all of your data can be transferred without any issues.
You may try to use “Disk Cleanup” function in “Properties” page to remove unnecessary files to save space.
Step 4: If the SSD has enough capacity, you can proceed with the transfer process. If not, you may need to consider purchasing a larger SSD or freeing up space on your current hard drive to reduce the amount of data that needs to be transferred.
Verifying the capacity of your SSD is a crucial step in transferring your hard drive data. It ensures that your SSD is able to accommodate all of your data and operating system, preventing any potential issues during the transfer process. Be sure to compare the capacities of your hard drive and SSD before proceeding with the transfer. Next, we will discuss how to clone your existing HDD onto the new SSD using Renee Becca without having to reinstall the operating system.

For Windows User : Using Renee Becca to Clone your existing HDD onto the new SSD

If you are a Windows user looking to transfer your hard drive to a new SSD, the process may seem daunting at first. However, with the help of Renee Becca, a free backup and clone software, the task becomes much simpler. This method allows you to clone your existing HDD onto the new SSD without having to reinstall the operating system, saving you both time and effort.
Renee Becca is a tool specially used for system/hard disk data backup and restoration. It can help you back up and restore important data in your computer, such as programs, system configuration, emails, photos, videos, documents, bookmarks, etc. In addition, you can also use it to clone disk and system data. The software provides three cloning methods, including hard disk cloning/cloning system hard disk; partition cloning and system migration. You can choose the most suitable cloning method according to your different needs.
Here is a guide on how to use Renee Becca for cloning your HDD to an SSD:
Step 1:Download and Install Renee Becca
Start by downloading Renee Becca and follow the instructions to install it onto your computer. It is important to note that this method only works for Windows operating systems, so Mac users will need to refer to the subsequent chapters for alternative methods.
Renee Becca - Reliable Data Backup & Restore Software

Quick Backup files at up to 3,000MB/min.

Fullfill different backup needs Supports system backup, disk / partition backup, file backup and disk clone.

Intelligent Automatically analyze the differences between source and backup data.

Convenient Support VSS, allowing to freely view webpages when backing up system.

Highly compatible Supports various files and storage devices.

Quick Backup files at up to 3,000MB/min.

Fullfill different backup needs Backup for disk, partition and system. Save disk space by backing up incremental /differential data.

Highly compatible Supports various files and storage devices.

Free TrialFree Trial 2000 users have downloaded and enjoy Renee Becca!
Step 2:Connect your new SSD
Connect your new SSD to your computer using an adapter if necessary. Once connected, ensure that it is recognized by your computer before proceeding with the cloning process.
transfer hard drive to ssd
Step 3:Open Renee Becca and Select Clone Disk
Open Renee Becca and select the “Clone” option from the main menu. This will bring you to a screen with four different cloning options. Choose “Disk Clone” to clone the entire contents of your HDD.
clone function of Renee Becca
Step 4:Select Source and Target Disks
In the next step, you will need to select your HDD as the source disk and your SSD as the target disk. Ensure that you have selected the correct disks before moving on to the next step.
select the source and target disk
Step 5:Start Cloning Process
Once you have selected your options, click on “Clone” to begin the cloning process. This may take some time depending on the size of your HDD, so be patient and do not interrupt the process.
Step 6:Restart Your Computer
Once the process is complete, you will need to restart your computer and enter the BIOS. Please refer to the subsequent chapters to adjust the boot priority in your computer’s BIOS to ensure that it boots from the new SSD.
Summary: In summary, using Renee Becca to clone your HDD onto a new SSD is a simple and efficient method for Windows users. It eliminates the need for a clean install of the operating system and allows you to transfer all of your data, programs, and settings to the new SSD. However, it is important to make sure that the capacity of your SSD is equal to or greater than your HDD and to double check all steps before proceeding to avoid any potential issues.
Pros:
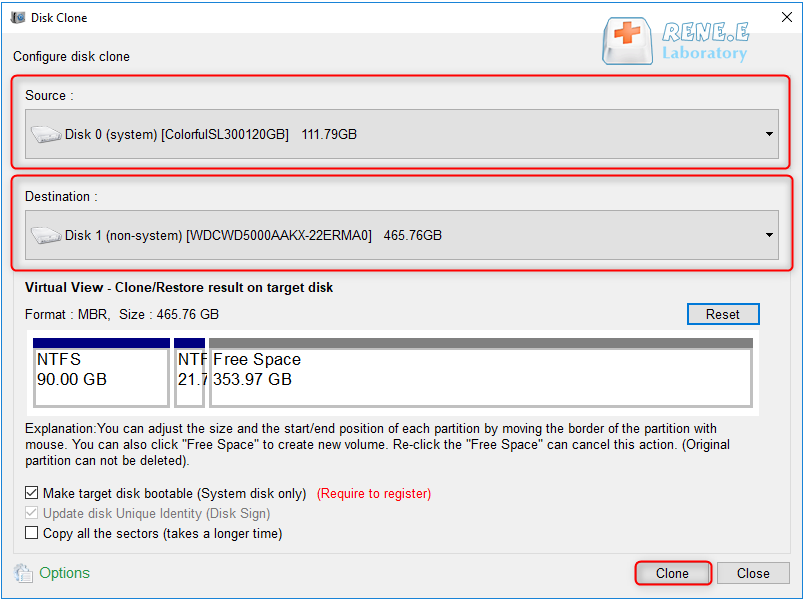
  • Provides a reliable alternative to clone HDD to SSD
  • Offers an intuitive interface and step-by-step instructions
  • Simplifies the process of cloning a hard disk

Cons:

  • Doesn't have a Mac version.Paid subscription required for full access to all features.
  • Paid subscription required for full access to all features.

Next, Mac users can refer to the subsequent chapters for alternative methods on how to transfer their hard drive to an SSD in MacOS.

For Mac OS User: Transfer Hard Drive to SSD in MacOS

Transitioning your Mac from an HDD to an SSD is a straightforward process that can breathe new life into your system. The core idea involves creating a fresh installation of macOS on the SSD and then safely migrating your data without loss or corruption. As a Mac OS user, this upgrade is not just about increased storage but also significant performance improvements.
Step 1: Use Time Machine or another backup solution to create a current backup of your data to an external drive. This step protects against data loss during the transfer process.
Use Time Machine
Step 2: Boot from a macOS installer, which can vary based on your operating system version.
For macOS 10.7 or later, use the recovery partition on your original drive; for more recent models like the Aura Pro X2, Aura Pro X, and Aura N SSDs, you will need to boot using 
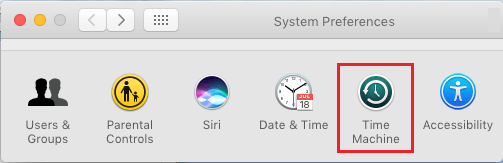
Command + Option + R or via a USB installer created with a utility like DiskMaker X.
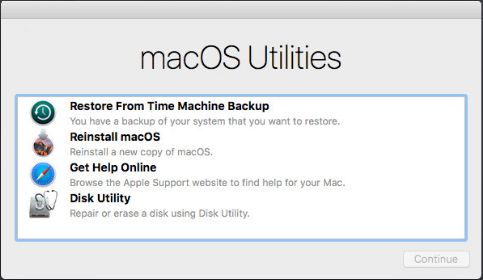
Step 3: After booting into the recovery environment, open Disk Utility.
For macOS 10.12.6 and earlier, directly select the newly installed SSD and navigate to the “Erase” tab. For macOS 10.13 and later, you may need to select “Show all Devices” from the View button to ensure the SSD is visible for formatting. Set the format to “Mac OS Extended (Journaled)” for HDDs and “APFS” for SSD boot drives. Assign a new name different from the drive being replaced, then click “Erase.
open Disk Utility
Step 4: Decide whether to perform a fresh macOS install or restore from Time Machine. A clean install is preferable for setting up the SSD with a recovery partition. Follow the installer prompts, ensuring you select the newly formatted SSD as the destination.
Step 5: Once the OS installation is complete, use the Migration Assistant during the initial setup to migrate data from Time Machine or another source. If you miss this step, access Migration Assistant within the Utilities folder later. Select the relevant user accounts, applications, files, and settings to transfer, then initiate the process.
Step 6: When the migration is done, complete the setup. Your Mac should boot to the login screen or desktop. Check for immediate macOS updates and install them to ensure system stability and performance. Follow the regular updating process based on your OS version (some versions require you to open the App Store application, others can be updated by choosing Apple > Software Update). Restart if necessary and repeat the process until there are no more updates.
Step 7: If you are using macOS 10.12 or later, skip this step. For Mac OS X 10.6-10.11, use Disk Utility to repair permissions on your new SSD. Select the new macOS volume, navigate to the “First Aid” tab, and click on “Repair Disk Permissions“.
Step 8: Double-check your files and applications to ensure correctness and functionality. You might need to re-authorize some applications or, in very rare instances, reinstall them. Confirm that everything is working as expected before proceeding.
Step 9: Celebrate the completion of your upgrade process. With your data correctly transferred and your system updated, you can either repurpose the old drive for additional storage or archive it.
clone hdd in Mac
In summary, upgrading from an HDD to an SSD on a Mac involves verifying SSD compatibility, data backup, SSD installation, and choosing between a fresh OS installation or a Time Machine restore – ideally the former for a cleaner setup. Data migration is streamlined with Apple’s Migration Assistant, and permission repairs and system updates ensure a smooth transition.
Pros:
  • Faster performance
  • Increased reliability
  • Potential extension of Mac's usable life

Cons:

  • Incorrect installation or data transfer process can lead to data loss or system issues

Set SSD as Boot Drive in BIOS

After completing the cloning process from your hard drive to your new SSD, the next step is to adjust the boot priority in your computer’s BIOS to ensure that it boots from the new SSD.
Step 1: Restart your computer and enter the BIOS by pressing the designated key on your keyboard during startup. This key varies depending on the manufacturer of your computer or laptop, but it is commonly the F2, DEL, or ESC key.
Common Server:
Server TypeEnter boot menu method
DELLPress the F12 key repeatedly before the Dell logo appears on the screen.
HPPress the F9 key multiple times when the HP logo is displayed.
Common Computers:
BIOS NameEnter boot menu method
ASRockDEL or F2
ASUSDEL or F2 for PCs/ DEL or F2 for Motherboards
AcerDEL or F2
DellF12 or F2
ECSDEL
Gigabyte / AorusDEL or F2
Lenovo (Consumer Laptops)F2 or Fn + F2
Lenovo (Desktops)F1
Lenovo (ThinkPads)Enter then F1
MSIDEL
Microsoft Surface TabletsPress and hold Power and Volume Up buttons
Origin PCF2
SamsungF2
ToshibaF2
ZotacDEL
HPEsc/ F9 for `Boot Menu`/ Esc/ F10/ Storage tab/ Boot Order/ Legacy Boot Sources
INTELF10
Step 2: Once in the BIOS, navigate to the “Boot” tab using the arrow keys on your keyboard.
Step 3: If your computer uses Legacy BIOS, change the boot order to set the SSD as the first boot device. To do this, select the SSD using the arrow keys and press “Enter” to move it to the top of the boot order list.
change the boot order
Step 4: If your BIOS mode is UEFI, select the SSD as the primary boot drive. To do this, navigate to the “Boot” tab and look for an option called “UEFI Boot” or “Boot Mode“. Select the SSD from the list of available drives.
change boot order in UEFI BIOS utility
Step 5: Save the changes and exit the BIOS by pressing the designated key on your keyboard. This is usually the F10 key.
By setting the new SSD as the boot drive, you are ensuring that your system will boot from the faster and more efficient drive, resulting in improved performance and speed. However, if you encounter any boot issues after following the above steps, you may need to consult your computer or laptop manual for specific instructions on how to configure the BIOS settings for your particular model.
In summary, adjusting the boot priority in the BIOS is an essential step in transferring your hard drive to an SSD. It ensures that your computer will boot from the new SSD and that you will experience faster speed and improved performance. However, it is crucial to ensure that the partition structures are the same on both disks and that the correct boot mode is set (Legacy BIOS for MBR partition style, and UEFI for GPT).
To further improve your SSD performance and longevity, it is recommended to implement optimization techniques for both Windows and MacOS, which will be covered in subsequent chapters.

Implement SSD Optimization Techniques for Sustained High Performance and Longevity

Solid State Drives (SSDs) have become increasingly popular due to their faster speeds, lower power consumption, and longer lifespan compared to traditional hard drives. However, to truly maximize the benefits of an SSD, it is important to implement optimization techniques that can improve performance and longevity. In this chapter, we will explore various methods and options for optimizing an SSD on both Windows and Mac OS.
Step 1: Enable TRIM Support
TRIM is a command that allows an operating system to inform an SSD which data blocks are no longer in use and can be wiped clean. This helps to maintain high performance levels and prolong the lifespan of an SSD.
On Windows, Type “cmd” in the search bar and right-click on “Command Prompt” to select “Run as Administrator“. In the command prompt, type

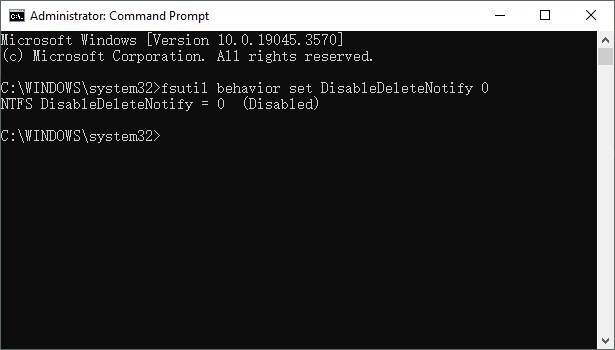
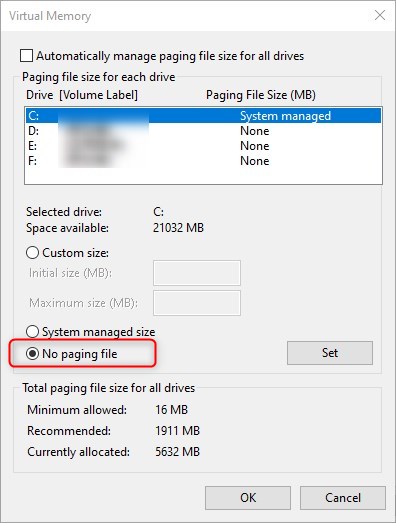
fsutil behavior set DisableDeleteNotify 0

and press Enter.
Enable TRIM Support
For Mac OS, TRIM is automatically enabled for Apple-branded SSDs. For third-party SSDs, use a third-party utility such as “Trim Enabler” or “Disk Sensei” to enable TRIM support.
Enable TRIM Support in Mac
Step 2: Optimize Power Settings
SSDs do not require the same amount of power as traditional hard drives, therefore, it is important to optimize power settings to ensure maximum performance and longevity.
On Windows, go to “Control Panel” > “Power Options” and select “High Performance” mode.
select High Performance mode
For Mac OS, go to “System Preferences” > “Energy Saver” and disable “Put hard disks to sleep when possible“.
disable Put hard disks to sleep when possible
Step 3: Disable Indexing
Indexing is a system process that creates an index of files on the hard drive to improve search performance. However, since SSDs already have fast access times, indexing can actually decrease performance and cause unnecessary wear on the drive.
On Windows, open “My Computer“, right-click on your SSD, select “Properties“, and uncheck “Allow files on this drive to have contents indexed in addition to file properties“.
Allow files on this drive to have contents indexed in addition to file properties
For Mac OS, go to “System Preferences” > “Spotlight” and uncheck “Indexing” for your SSD.
Step 4: Move System Files to HDD
While an SSD can provide faster boot and load times for the operating system and frequently used applications, it is not necessary for system files and other less frequently accessed files to be stored on the SSD. Moving these files to a traditional hard drive can free up space on the SSD and prolong its lifespan.
If using Windows, go to “Control Panel” > “System and Security” > “System” > “Advanced System Settings” > “Advanced” > “Settings” under “Performance” > “Advanced” > “Change” > “No paging file” for your SSD.
Move System Files to HDD in Windows
For Mac OS, open “Finder” and navigate to “Library” > “Caches” and move the cache folder to your HDD.
Move System Files to HDD in macos
Step 5: Maintain Proper Storage Capacity
It is important to maintain a reasonable amount of available storage space on an SSD. Overfilling the drive can lead to decreased performance and a shorter lifespan. As a general rule of thumb, it is recommended to keep at least 10% of the drive’s capacity free.
Use a third-party utility “Disk Cleanup” for Windows to regularly remove unnecessary files and free up space on the drive.
Use a disk cleanup tool
Use a third-party utility “Disk Doctor” for Mac OS.
Disk Doctor for MacOS
Step 6: Enable AHCI Mode
AHCI (Advanced Host Controller Interface) is a mode that allows SATA drives, including SSDs, to run at their full speed potential.
On Windows, right-click on “Computer” > “Manage” > “Device Manager” > “IDE ATA/ATAPI controllers” and make sure the driver is listed as “Standard AHCI 1.0 Serial ATA Controller“.
Enable AHCI Mode in Windows
For Mac OS, click on the “Apple” icon and select “About This Mac” > “System Report” > “SATA/SATA Express” and make sure your SSD is using an “AHCI” interface.
Summary
In summary, implementing SSD optimization techniques can ensure sustained high performance and longevity for both Windows and Mac OS. By enabling TRIM, optimizing power settings, disabling indexing, moving system files to a HDD, maintaining proper storage capacity, and enabling AHCI mode, you can make the most out of your SSD and enjoy its benefits for a longer period of time. However, it is important to note that enabling these techniques may vary depending on your specific system and hardware configuration. It is recommended to do further research and consult with a professional if needed.

Conclusion

In conclusion, upgrading your computer’s performance by transitioning from an HDD to an SSD can greatly improve your experience. With careful preparation and the use of reliable software tools, you can easily clone your existing HDD onto the new SSD without having to reinstall your operating system. For Mac OS users, transferring the hard drive to an SSD is also a straightforward process. Just make sure to adjust the system’s boot priority in BIOS to boot from the new SSD after cloning. Once the transition is complete, you can further optimize your SSD’s performance and longevity for both Windows and Mac OS. With these steps, you can maximize your PC’s performance and enjoy a faster and more efficient computing experience. So don’t hesitate to make the switch from HDD to SSD and see the difference for yourself.