author avatar
    Senior Product Manager
 

Summary
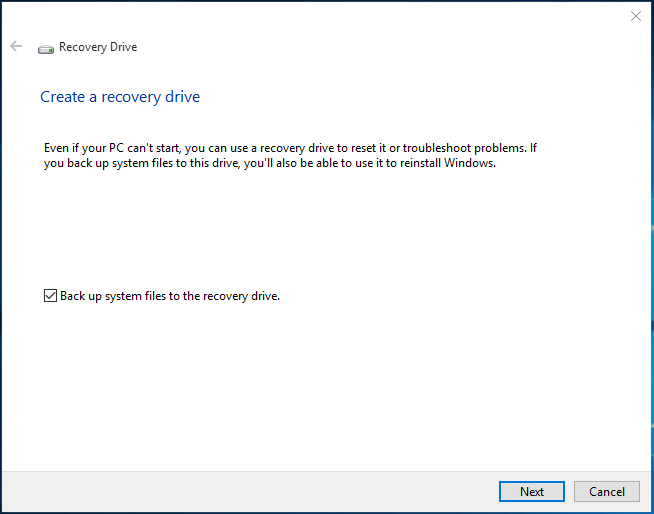
Although Windows 10 is a stable system, we sometimes meet with the applications conflicting with the system, and the improper operations can lead to many errors, such as black screen and abnormal startup. At these situations, you can create a Windows 10 recovery USB to restore the system. Let’s learn about how to do in this essay!


how to create windows 10 recovery usb drive

Part 1: What is Windows 10 Recovery Drive?

Recovery Drive is used to save the critical system installation files. When the system gets crashed, we can use the Windows 10 recovery USB to reinstall the system. But the Windows recovery USB drive doesn’t contain the personal files and the installed applications. If you save the important files in the computer, you should back up the data regularly. Besides, the Windows 10 recovery USB drive should not be below 16 GB.
Note: Please use the blank USB drive because all data will be emptied when the recovery USB drive is created on Windows 10.

Part 2: How to Create Windows 10 Recovery USB Drive?

The followings are more details.

1. How to Create Windows 10 Recovery USB Drive?

Step 1: Search [create a recovery drive] in the system.
Step 2: Then, check the option [Back up system files to the recovery drive] and click on [Next] to go on.
how to create a windows 10 recovery usb drive
Step 3: Connect the USB drive to the computer and click on [Next]. After that, click on [Create] when the system notifies that all personal files on the drive is going to be deleted.

2. How to UseRecovery USB Drive to Restore Windows 10?

When Windows 10 gets crashed, we can use the created recovery USB drive to restore the system. Here are the steps.
TipsDuring this process, the system files may be deleted. Please transfer the important data beforehand.
Step 1: Insert the Windows 10 recovery USB drive into the target system, and then get the computer started. Set the system to boot from the USB drive in BIOS. Next, press the key F10 to get the computer restarted.
Note: To learn about how to get into BIOS, you should check the product instruction provided by the computer suppliers.
Step 2: Select [US] under [Choose your keyboard layout].
Step 3: In [Choose an option], select [Troubleshoot].
Step 4: Select [Recover from a drive]. That will remove all your personal files and apps.
If you want to restore the system from the restore point, please select [Advanced Options] – [System Restore]. That will not remove the personal files, but the recently installed applications, drivers and updates will be deleted.
Step 4: Select [Just remove my files] to keep the PC or [Fully clean the drive] to recycle the PC. After that, follow the prompts to get the computer restarted.
These are the steps about how to restore the system with the Windows 10 recovery USB drive. If you need to transfer the important data, you can use Renee PassNow to transfer the data before the above operations.

Part 3: How to Transfer Data with Renee PassNow?

Renee PassNow is the professional system rescue software which can help Windows users clear the password, create new administrator account, restore the disk/SD card data, retrieve the formatted drive, transfer data and fix Windows problems. Besides, it can fix the MBR boot reocrd, the DBR error parameters, 0xc00000e, black screen and blue screen.
If you cannot get into the crashed system, you can use the professional software to transfer the system data. Renee PassNow is here to help you.
Renee Passnow – Professional Windows Password Remover

Remove Windows Login Password 3 steps for whole password remove process.

Enable/Create Administrator One click for creating new administrator and enable the disabled account.

Widely Use New version supports UEFI boot model, which can be used on more computers, laptops and even surfaces.

Multifuctional Data transfer, data recovery, bootable problem recovery can be run without system.

Highly compatible Windows 10/8.1/8/7/XP/Vista.

Remove Login Password 3 steps for whole password remove process.

Enable/Create Administrator One click for creating new administrator and enable the disabled account.

Easy to use No need of any professional knowledge or password reset disk.

Free TrialFree TrialNow 2000 people have downloaded!

1. Create Boot USB

Steps
Step 1: First, download and install Renee PassNow in another computer. Insert CD/DVD/USB. Then, run the software. Select one option from [Crate a Live USB] and [Create a Live CD]. It is noted that the data should be backed up well when you insert the USB into the computer.
Step 2: Next, select [x64] or [x86] according to your computer. After that, click on [Download Now] to download the licensed ISO. Remember to activate the software beforehand. After that, click on [Create USB] to create the boot media. Click on [Eject USB] when the boot USB is created.
use renee passnow to create usb to reset passnword

2. Transfer Data

You can follow these steps to transfer the important data to the other disks in case that it is lost during the restore process.
Step 1: Connect the boot USB to the target computer. Enter into BIOS and set the system to boot from the USB. Click here to learn about how to change the boot order.
Note: If the boot disk is a USB flash drive, select [Removable Devices] as the first boot option. If you use a CD, select [CD-ROM Drive].
steps to change the boot order in BIOS
Step 2: After that, click on [Data Transfer] when the software is loaded well.
data transfer
Step 3: Drag the target files from the source disk to the target disk to complete data transfer.
data transfer in Renee Passnow