author avatar
    Senior Product Manager
 

Summary
Learn how to use Windows 10 repair command prompts to fix common system failures, including startup issues, blue screen errors, and crashes.


windows 10 repair command prompt

I. What are the Windows 10 system repair commands? how to use?

Users have the option to utilize different system repair commands within the command prompt window (cmd.exe) in order to successfully repair their system. Below are some of the frequently used system repair commands that are available.
Before understanding the system repair command, we can understand the steps to open the command prompt window:
Find the “Search” button in the bottom left corner of your Windows 10 device. Type (cmd) into the search box and the “Command Prompt” application will appear on the page. Right-click on the command prompt and choose (run as administrator) to open the Command Prompt window.
run as administrator

1. System file scan and repair command

If you want to scan and repair system files, you can directly enter the (sfc /scannow) command in the command prompt window. The repair process may take a long time, please wait patiently.

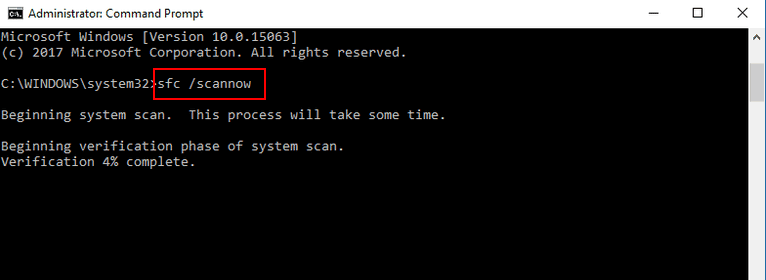
Click on sfc /scannow command for more information.

Check and fix system files Windows 10

2. Rebuild BCD and repair MBR commands

If Windows fails to start, it may be necessary to rebuild the boot configuration data and repair the master boot record file. In the command prompt window, try running the following commands one by one to fix the MBR and rebuild the BCD. Once the repair is finished, restart the computer to see if it can start normally.
● bootrec /fixmbr
● bootrec /fixboot
● bootrec /rebuildbcd
Rebuild BCD and Repair MBR commands

3. Check disk error command

Disk errors are a common cause of system failures in Windows 10. To effectively address these failures, one can check for disk errors. Simply enter the (chkdsk /r) command in the command prompt window and chkdsk will scan the hard disk for any logical errors or bad sectors. If a bad sector is detected, chkdsk will automatically repair it, but this may result in data loss. For instance, if we want to check the C: drive, we can enter (chkdsk /r C:) in the command prompt (where C: represents the drive letter).
check disk error command

4. Commands to scan and repair system files and system image files

scan system image file command
Enter the (Dism /Online /Cleanup-Image /ScanHealth) command in the command prompt window to scan all system files and system image files to check for damage.
You can also use the command (Dism /Online /Cleanup-Image /CheckHealth) to verify the integrity of the system image file. This will determine if the image is in good condition, if it can be repaired, or if it needs to be discarded and started over. If the image is repairable, you can use the /RestoreHealth parameter to restore it.
Scan all system files and system image files command
repair image command
If the scan image command determines that the image can be repaired, the /RestoreHealth parameter can be utilized to restore the image. This can be done by using the mounted image as a repair source for an offline image. To do so, simply enter the following command at the command prompt: Dism /Image:C:\offline /Cleanup-Image /RestoreHealth /Source:c:\test\mount\windows.
Alternatively, if you want to fix your online image without relying on Windows Update, you can use your own sources by entering the following command at the command prompt: Dism /Online /Cleanup-Image /RestoreHealth /Source:c:\test\mount\windows /LimitAccess. If you are unfamiliar with how to use these sources, you can learn more about them here.
restore command
That’s all there is to it when it comes to Windows 10 system repair commands and their functions. If you have limited knowledge of these commands or are not comfortable using the command prompt, you may run into issues when trying to restore your system. Inputting incorrect commands or making mistakes while operating can lead to further problems with your system. To avoid this, we recommend using Renee Passnow, a user-friendly software designed specifically for system repair. This tool is perfect for beginners. Let’s dive into the step-by-step instructions below.

II. How to use Renee Passnow to repair Windows 10 system?

1. What is Renee Passnow?

Renee PassNow is a professional system rescue software, which can help Windows users clear Windows account passwords, create new administrator accounts; restore disk/memory card data, recover data after hard disk formatting; transfer disk files; erase or scan disk files wait. In addition, this software also supports repairing Windows system problems, such as: repairing MBR boot records, DBR error parameters, 0xc00000e, Windows system startup failure, and some problems that cause black screen or blue screen, etc.
As a system rescue tool with various functions, it is perfectly compatible with multiple systems including Windows 10/8.1/8/7/XP/Vista.
Renee PassNow – Professional Windows System Rescue Tool

Remove Windows Login Password 3 steps for whole password remove process.

Recover the files Recover the deleted files without Windows system.

Transfer the data Transfer the important files of the computer with system.

Fix Windows startup error Fix various Windows startup failures or crashes.

Erase disk Completely erase disk files which will not be restored.

Remove Windows Login Password 3 steps for whole password remove process.

Recover the files Recover the deleted files without Windows system.

Transfer the data Transfer the important files of the computer with system.

Free TrialFree TrialNow 2000 people have downloaded!

2. How to use Renee Passnow to repair Windows 10 system?

Repairing Windows 10 system with Renee Passnow is very simple. Even if you are a computer novice, you can learn how to operate it in a few minutes. Let’s learn the detailed steps together.
Step 1: Download and install Renee Passnow on other computers that can log in and run normally, then connect the external USB disk to the PC through the USB port, run Renee Passnow, and then check the (Create a Live USB) option.

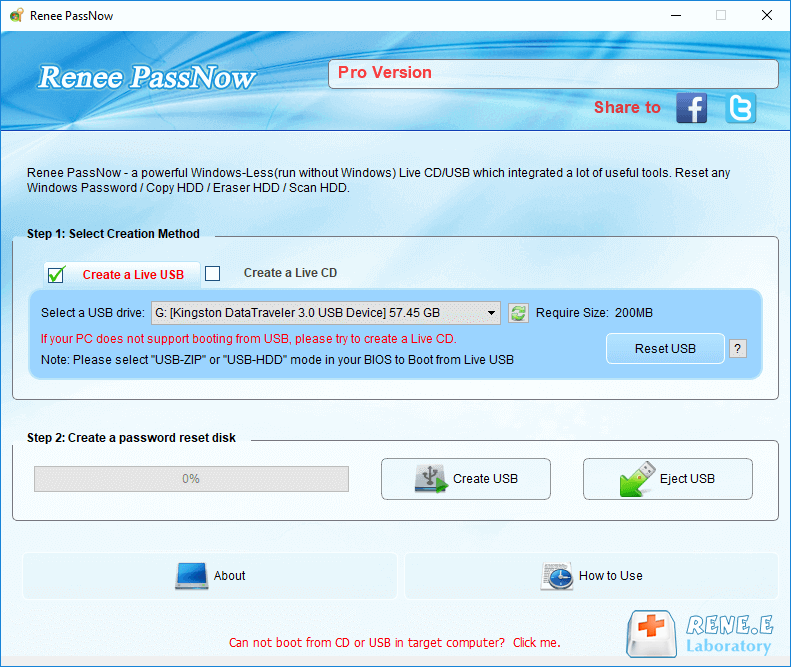
Note: Before performing this operation, please make sure that the important files in the USB disk have been saved in other locations because the operation will delete all the data in the USB disk.

create a boot media with renee passnow
Step 2: Next, select (x64) or (x86) according to the system type, click the (Download Now) button to download the ISO file, click the (Create USB) button after the file is downloaded, and click the (Eject USB) button.
use renee passnow to create usb to reset passnword
Step 3: Connect the created boot USB to the PC that needs to repair the system.

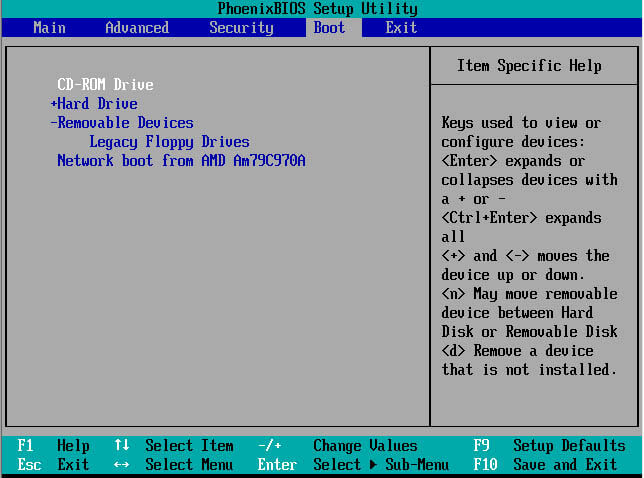
Turn on the computer, and then the shortcut key to enter the BIOS will be displayed on the computer screen (the display time of this interface is very short, maybe only one or two seconds, and need to concentrate on checking the computer manual to find out the BIOS shortcut key), click the BIOS shortcut key continuously to enter the BIOS setting interface, in the BIOS (Boot) interface, set the USB device or CD-ROM drive as the preferred boot item Save and exit. Please refer to: How to enter BIOS and modify the boot order.

Note: If you create a rescue USB disk, select (Removable Devices) as the first boot item, and if you create a rescue CD, select (CD-ROM Drive) as the first boot item.
change boot order in BIOS menu
Step 4: Wait for a while, after Renee Passnow is loaded, select the (Windows Recovery) option.
use renee passnow to fix errors when you cannot get into windows 10
Step 5: Then in the pop-up window, you can choose (repair CHS parameter in MBR) or (repair DiskSign in BCD file) option according to the system.

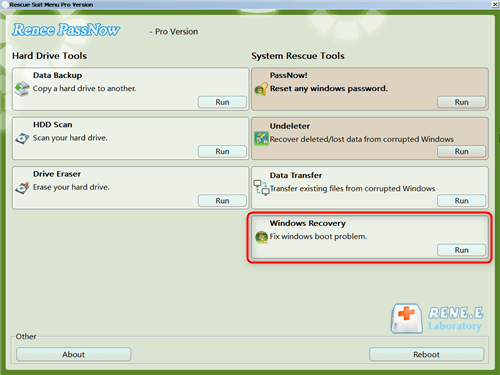
To repair the Windows 10 system, select the following (BCD file repair DiskSign). After the system is repaired successfully, eject the USB disk and restart the computer.