author avatar
    Senior Product Manager
 

Summary
Learn how to fix the stuck status bar in Windows 10 and recover data in case of computer failure, with comprehensive guidance and solutions.


windows 10 taskbar frozen

I. What are the reasons for the stuck status bar of Windows 10?

The taskbar of the Windows operating system refers to the operation window at the bottom of the computer screen. With it, you can locate and launch programs through the Start menu, or view currently open programs.
However, when the taskbar isn’t working properly, you won’t be able to use it for a range of things like enabling the start menu, searching for apps, viewing notifications, and more. Unresponsive Windows 10 taskbar can be caused by various reasons, such as system update errors, corrupted system files, corrupted user account files, etc. Luckily, we found some ways to fix frozen and unresponsive taskbar. We continue to learn.

II. How to solve the problem that the Windows 10 status bar is stuck?

1. Restart Windows Explorer

The operation steps to restart Windows Explorer are relatively simple, the specific method is as follows:
Simultaneously press the (Ctrl + Shift + Esc) keys on your computer keyboard to open the Task Manager window. Then select the (Windows Explorer) option in the (Process) window, and click the (Restart) button to execute the restart command. If the status bar is still not working, try the other solutions below.
restart Process In Task Manager

2. Use the SFC /scannow command to check and repair damaged system files

When the file system is damaged, it may also cause the status bar to be stuck. At this time, you can use the SFC /scannow command to try to repair, the specific operation steps are as follows:
Step 1: When the task is stuck and cannot be searched, you need to click (Windows icon) or press (Ctrl+ESC) keys at the same time to open the start menu. Next, find the (Command Prompt) app under (Windows System) and open it.
Windows 10 open command prompt
Step 2: In the opened command prompt window, enter the command (SFC /scannow) and press the (Enter) key. Next, System File Checker will perform a system scan and fix problematic system files. After the repair is complete, restart the computer to see if the problem is resolved.
Enter the SFC command

3. Enable User Manager

In addition, the freezing of the Windows 10 taskbar may also be caused by the user manager being disabled. At this time, you can try to re-enable it to solve the problem. Specific steps are as follows:
Step 1: Press the (Windows+R) key at the same time to open the “Run” window, then enter the (services.msc) command and click the (OK) button.
open service window
Step 2: In the “Services” window, find and double-click the (User Manager) option.
Step 3: Check whether the “Startup Type” is an (automatic) option. If it is disabled, it is recommended to select the (automatic) option to open the service. Restart your computer afterward to see if the problem is resolved.
en_userManagerServiceSetAuto
The above are three commonly used methods to solve the stuck status bar. Data loss is likely to occur when the status bar is stuck and you cannot enter the system or use applications normally. At this time, if you want to restore lost data or back up important files, you can use Renee Passnow to solve it.

III. (Extended reading) How to restore or backup data when the status bar is stuck and cannot enter the system?

1. What is Renee Passnow?

Renee Passnow It is a professional system rescue software, which can help Windows users clear Windows account passwords, create new administrator accounts; restore disk/memory card data, recover data after hard disk formatting; transfer disk files; erase or scan disk files ; Repair Windows system problems, etc. In addition, this software also supports repairing Windows system problems, such as: repairing MBR boot records, DBR error parameters, 0xc00000e, Windows system startup failure, and some problems that cause black screen or blue screen, etc. As a system rescue tool with various functions, it is perfectly compatible with multiple systems including Windows 10/8.1/8/7/XP/Vista, and can meet the system rescue needs of different users.
Hot Topic - ADsRenee PassNow – 3 Steps to transfer data from the crashed system

Easy to use 3 steps to transfer the files.

Transfer the files Transfer the important files of the computer without system.

Preview the files Preview the files while transferring the data.

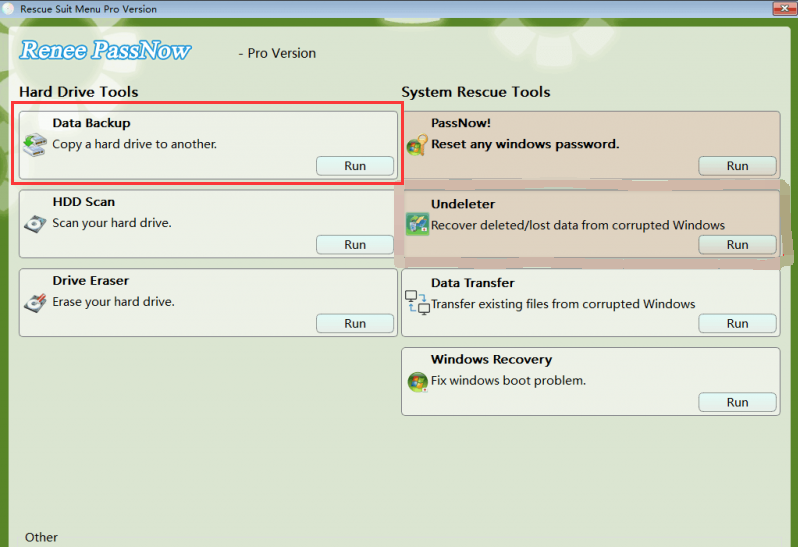
Multifuctional Data recovery, Windows password reset, bootable problem recovery can be run without system.

Highly compatible Windows 10/8.1/8/7/XP/Vista. Also supports UEFI boot mode.

Easy to use 3 steps to transfer the files.

Transfer the files Transfer the important files of the computer without system.

Preview the files Preview the files while transferring the data.

Free TrialFree TrialNow 2000 people have downloaded!

2. How to use Renee Passnow to restore or backup data?

Restoring or backing up system data with the help of Renee Passnow is very simple, even if you are a computer novice, you can easily operate, let’s learn the detailed steps together.
Steps to create a boot disk:
Step 1: Download and install Renee Passnow on other computers that can log in and run normally, then connect the external U disk to the computer, run Renee Passnow, and then check (Create a rescue USB disk) option. (Note: Before performing this operation, please make sure that the important files in the U disk have been saved in other locations, because the operation process will delete all the data in the U disk.)
Step 2: Next, select (x64) or (x86) according to the system type, click the (Download Now) button to download the ISO file, click the (Create Rescue USB) button after the file is downloaded, and click the (Eject USB) button.
use renee passnow to create usb to reset passnword
Step 3: Connect the created boot device to the Windows 10 device that needs to restore data, turn on the computer, and then the shortcut key to enter the BIOS will be displayed on the computer screen (the display time of this interface is very short, maybe only one or two seconds, it needs Concentrate on checking, you can also check the computer manual to determine the BIOS shortcut key), click the BIOS shortcut key continuously to enter the BIOS setting interface, in the BIOS (Boot) interface, after setting the USB device or CD-ROM drive as the preferred startup item Save and exit.
Note: If you create a rescue U disk, select (Removable Devices) as the first boot item, if you create a rescue CD, select (CD-ROM Drive) as the first boot item. Different brands have different BIOS interfaces, which can be set according to the actual situation.
select boot order
Steps to recover data:
Step 1: After the computer is successfully booted from the rescue U disk, select the (Undeleter) option and click the (Run) button.
data recovery function in Renee Passnow
Step 2: Select (Partition Recovery) to scan the hard disk.
how to recover photos from sd card select the function fast partition scan in renee undeleter
Step 3: After the scan is complete, select the lost files you want to recover, click the (Recover) button to execute the recovery command, and save the files to other disks.
Steps to backup data:
Step 1: After starting the computer from the bootable USB flash drive, select the (data backup) option. This option is equivalent to completely cloning the hard disk to other hard disks. If you only need to back up some important files, you can also choose (Data Transfer ) option.
passnow data backup
Step 2: Select the hard disk to be backed up in the (source) list, select the target hard disk to save the file in the (destination) list, and finally click (clone) and wait for the cloning to complete to successfully back up the computer files. The data on the target hard disk may be cleared during the cloning process, so it is recommended to make a backup in advance.
Device backup data parameters