

[2025] How to Clone Your SSD to a New One Without Reinstalling Windows


Summary
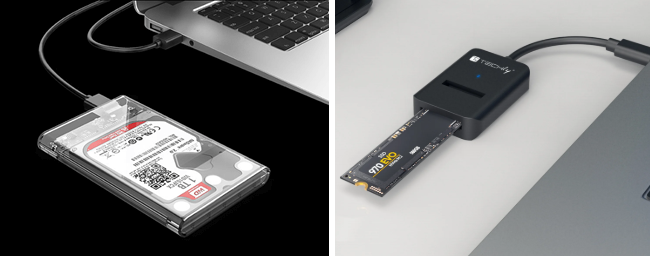
Easily clone your entire system—Windows OS, files, and applications—to a new SSD without reinstalling or losing data. This step-by-step guide ensures a smooth boot, zero downtime, and a frustration-free upgrade for first-time users.


Automatic 4K alignment Improves SSD performance during system migration.
Support GPT and MBR Automatically adapt to the suitable partition format.
Support NTFS and FAT32 Redeploy various files in different file systems.
Back up quickly Back up files at up to 3,000MB/min.
Overall backup schedule Support system redeployment/system backup/partition backup/disk backup/disk clone.
Automatic 4K alignment Improve SSD performance
Support GPT and MBR Intelligently adapt to a partition format
Support NTFS and FAT32 Redeploy files in different file systems
| Function Name | Feature | Suitable For |
|---|---|---|
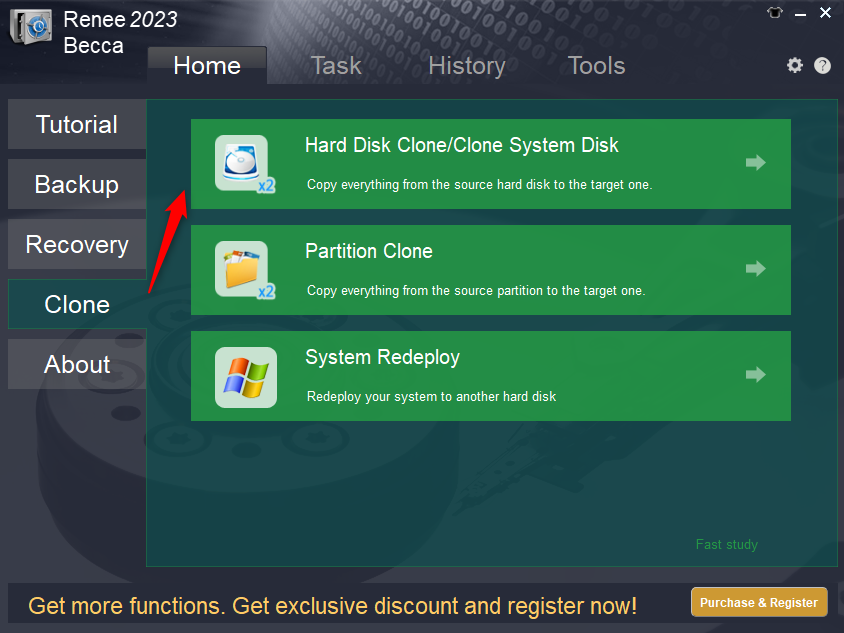
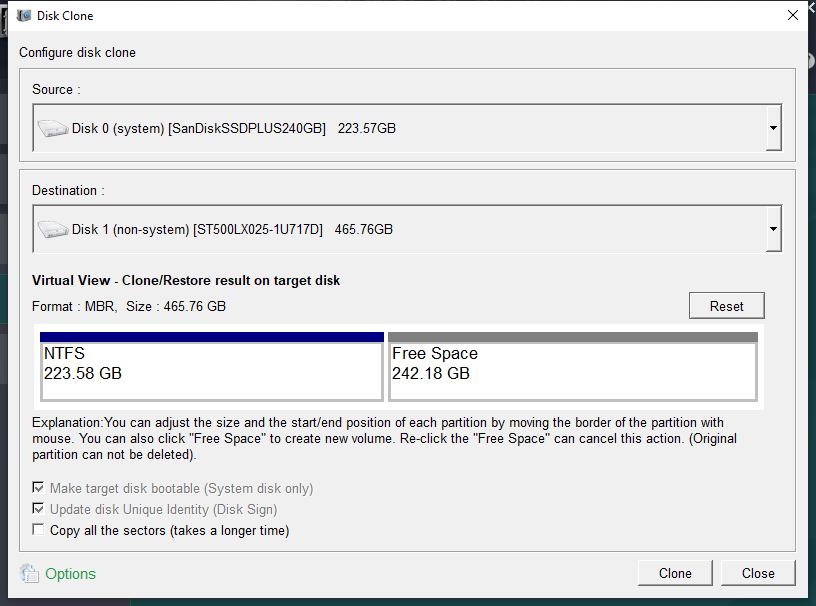
Hard Disk Clone/Clone System Disk | Creates an exact copy of the selected disk, supports adjusting partition size by moving the partition boundary with the mouse, and enables starting the cloned hard disk. | Complete SSD Replacement |
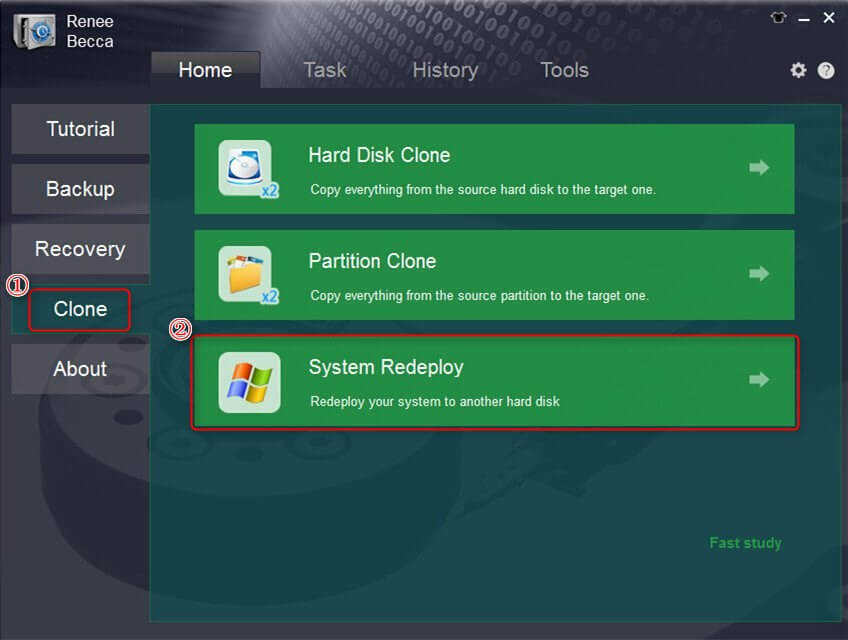
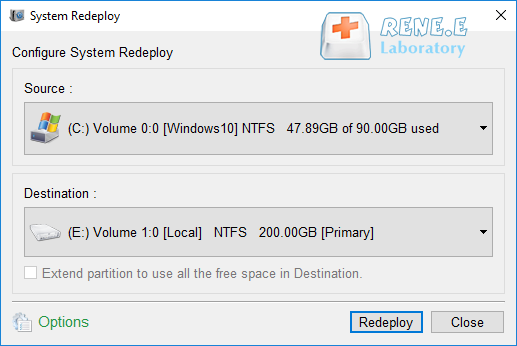
System Redeploy | Support to only migrate the Windows system partition to another hard disk. | Dual-Drive Configuration, HDD-to-SSD Migration |
Option 1: Clone the Entire Drive Using 'Hard Disk Clone'

Option 2: Clone Only the System with 'System Redeploy'
Automatic 4K alignment Improves SSD performance during system migration.
Support GPT and MBR Automatically adapt to the suitable partition format.
Support NTFS and FAT32 Redeploy various files in different file systems.
Back up quickly Back up files at up to 3,000MB/min.
Overall backup schedule Support system redeployment/system backup/partition backup/disk backup/disk clone.
Automatic 4K alignment Improve SSD performance
Support GPT and MBR Intelligently adapt to a partition format
Support NTFS and FAT32 Redeploy files in different file systems
lsblk -o NAME,SIZE,FSTYPE,MOUNTPOINT,LABEL,UUID
- Enable bootloader cloning and partition resizing if your new SSD is larger.
- Confirm your choices. Clonezilla will show a final warning before starting.
- You’ll see a live progress bar—no need to touch anything.
| Method | Features | Pros | Cons | Target Users |
|---|---|---|---|---|
Renee Becca (Free \& Paid Options) | All-in-one backup and cloning utility; supports system migration in 3 steps; offers incremental/differential backups, AES-256 encryption, and scheduled tasks; backs up to local, external, or cloud storage. | Intuitive interface; flexible backup modes; fast system migration; full disk image restore; works during active use via VSS. | Free version has limited advanced features; paid upgrade needed for full functionality. | Home users, professionals, and small businesses needing reliable backup and easy system migration. |
Samsung Magician (Brand-specific, Free) | Tailored for Samsung SSDs; supports data migration and firmware updates; requires encryption to be disabled before cloning; auto-detects drives. | Easy to use; no extra cost; includes SSD management tools; performance optimization after cloning. | Only works with Samsung SSDs; encrypted drives need extra steps; not compatible with other brands. | Samsung SSD owners; beginners looking for a brand-integrated solution. |
Clonezilla / Rescuezilla (Free, Open Source) | Boots from USB; performs 1:1 cloning including partitions; supports various SSD types (e.g., SATA to NVMe). | Completely free; no installation required; supports multiple operating systems. | Outdated interface; steep learning curve; requires USB boot; may need manual partition expansion. | Tech-savvy users or budget-conscious individuals; Linux/Windows hybrid setups. |
Acronis True Image (OEM Free or Paid) | Auto-resizes partitions; supports HDD/SSD/NVMe; OEM version limited to specific brands (e.g., WD, Crucial); cloning without reboot. | User-friendly interface; preserves system settings; free with brand OEM. | Paid version required for non-OEM; brand-limited free edition. | Brand SSD users; beginners preferring paid reliability. |
NTI Echo (Paid) | Simple interface; USB-based cloning; supports HDD to SSD migration. | Fast (≈20 min); no second PC needed. | Requires USB adapter; doesn’t handle partition expansion. | Speed-focused beginners; users with USB hardware. |
Automatic 4K alignment Improves SSD performance during system migration.
Support GPT and MBR Automatically adapt to the suitable partition format.
Support NTFS and FAT32 Redeploy various files in different file systems.
Back up quickly Back up files at up to 3,000MB/min.
Overall backup schedule Support system redeployment/system backup/partition backup/disk backup/disk clone.
Automatic 4K alignment Improve SSD performance
Support GPT and MBR Intelligently adapt to a partition format
Support NTFS and FAT32 Redeploy files in different file systems
| Brand Name | |
|---|---|
DELL | Press the F12 key repeatedly before the Dell logo appears on the screen. |
HP | Press the F9 key multiple times when the HP logo is displayed. |
| Brand Name | |
|---|---|
ASRock | DEL or F2 |
ASUS | DEL or F2 for PCs/ DEL or F2 for Motherboards |
Acer | DEL or F2 |
Dell | F12 or F2 |
ECS | DEL |
Gigabyte / Aorus | DEL or F2 |
Lenovo (Consumer Laptops) | F2 or Fn + F2 |
Lenovo (Desktops) | F1 |
Lenovo (ThinkPads) | Enter then F1 |
MSI | DEL |
Microsoft Surface Tablets | Press and hold Power and Volume Up buttons |
Origin PC | F2 |
Samsung | F2 |
Toshiba | F2 |
Zotac | DEL |
HP | Esc/ F9 for Boot Menu/ Esc/ F10/ Storage tab/ Boot Order/ Legacy Boot Sources |
INTEL | F10 |
Automatic 4K alignment Improves SSD performance during system migration.
Support GPT and MBR Automatically adapt to the suitable partition format.
Support NTFS and FAT32 Redeploy various files in different file systems.
Back up quickly Back up files at up to 3,000MB/min.
Overall backup schedule Support system redeployment/system backup/partition backup/disk backup/disk clone.
Automatic 4K alignment Improve SSD performance
Support GPT and MBR Intelligently adapt to a partition format
Support NTFS and FAT32 Redeploy files in different file systems
How do I clone my M.2 SSD to a new M.2 SSD?
Can I swap an M.2 SSD without reinstalling Windows?
How do I clone my SSD to another SSD for free?
What if the cloning process fails midway?
Can I clone my SSD to a smaller SSD?
How long does SSD cloning usually take?
Is cloning safe, or could it damage my data?
What's the difference between cloning and creating a disk image?
Automatic 4K alignment Improves SSD performance during system migration.
Support GPT and MBR Automatically adapt to the suitable partition format.
Support NTFS and FAT32 Redeploy various files in different file systems.
Back up quickly Back up files at up to 3,000MB/min.
Overall backup schedule Support system redeployment/system backup/partition backup/disk backup/disk clone.
Automatic 4K alignment Improve SSD performance
Support GPT and MBR Intelligently adapt to a partition format
Support NTFS and FAT32 Redeploy files in different file systems
Relate Links :
How to Clone Windows 10 to New HDD or SSD with 3 Simple Steps?
13-07-2022
Ashley S. Miller : 3 steps clone Windows 10 to new HDD or SSD directly! No need to make image and bootable!...
Effortless OS Migration: Transfer Your Windows from One Samsung SSD to Another Without the Headache
13-08-2025
Ashley S. Miller : Learn how to transfer Windows from one Samsung SSD to another with confidence. This guide provides trusted, step-by-step...
How to Upgrade Your Dell XPS: Step-by-Step SSD Cloning Guide

29-07-2025
Amanda J. Brook : This expert guide shows how to perform a dell xps ssd clone upgrade, helping you transfer data safely...
Boost Performance: Upgrading the SSD in Your Samsung Galaxy Book 2

26-07-2025
John Weaver : This guide breaks down everything you need to know about upgrading your Galaxy Book 2 SSD—covering compatibility checks,...


User Comments
Leave a Comment