author avatar
    Specialist of Customer Service Dept.
 

Summary
Learn how to format hard disks in Windows 10 without losing data. Follow our detailed guide to ensure data backup and avoid permanent loss.


I. About hard disk formatting

how to format a hard drive windows 10
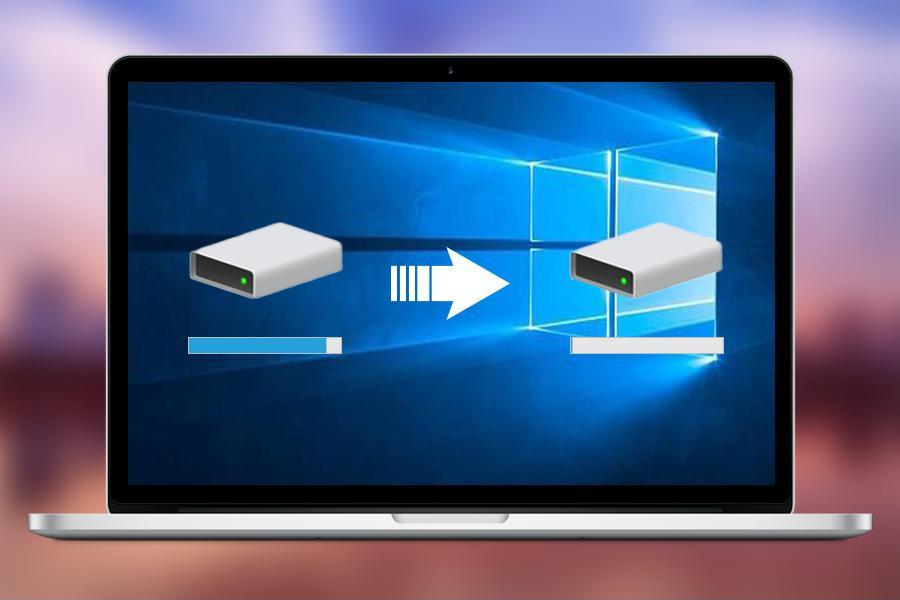
Formatting is an operation that initializes a disk or a partition on a disk, which erases all files on the existing disk or partition.
High-level formatting and low-level formatting are two types of formatting. High-level formatting, also known as logical formatting, is done through the operating system and involves deleting all data on a partition and resetting the file system. This process includes clearing data, generating boot area information, initializing the FAT table, and marking bad sectors. Low-level formatting, also known as physical formatting, divides a blank disk into cylinders, tracks, sectors, logos, gap areas, and data areas.

Why format a hard drive?

● Formatting is required before using a new hard disk.
● The file system of the hard drive needs to be changed.
● The redundant data on the hard disk must be erased to restore its full capacity.
● Solve problems such as crashes or freezes caused by hard disk problems.
Clear temporary files, cached data, and unnecessary files for a faster and smoother operating experience.

How to choose the correct hard drive format (file system format)

1. If you are using a Windows system, you can choose  NTFS, FAT32, or exFAT.
2. If you are using a Mac system, it is recommended that you use APFS (Apple File System).
3. If you want to transfer files between Windows and Mac systems, please choose exFAT.
Common hard disk formats (file system formats) are:

    • NTFS: Ideal for the main drive with Windows OS, no
    • FAT32: Compatible with most operating systems, limited to 2TB partition capacity and 4GB file size.
    • APFS: Default file system for macOS High Sierra, optimized for SSDs.
    • OS Extended (HFS+): Replaced by APFS.
    • exFAT: Suitable for removable storage devices for cross-platform file transfer.
After gaining an understanding of hard disk format, the following will introduce various methods of formatting the hard disk on Windows. If you need to back up important files in the hard disk, continue reading the backup introduction in the second part. If not, you can skip this part.

II. How to backup Windows 10 computer data

To prevent data leakage, choose safe and reliable backup software like Renee Becca. It supports backup of all file types with fast speed and simple operation. Renee Becca is compatible with Windows 10/8.1/8/7/Vista/XP and offers system backup, partition backup, hard disk backup, and disk cloning.
Renee Becca - Reliable Data Backup & Restore Software

Quick Backup files at up to 3,000MB/min.

Fullfill different backup needs Supports system backup, disk / partition backup, file backup and disk clone.

Intelligent Automatically analyze the differences between source and backup data.

Convenient Support VSS, allowing to freely view webpages when backing up system.

Highly compatible Supports various files and storage devices.

Quick Backup files at up to 3,000MB/min.

Fullfill different backup needs Backup for disk, partition and system. Save disk space by backing up incremental /differential data.

Highly compatible Supports various files and storage devices.
Free TrialFree Trial 2000 users have downloaded and enjoy Renee Becca!
The steps are as follows:
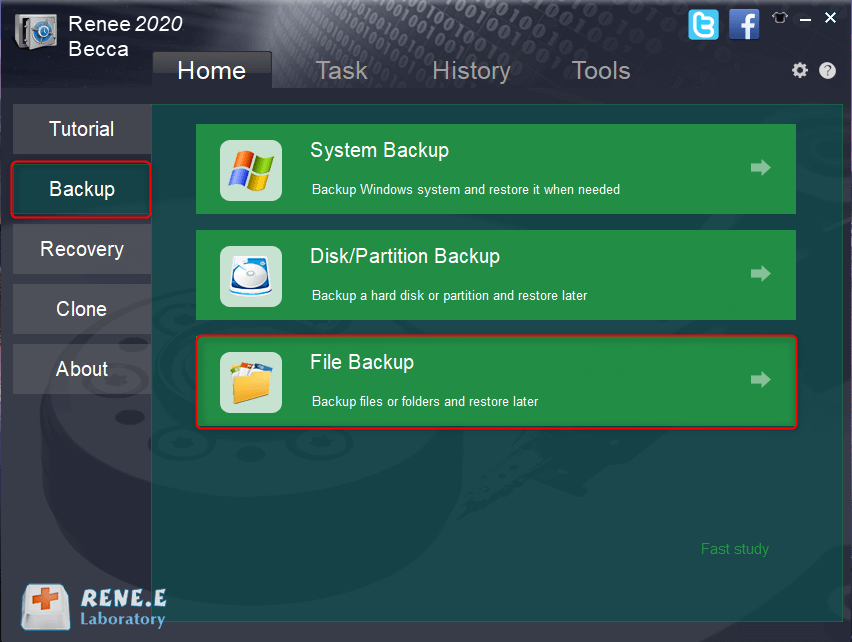
① Download Renee Becca to the computer, open the software, click Backup, select File Backup, and choose the (hard disk/partition backup).
click to back up files in renee becca
② Select the target file and destination for backup, then click "Backup".
Note: Select a non-system disk for backing up files without disk compression. Back up files to an external hard drive for optimal storage.
how to back up files in renee becca
Renee Becca offers 5 backup schemes for you to choose from, along with the option to set up an automatic backup schedule for tasks to run at a specified time.
● Version chain mode: Only the latest 5 versions are kept, and useless old versions are automatically deleted after the backup is completed.

● Single version mode: Only the latest version is kept, and the previous version is automatically deleted after the backup is completed.

● Full mode: Creates a full backup.

● Incremental mode: After the initial full backup, only incremental backups are created.

● Differential mode: After the initial full backup, only differential backups are created. You can view the difference between incremental backup and differential backup.
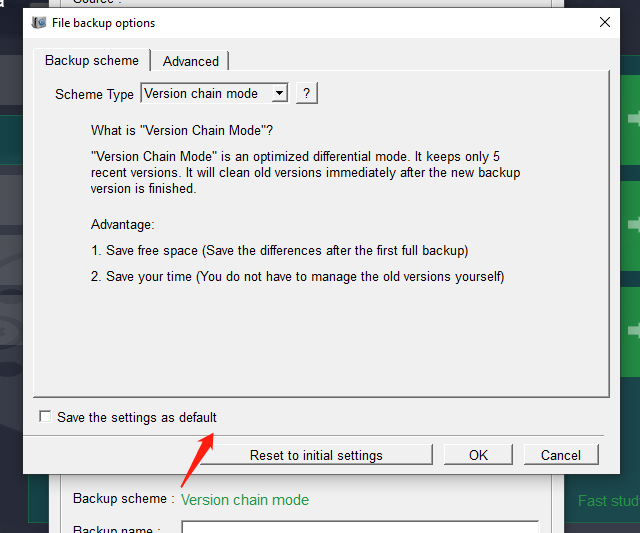
backup mode of file backup on Renee Becca
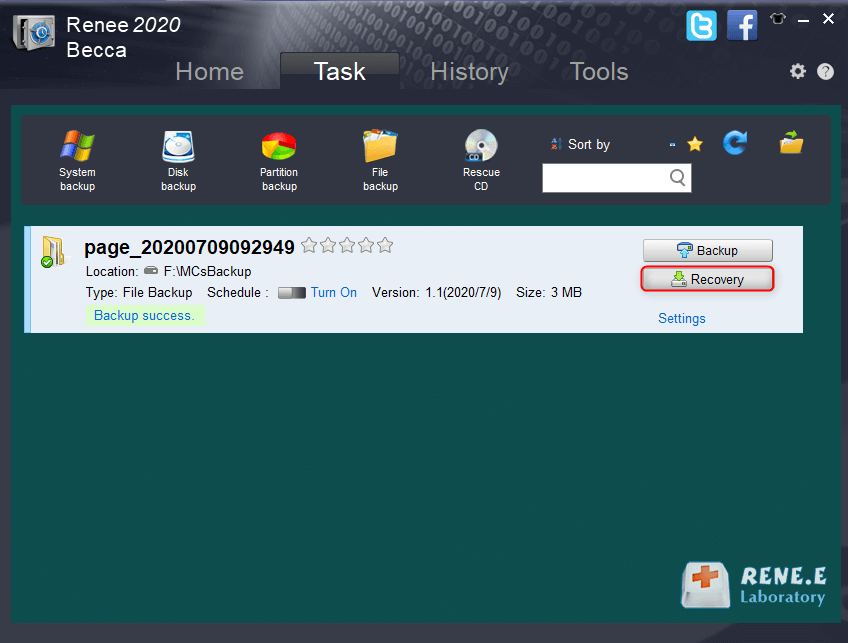
③ After successfully backing up files, click the (Task) tab to view and restore the backed up files after formatting the computer.
recover backup files from renee becca
After making a hard disk backup, you can format the hard disk with confidence. When formatting a hard disk, we need to confirm the type of hard disk to be formatted. Different types of hard disks may be formatted in different ways. In addition to the internal hard drive, there may be some external hard drives connected to the computer. The following will introduce how to format the system disk, external hard disk, or non-system disk.

III. How to format the system hard disk

The main drive or C: drive is where the operating system is installed, meaning you cannot directly format it while it’s running. To format the system hard drive, run the Windows installer from the installation media (CD/USB drive) and format it.
The steps are as follows:
① Please insert the installation CD into the computer and restart the computer. If you don’t have an installation CD, you can also use a USB flash drive to create installation media. Detailed steps to create click here.
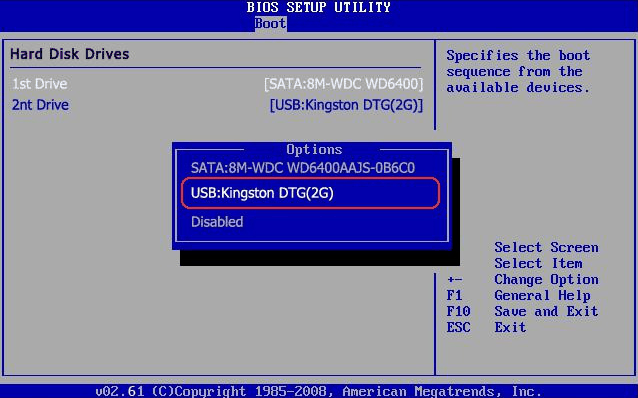
Enter BIOS to change boot sequence and boot from installation media. If computer doesn’t boot to disc or USB, adjust boot order in BIOS/UEFI settings. Press key after turning on computer to open boot menu or change boot order (e.g. F2, F12, Delete, ESC). Please read How to Enter BIOS and Modify Boot Order.
boot from usb
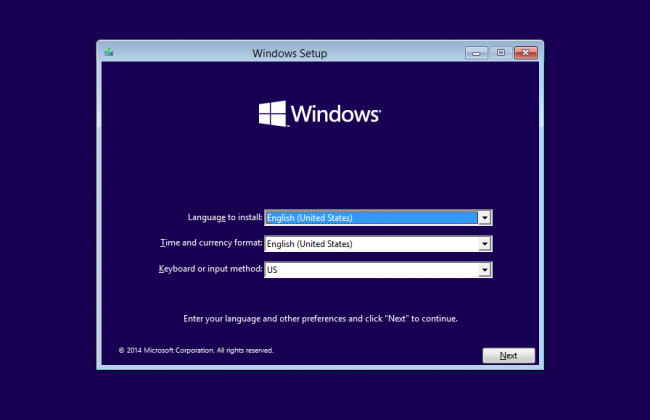
③ After booting from the installation media, select your language, time, and keyboard preferences on the installation interface. Then click (Next) > (Install Now).
windows installation media
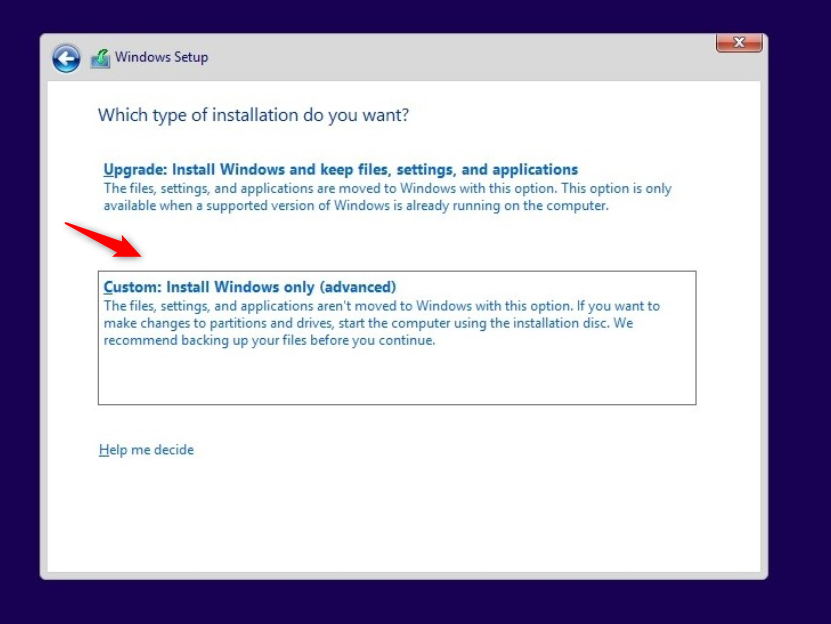
④ Next, read and accept the license terms and select the Custom: Install Windows only (advanced) option.
Windows 10 installation
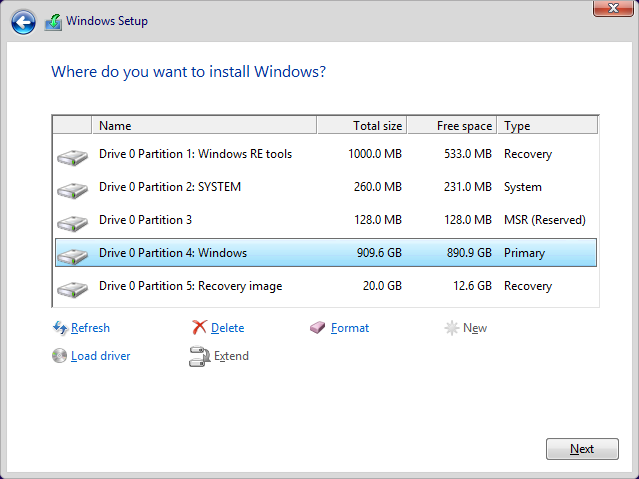
⑤ When entering the “Where do you want to install Windows?” page, select the system drive to format, and click (Format). After formatting the system drive (or C drive), proceed to reinstall Windows or exit.
Windows 10 installation

IV. Format external/non-system hard drive on Windows

Your Windows hard drive may be partitioned into several different drives, including the system disk (C disk) and other internal drives like D disk, E disk, F disk, etc. Formatting a non-system drive or an external hard drive is easier and can be done in various ways.

1. Format in Disk Management

The specific steps are as follows:
① Press the (Windows+X) key on the keyboard at the same time. Then in the pop-up list, select the (Disk Management) option.
open windows disk management
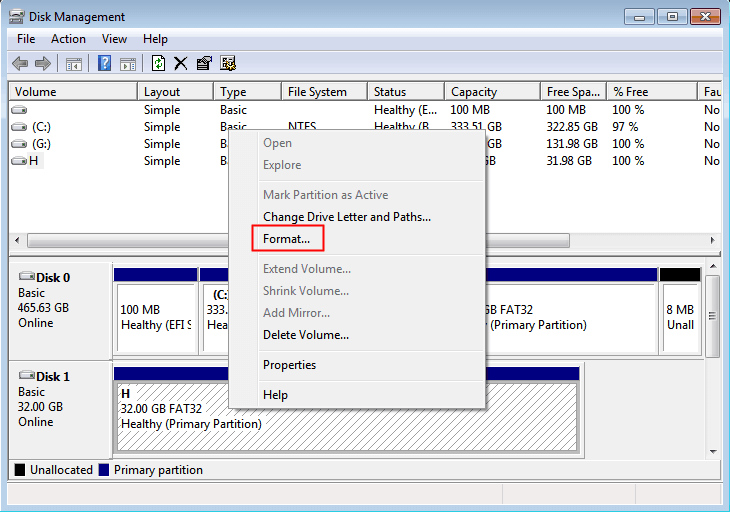
② Find the hard disk to be formatted, right-click on it, and select (Format).
format drive
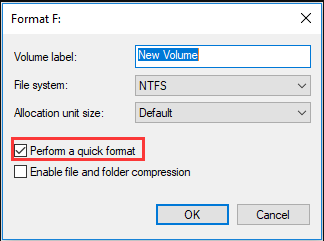
③ According to your needs, select the appropriate file system. Choose NTFS for Windows systems. Click OK to finalize.
quick Format

2. Format in This PC

The steps are as follows:
① Open “This PC” in the computer, then find the hard disk to be formatted, right-click on it, and select (Format).
format the hard disk
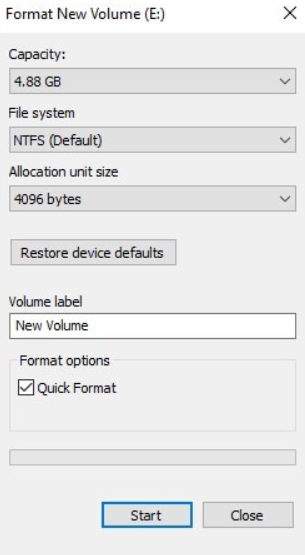
② Then select “File System” according to your needs, and then click (Start).
format the hard disk

3. Use Diskpart to format the hard disk in the command prompt

DiskPart Command Prompt offers more advanced operations than Disk Management and File Explorer, including disk formatting. Caution is advised to avoid serious consequences from incorrect operations.
The steps are as follows:
① Run the Windows computer, enter (Diskpart) in the “Search Box” in the lower left corner, and open the application.
run diskpart
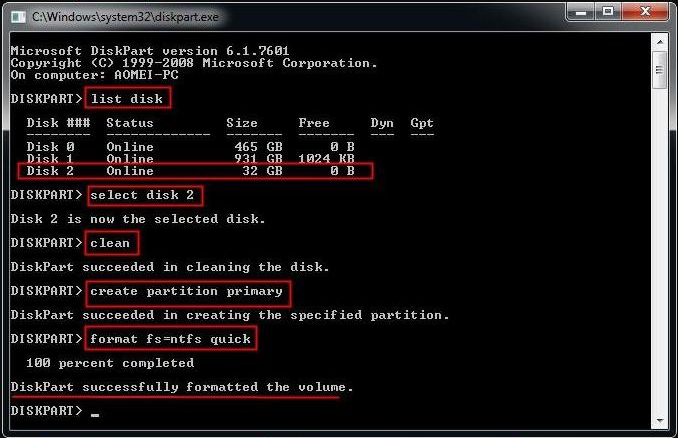
② Next, enter the following commands one by one and press the (Enter) key. After the commands are executed, the hard disk can be successfully formatted.
list disk (list all disks)
select disk 2 (2 is the number of the hard disk)
clean (erase the entire disk)
create partition primary
format fs=ntfs quick (quickly format the hard disk to NTFS file system)
exit
dispart format hard disk

V. How to solve the problem that the hard disk cannot be formatted

Under normal circumstances, the hard disk can be quickly formatted according to the above method, but sometimes it cannot be formatted. When this happens, try the solutions below. After the repair is complete, format it as mentioned above.

1. Delete the read-only write protection of the disk

When the disk is write-protected, formatting will fail. Clear the read-only attribute of the disk to solve the problem.
① Connect the hard disk that cannot be formatted to the computer, search for (cmd) in the lower left corner search box, and select (run as administrator) to open the command prompt tool.
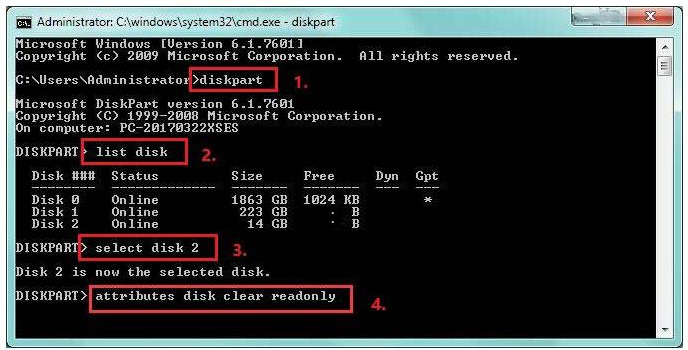
run as administrator
② In the opened command prompt window, enter the following commands one by one and press the (Enter) key:
Type (DiskPart) and press the (Enter) key to start executing the command;
Type (list disk) and press the (Enter) key to list all disks;
Type select disk 2 (2 is the target disk number) and press the (Enter) key;
Type (attributes disk clear readonly) and press the (Enter) key.
After clearing the read-only attribute of the disk, attempt to format the target hard disk again. If the issue persists, consider that the disk may not be write-protected and explore other methods.
command prompt formatting

2. Use the disk error checking tool to repair the damaged disk

If there is a bad sector in the hard disk, the format may fail. You can check and repair it through the disk check function of Windows. The specific steps are as follows:
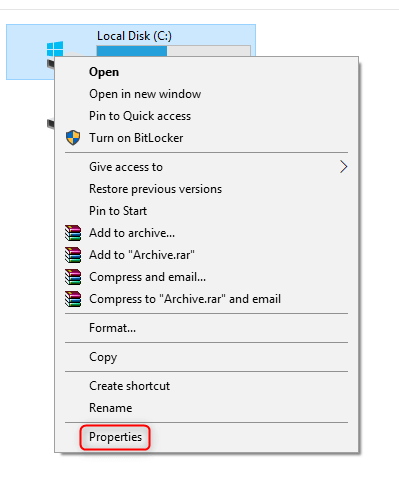
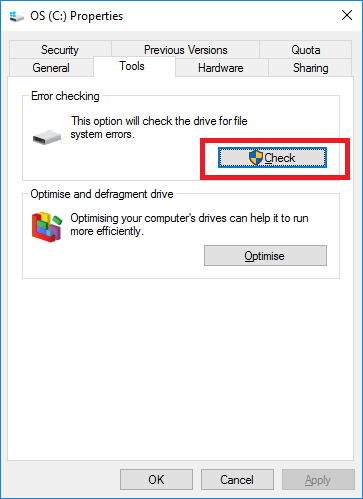
① Open “My Computer/This PC”, right-click the hard disk to be repaired, and select (Properties). Switch to the (Tools) option in the Properties window and click the (Check) button.
device properties Windowscheck disk
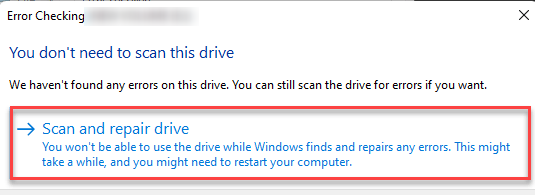
② Next, select the (Scan and repair drive) option in the Error Checking interface.
scan drive

3. Update the driver of the hard disk

It is also relatively simple to update the driver of the hard disk. The specific steps are as follows:
① Run the Windows computer, connect the hard disk, press (Windows+R) keys simultaneously to open the running window, enter (devmgmt.msc), click (OK) to enter the Device Manager.
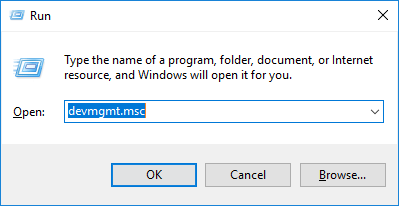
open device manager
② Next, in “Disk Drive”, right-click the target hard disk and select the “Update Driver” option.
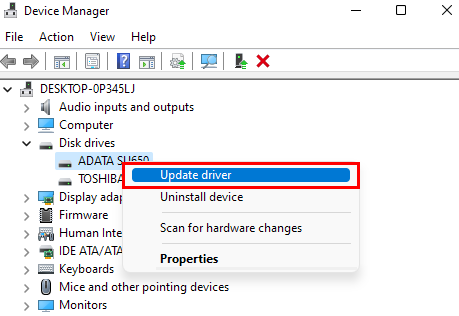
update driver disk
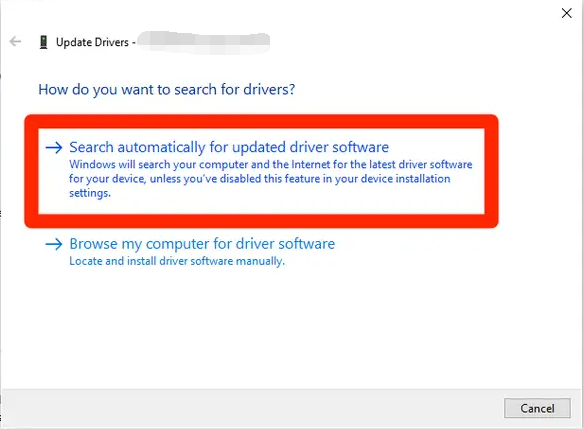
③ Select the (Search automatically for updated driver software) option, and follow the instructions to complete the update of the hard disk driver. After the driver update is complete, restart the device and try formatting the drive again.
update Driver Confirm