author avatar
    Technology Manager of Test Dept.
 

Summary
Learn about PFN_LIST_CORRUPT, a type of blue screen error, and its possible causes. Get common solutions to resolve it through this helpful article.


PFN LIST CORRUPT

I. Why does the PFN_LIST_CORRUPT blue screen error appear?

When your computer encounters a PFN_LIST_CORRUPT blue screen error, it typically indicates that the Page Frame Number (PFN) List has become corrupted. The PFN serves as an index number for hard drives, allowing them to locate each file on the physical disk. When the PFN is damaged, your system will experience abnormal functioning and may result in a BSOD (Blue Screen of Death) failure.
Usually, there may be several reasons for this error, such as:
① Outdated device drivers
②Memory failure or damage
③Hardware failure
④ Malware attack
⑤ Corrupted/lost system files
⑥ Damaged hard disk
After having a brief understanding of the PFN_LIST_CORRUPT blue screen error, let’s learn the general method to fix this error.

II. How to fix PFN_LIST_CORRUPT blue screen error?

Usually, once you encounter a blue screen error while using your computer, the most basic solution is to restart the device. If you still cannot start the system normally after restarting the PC, you need to enter the safe mode before fixing the issue.

1. Enter safe mode

Safe mode is a unique startup mode in the Windows system that only allows for the launching of essential files and drivers necessary for its operation. This mode provides an easy way to troubleshoot and repair any errors in the system. To enter safe mode, follow these steps:
Step 1: Start the computer. When the Windows startup logo appears, immediately hold down the power button on the computer to interrupt the startup process. Repeat this 3 times.

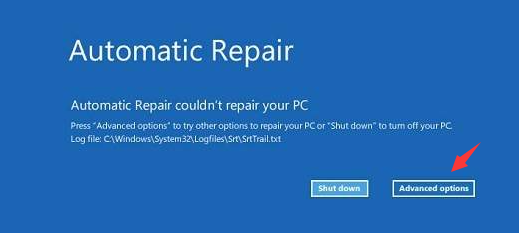
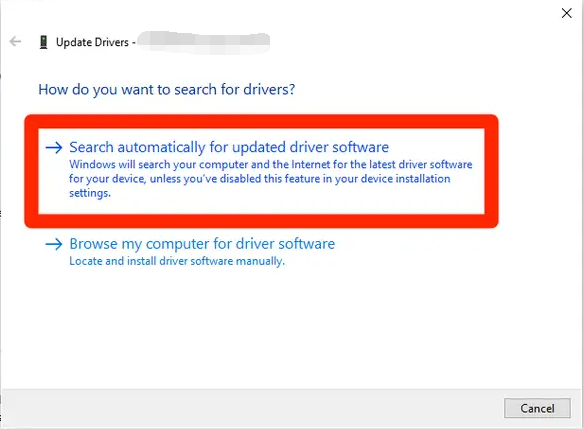
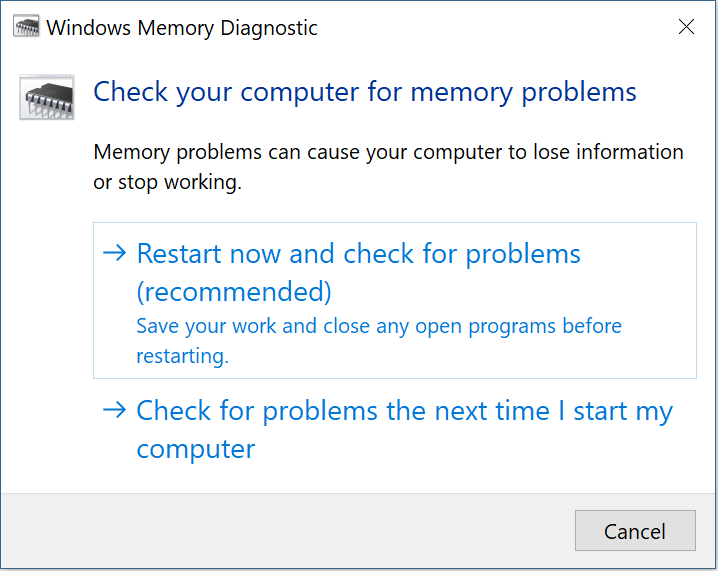
Then start the computer again, this time allowing the computer to fully start. Select (Advanced Options) in the “Automatic Repair” interface. You will then enter the Windows recovery environment.

automatic Repair
Step 2: After entering the safe mode, navigate to Troubleshoot>Advanced Options>Startup Settings>Restart. When the computer restarts, select 5 or F5 to enable Safe Mode with Networking.
startup settings windows 10 safe mode
After enabling safe mode, you can proceed to the following repair operations.

2. Update the device driver

Since the problem of the device driver is the main cause of the PFN_LIST_CORRUPT blue screen error, we can try to update the driver to solve the current problem. The specific steps are as follows:
Step 1: After entering safe mode, press (Windows key + R) on the keyboard at the same time to open the running window. After entering the command (devmgmt.msc), click the (OK) button to enter the Device Manager.
open device manager
Step 2: Next, locate the device that has a faulty driver. This is usually indicated by a yellow exclamation mark. Right-click on the device and choose the option to update the driver.
display adapters - Update drivers
Step 3: Next, select the (Search automatically for updated driver software) option, and then follow the instructions to complete the driver update. After that, restart your computer and see if the problem is resolved.
update Driver Confirm

3. Run the Blue Screen Troubleshooter

Troubleshooting is a built-in tool for quickly diagnosing and automatically repairing various device failures in the Windows system. You can try to use this tool to solve the PFN_LIST_CORRUPT blue screen error. The following are detailed steps:
Step 1: After entering safe mode, press the (Windows+I) keys on the keyboard at the same time to open the setting interface. Then click on the (Update & Security) option.
Windows update and security
Step 2: Find (Troubleshoot) in the left bar, click the (Blue Screen) option on the right, and press the (Run the troubleshooter) button. After that, restart your computer and see if the problem is resolved.
troubleshoot in windows settings

4. Use the Windows Memory Diagnostic Tool

Since memory issues can cause PFN_LIST_CORRUPT blue screen errors, you can check your system memory with the Windows Memory Diagnostic Tool. The specific steps are as follows:
Step 1: Press the (Windows+R) keys at the same time to open the run window, and then enter the (mdsched.exe) command to open the Windows Memory Diagnostic Tool.
mdshed
Step 2: Next, select the “Restart now and check for problems (recommended)” option. Wait patiently for the diagnostic process to complete, and then restart the computer to see if the blue screen problem has been resolved.
Windows memory diagnostic i

5. Use the SFC command to check and repair damaged system files

sfc /scannow is a commonly used command among all SFC commands. It can scan all protected system files and repair detected problems. The steps are as follows:
Step 1: Search (cmd) in the search box in the lower left corner, right-click the search result, and select (Run as administrator) to open the command prompt tool.
run as administrator
Step 2: In the opened command prompt window, enter the command (SFC /scannow) and press the (Enter) key. Next, System File Checker will perform a system scan and fix problematic system files. After that, restart your computer and see if the problem is resolved.
Enter the SFC command
Kind tips If you cannot enter safe mode to run SFC command or CHKDSK command, you can use the command prompt in the Windows recovery environment. Click here for specific steps.

6. Use the CHKDSK tool to scan and repair hard disk errors

The complete name of CHKDSK is Microsoft Check Disk, which is a program designed to check disks. The main purpose of CHKDSK is to scan the file system on the disk and fix any errors that may be present. It also has the ability to scan the disk’s sectors and attempt to repair any bad sectors. If the blue screen error PFN_LIST_CORRUPT is caused by a hard disk failure, the CHKDSK tool can be used to try and repair it.
Step 1: After entering safe mode, search for (cmd) in the search box in the lower left corner, right-click the search result, and select (run as administrator) to open the command prompt tool.
run as administrator
Step 2: In the opened command prompt window, enter the command chkdsk X: /r /f and press (Enter). After that, restart the computer to check whether the problem is resolved.

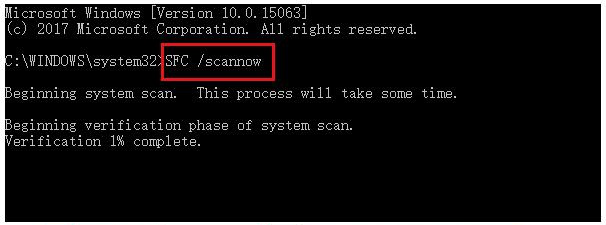
Note: X refers to the letter of the hard drive, which can be substituted according to your hard drive; /r and /f are chkdsk parameters, and /r can find bad sector and restore readable information; /f will try to fix all errors on the disk.

run chkdsk
The methods mentioned above are just a few of the simple solutions to fix the PFN_LIST_CORRUPT blue screen error. Hopefully, they will prove to be helpful to you. Furthermore, in case you encounter any system failures that prevent you from accessing your system, it is advisable to use specialized data backup tools to safeguard your important data beforehand. Here’s a detailed guide on how to do it.

III. When the system fails to start, use Renee PassNow for data backup

1. What is Renee PassNow?

Renee PassNow is a professional system rescue software, which can help Windows users clear Windows account passwords, create new administrator accounts; restore disk/memory card data, recover data after hard disk formatting; transfer disk files; erase or scan Disk files, etc. In addition, this software also supports repairing Windows system problems, such as: repairing MBR boot records, DBR error parameters, 0xc00000e, Windows system startup failure, and some problems that cause black screen or blue screen, etc. As a system rescue tool with various functions, it is perfectly compatible with multiple systems including Windows 10/8.1/8/7/XP/Vista, and can meet the system rescue needs of different users.
Hot Topic - ADsRenee PassNow – 3 Steps to transfer data from the crashed system

Easy to use 3 steps to transfer the files.

Transfer the files Transfer the important files of the computer without system.

Preview the files Preview the files while transferring the data.

Multifuctional Data recovery, Windows password reset, bootable problem recovery can be run without system.

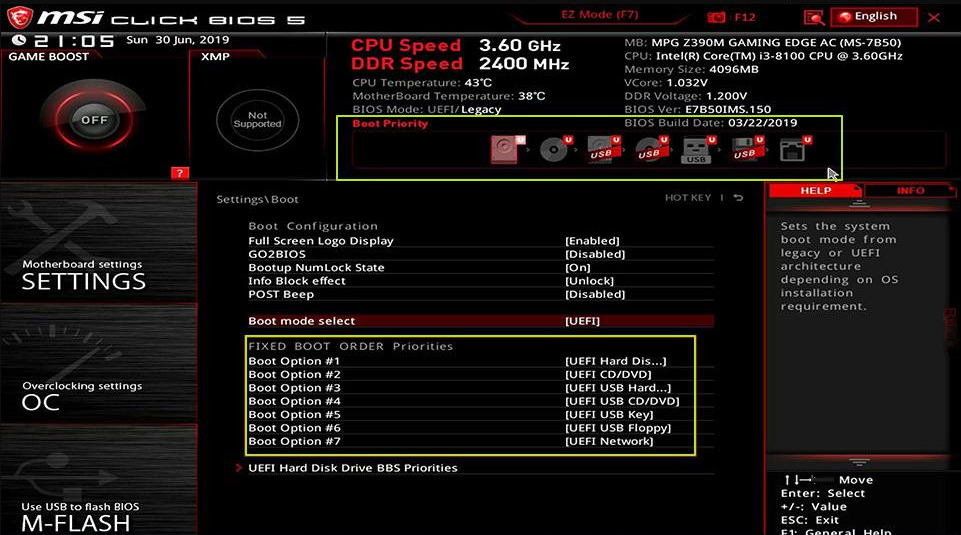
Highly compatible Windows 10/8.1/8/7/XP/Vista. Also supports UEFI boot mode.

Easy to use 3 steps to transfer the files.

Transfer the files Transfer the important files of the computer without system.

Preview the files Preview the files while transferring the data.

Free TrialFree TrialNow 2000 people have downloaded!

2. How to use Renee PassNow for data backup?

The steps are as follows:
Step 1: Download and install Renee PassNow on another computer that can log in and run normally, then connect the USB disk to the PC.

Please select the (Create a Live USB) option under “Step 1: Select creation method” in the main interface.

Note: Before performing this operation, please make sure that the important files in the USB disk have been saved in other locations because the operation will delete all the data in the USB disk.

Step 2: Next, select (x64) or (x86) according to the system type, and click the (Download Now) button to download the ISO file. After the file is downloaded, click the (Create USB) button, then click the (Eject USB) button.
use renee passnow to create usb to reset passnword
Step 3: ConnConnect the boot device you created to the computer where you want to transfer data. Turn on the computer and keep an eye out for the BIOS shortcut key on the screen (it may only appear for a few seconds). Continuously press the shortcut key to enter the BIOS settings. From there, set the bootable USB as the first option in the boot sequence under Boot Priority. Save the changes and restart the computer.
select boot order
Step 4: After booting the computer from the bootable USB flash drive, select the (Data Backup) option. This option refers to cloning the hard disk to other hard disks, so the capacity of the target hard disk(destination) should be larger.
passnow data backup
Step 5: Select the hard disk to be backed up in the (source) list and the hard disk to save the backup in the (destination) list. Next, click (clone) and wait for the cloning to complete.
Step 6: If you only need to transfer some important data in the hard disk, you can choose (Data Transfer).
data transfer
Step 7: You can easily transfer files by clicking on the disk drive letter (C/D/E/F, etc.) and selecting the desired files. For a safer option, it is recommended to transfer them to an external disk.

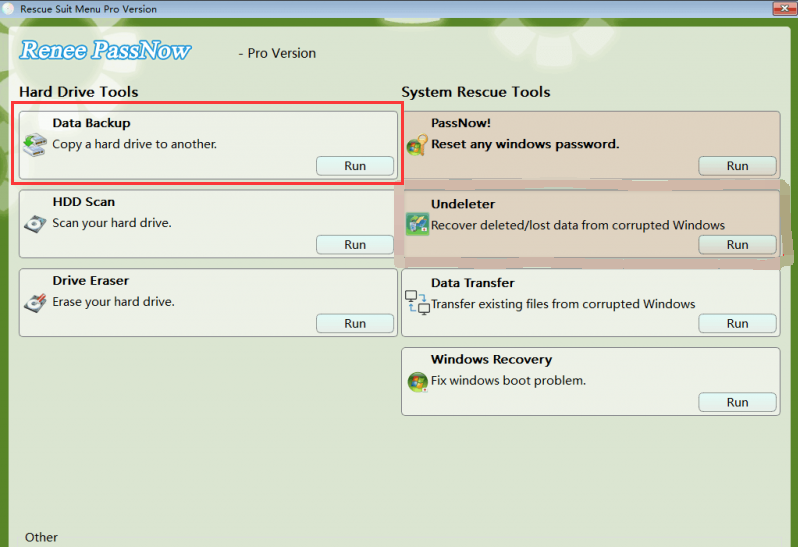
The process of transferring data is straightforward. For instance, to transfer data from the C drive to the G drive, simply select the C drive on the upper left, the G drive on the upper right, and then the files from the C drive. Click the Copy button in the middle to complete the transfer. Transferring disk data is a breeze. If you wish to delete a file, select it and click the Delete button in the middle. Keep in mind that this action cannot be undone, so proceed with caution.

data transfer in Renee Passnow
Kind tipsIf you find that files are lost during the process of backing up or transferring data, you can select the (Undeleter) option on the main interface to perform data recovery.