Windows 10/11 User Profile Missing? Here’s How to Recover It Quickly and Effectively
2 August 2025Ashley S. Miller Specialist of Customer Service Dept.
Last update by Olivia Brown at 2 August 2025
Summary Discover step-by-step solutions to recover your Windows user profile after a sudden loss or corruption. This guide walks you through common causes, smart prevention tips, and tested recovery methods to help restore access to your files, settings, and user account with confidence.
It’s a sinking feeling: you log into Windows, and your user profile has vanished. All your personal settings, desktop icons, and files stored in folders like Documents and Pictures are suddenly gone. It’s a frustrating experience, but don’t panic.
In this guide, we’ll walk you through several proven methods to recover a user profile. We’ll cover everything from simple system tools to more advanced techniques, and even show you how to get your precious files back if the profile itself can’t be saved.
Understanding Why You Might Need to Recover a User Profile
Knowing what caused your profile to disappear won’t instantly bring it back, but it can help you avoid this headache in the future. A user profile can be lost for a few different reasons, some obvious and some that happen behind the scenes.
Accidental Deletion: It’s surprisingly easy to accidentally delete your own profile, especially when you’re cleaning up old accounts or managing files in the C:\Users directory. You might think you’re just clearing out some junk, but end up wiping out an entire user account.
Software Glitches: Sometimes, third-party programs can mess with your system in unexpected ways. Cleanup utilities, aggressive antivirus software, or even automated scripts can mistakenly identify your profile as unnecessary and delete it without warning.
Problematic Windows Updates: After a major Windows update, you might find yourself logged into a temporary profile, with your original one nowhere in sight. This often happens when the update process corrupts a registry entry, preventing Windows from loading your profile correctly.
Malware and Viruses: Malicious software is a common culprit. A virus can corrupt or delete key profile files, making your account inaccessible. In a worst-case scenario, ransomware could encrypt your entire user folder, holding your data hostage.
How to Recover User Profile: Step-by-Step Methods
Before you jump into recovering your user profile, let’s talk about a smart game plan for saving your data:
Recovery Strategy: Offline File Rescue Before Windows Operations
Rescue your files offline first, then tackle Windows with its built-in tools or other software
This approach seriously boosts your chances of getting your data back! Here’s why: your user profile is usually stored on the C drive (the system drive), and messing around in Windows (Using Windows Restore or File History restore) can create a ton of temporary files and fragments. Those can overwrite the data you’re trying to save, and once that happens, it’s game over.
So, the second you realize your user profile is missing or corrupted, shut down your computer immediately! Grab another PC, set up an offline recovery tool like a bootable USB, and get to work. Plug in the USB, boot up the problematic computer, and you can transfer your important files to safety without ever starting Windows. Once your data is secure, then you can boot into Windows to fix the system or recover the profile. That’s the way to play it safe!
Method 1: Use Rescue Tools to Rescue Data in Windows Offline Mode
💡 Important Note: Your chance of recovery depends heavily on your hard drive type. On modern Solid-State Drives (SSDs), a command called TRIM often permanently erases deleted data very quickly, making recovery difficult or impossible. On traditional Hard Disk Drives (HDDs), deleted files remain physically on the disk until new data overwrites them. For this reason, if you’re using an HDD, stop using the computer immediately to avoid overwriting your lost files and run the recovery scan as soon as possible.
When your user profile is lost or corrupted, your personal files and settings stored in the C:\Users directory are at risk. To maximize the chances of recovering your important data, it’s crucial to avoid any operations within Windows that could overwrite the deleted files. Instead, you should immediately shut down the computer and use an offline recovery method. Renee PassNow is an excellent tool for this purpose, as it allows you to boot from a USB drive and access your files without starting Windows.
Renee Passnow – Professional Windows Password Remover
Remove Windows Login Password 3 steps for whole password remove process.
Recover the files Recover the deleted files without Windows system.
Transfer the data Transfer the important files of the computer with system.
Multifuctional Data transfer, data recovery, bootable problem recovery can be run without system.
Highly compatible Windows 11/10/8.1/8/7/XP/Vista. UEFI boot.
Remove Login Password Support Windows 11/10/8.1/8/7/XP/Vista. UEFI boot.
Recover the files Recover the deleted files without Windows system.
Transfer the data Transfer the important files of the computer with system.
Renee PassNow includes a powerful “Data Transfer” feature that enables you to safely migrate your files from the affected drive to an external storage device. This ensures that your important documents, pictures, and other personal data are secured before attempting any further recovery or repair operations.
Additionally, Renee PassNow offers data recovery functions “Renee Undeleter” to help you retrieve deleted or lost files from the user profile. If you are unable to log in due to a missing or corrupted user profile and lack an administrator account, Renee PassNow also provides a feature to create a new user account, allowing you to regain access to the system.
To recover your user profile data using Renee PassNow, follow these steps:
Step 1: On a functioning computer, download and install Renee PassNow. Connect a USB drive to this computer and launch Renee PassNow.
Step 2: Create Rescue USB/CD
Select “Create USB” in “Step 1: Choose creation method”. Note that this process will erase the contents of the USB drive, so make sure to back up any important files on it first. Choose the appropriate system type (x64 or x86), click Download Now to get the ISO file, then click Create Live USB. After the process completes, click Eject USB.
Step 3: Insert the bootable USB drive into the computer with the missing user profile.
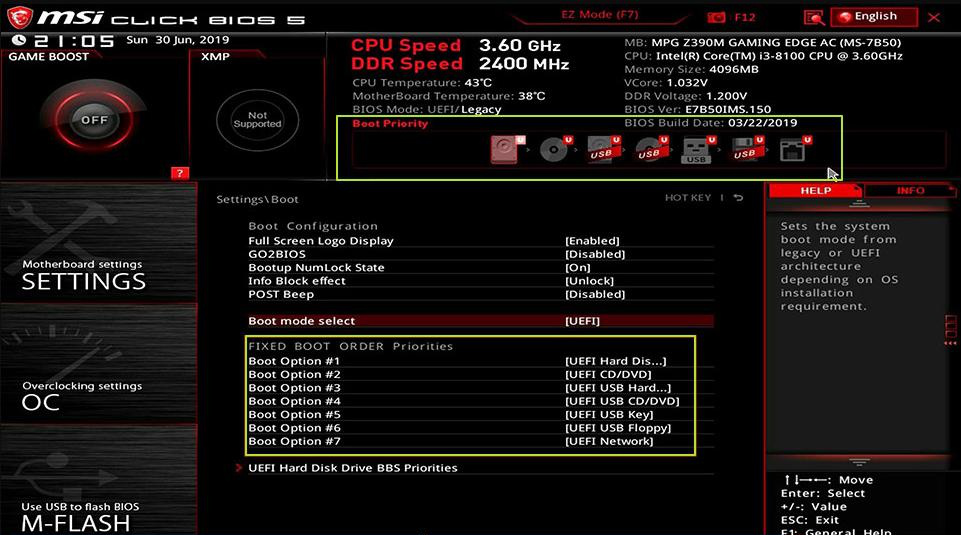
Power on the computer and immediately press the BIOS access key (this varies by manufacturer; common keys are F2, F12, Del, etc.). Set the USB drive as the primary boot device in the BIOS settings, save the changes, and reboot.
Common Server:
Server Type
Enter boot menu method
DELL
Press the F12 key repeatedly before the Dell logo appears on the screen.
HP
Press the F9 key multiple times when the HP logo is displayed.
Step 4: Once Renee PassNow loads, select “Data Transfer” to begin rescuing your files. If you need to back up the entire hard disk, you can choose the Data backup option.
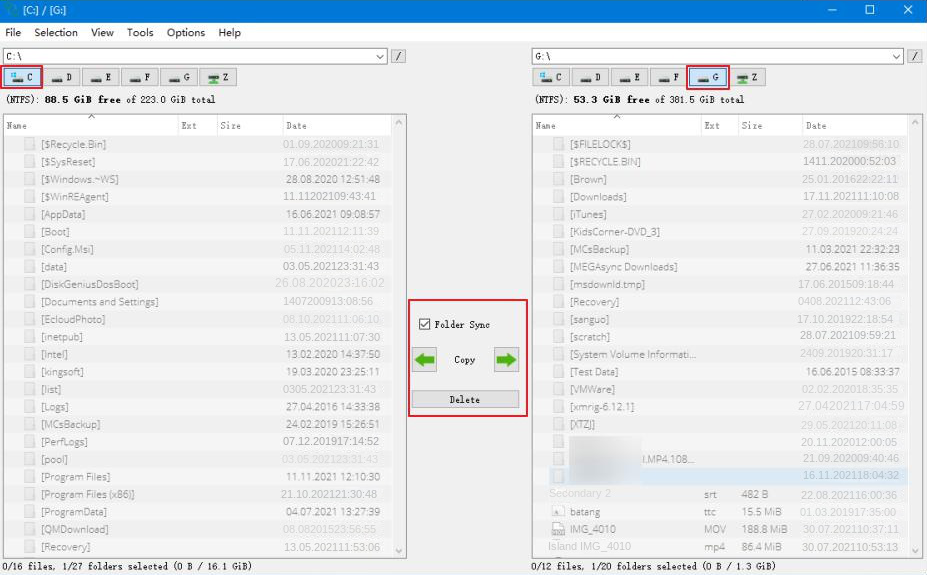
Step 5: In the Data Transfer interface, you can browse the drives (C, D, E, etc.) to locate your user profile files. Select the source drive (e.g., C) on the left, and the destination drive (e.g., an external USB drive) on the right. Choose the files you want to transfer and click “Copy” to move them to safety.
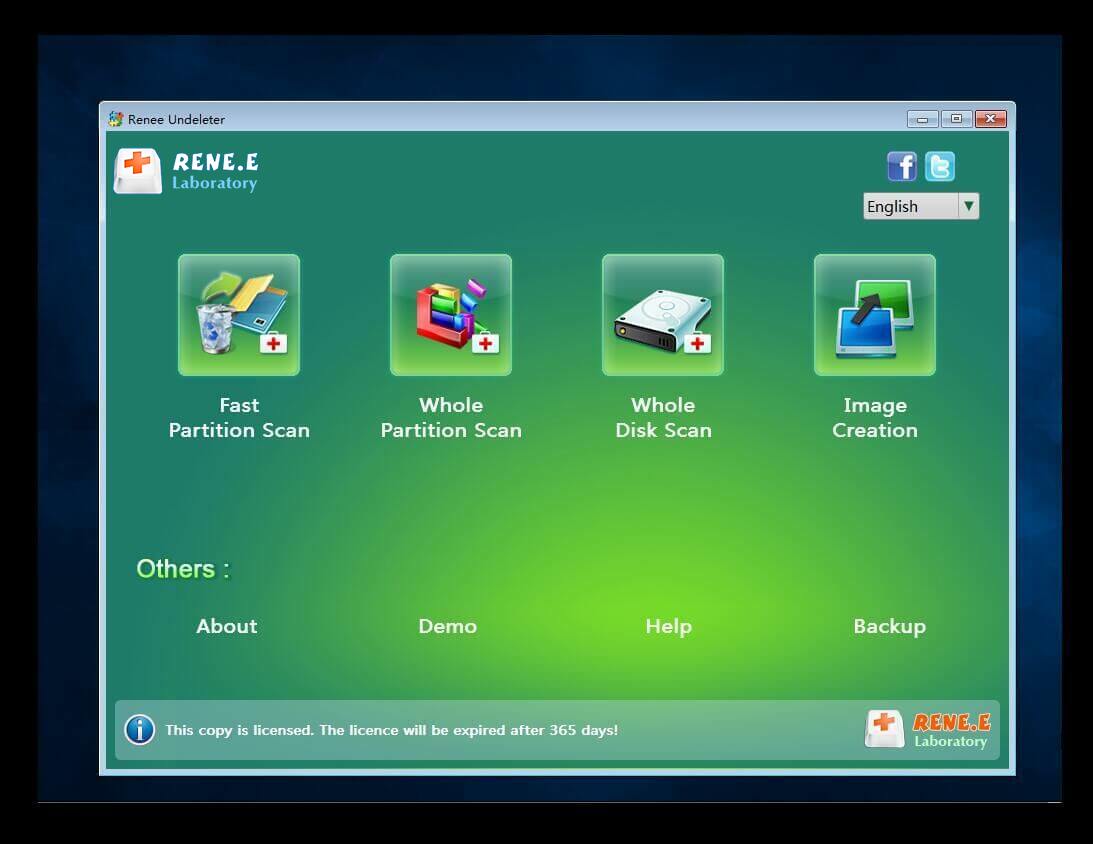
Step 6: If you discover that some files are missing or deleted, you can use the “Undeleter” feature in Renee PassNow to attempt recovery. Select “Undeleter” from the main interface and click Run.
Step 7: Choose a scanning mode to search for lost files on the target hard disk.
Step 8: After the scan completes, preview the recoverable files, select the ones you need, and click “Recover” to save them to an external disk.
Once you have successfully transferred and recovered your important data, you can proceed with other methods to repair or recreate your user profile, knowing that your files are safe.
Important: Before attempting any other recovery methods that involve booting into Windows or performing operations within the system, it is highly recommended to first use an offline recovery tool like Renee PassNow to secure your important files. Operations within Windows can generate significant file read and write activity, which may overwrite the deleted data, reducing the chances of successful recovery.
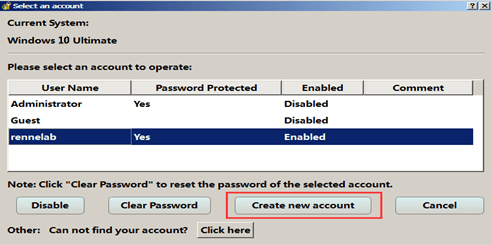
Extension : Create a New Administrator Account Offline Using Renee PassNow
If you can’t log into Windows because your user profile is gone or corrupted, and you don’t have another administrator account to work with, don’t worry—Renee PassNow has your back. Its “Create a New User” feature lets you quickly set up a new local account with admin privileges, giving you access to Windows so you can try other recovery methods.
Here’s how to do it:
1. Boot your computer using the Renee PassNow USB drive you created in Method 1.
Renee Passnow – Professional Windows Password Remover
Remove Windows Login Password 3 steps for whole password remove process.
Recover the files Recover the deleted files without Windows system.
Transfer the data Transfer the important files of the computer with system.
Multifuctional Data transfer, data recovery, bootable problem recovery can be run without system.
Highly compatible Windows 11/10/8.1/8/7/XP/Vista. UEFI boot.
Remove Login Password Support Windows 11/10/8.1/8/7/XP/Vista. UEFI boot.
Recover the files Recover the deleted files without Windows system.
Transfer the data Transfer the important files of the computer with system.
2. Once Renee PassNow loads, select the “Create New User” option from the main interface.
3. The default account name and password will be Renee and 123456789.
4. Log into Windows with the new account you just created.
With this new admin account, you’re ready to tackle the other recovery methods below, like System Restore or Registry Editor fixes, with full permissions to make changes.
Note: Creating a new account doesn’t recover your old profile, but it gives you a way to access Windows and continue troubleshooting. Make sure you’ve already used Renee PassNow’s Data Transfer and Undeleter features to rescue your files before moving forward.
Method 2: Use System Restore to Recover User Profile
If your profile disappeared very recently, System Restore is your best first shot. This tool can roll your system files and settings back to a time when everything was working correctly. Keep in mind that System Restore won’t recover your personal files (like documents or photos), but it can often fix the underlying issue that’s preventing your profile from loading.
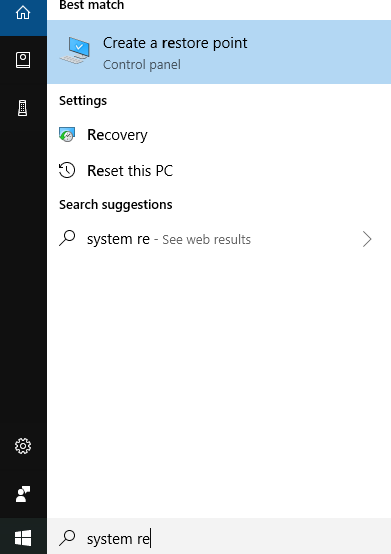
1. Press the Win + S keys and type “restore point” .” Click on Create a restore point from the search results.
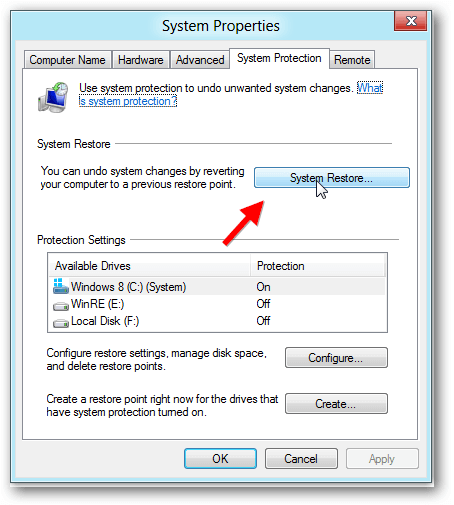
2. In the System Properties window, switch to the System Protection tab and click the “System Restore…” button.
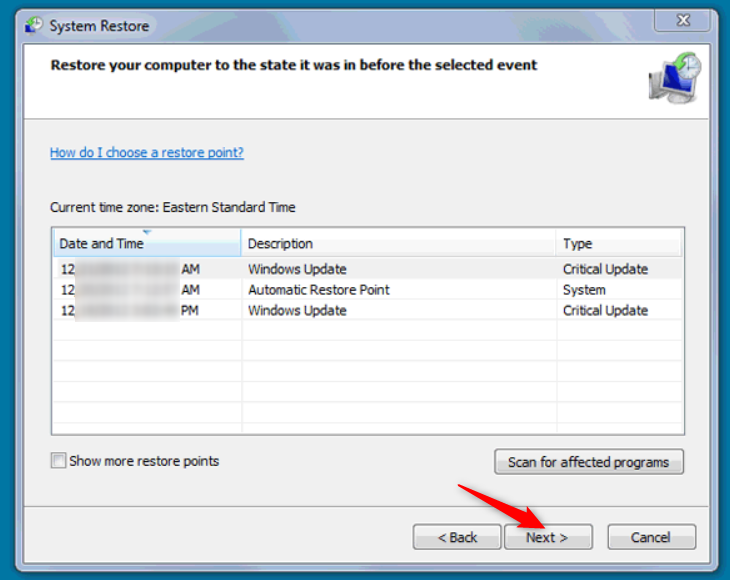
3. Click Next to start the process.
4. You’ll see a list of available restore points. Pick one that’s dated before your user profile went missing.
5. Click Next, and then click Finish to confirm your choice.
6. A warning will pop up to let you know the process can’t be interrupted. Click Yes to continue.
7. Your computer will restart and begin the restoration. Once it’s done, Windows will boot up.
Log in and check if your profile is back. If it’s still missing, or if you didn’t have any restore points available, move on to the next method.
Method 3: Recover User Profile Data with File History
If you had File History enabled, you’re in luck.
This feature is designed to back up the personal files within your user folder—things like your Desktop, Documents, Downloads, and Pictures. While this won’t fix a broken profile login, it’s a fantastic way to recover the data that makes the profile yours.
It’s a smart idea to recover your files using this method before trying more technical fixes, as it ensures your important data is safe and sound.
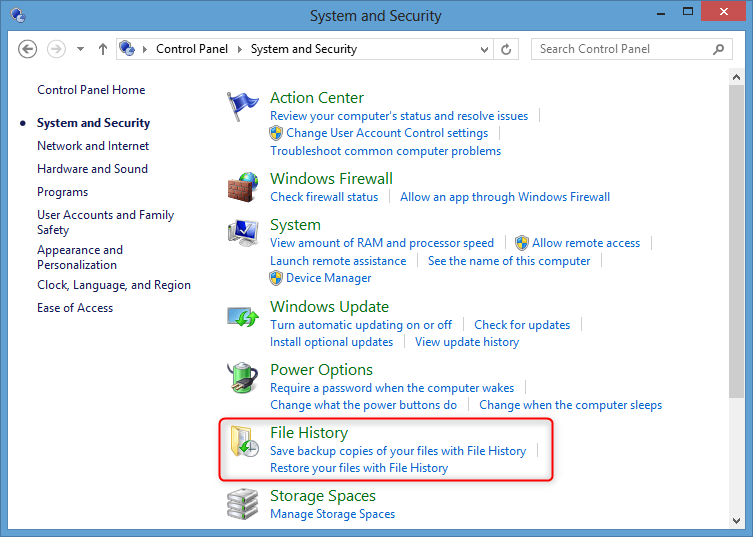
1. Open the Control Panel. You can find it by searching in the Start Menu. Once open, search for and click on File History.
2. If File History was active, you’ll see an option on the left menu that says Restore personal files. Click it.
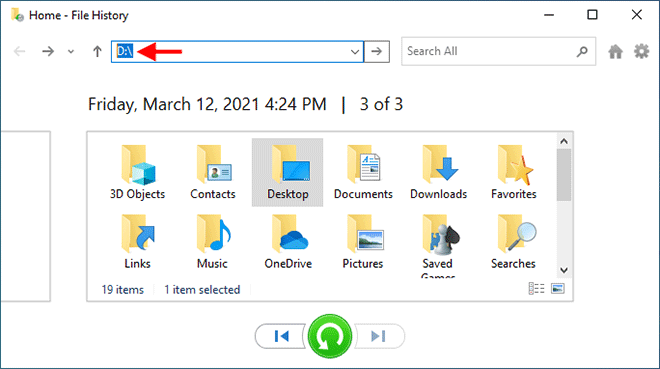
3. The File History window will open. Navigate to the C:\Users location.
4. Find the folder that belonged to your deleted profile. Use the back and forward arrows at the bottom of the window to browse through different backup dates until you find a version that contains your files.
5. Select the user folder and click the big green Restore button. Alternatively, you can right-click it and choose Restore to if you’d prefer to save the files to a different location.
6. Once the process finishes, check to make sure your folder and its contents have been restored.
With your personal data now safely recovered, you’re ready to attempt a manual profile repair.
Method 4: Manually Recover User Profile via the Registry Editor
This method is for cases where your user profile folder (C:\Users\YourName) still exists, but Windows can’t load it, logging you into a temporary profile instead. This usually happens because the registry key pointing to your profile is corrupted. Windows often renames the corrupted key with a .bak extension. By carefully editing the registry, you can point Windows back to your original profile.
⚠️ Warning: The Registry Editor is a powerful tool. Making incorrect changes can cause serious system instability. Follow these steps exactly as written.
1. Press Win + X and select Terminal (Admin) or Windows PowerShell (Admin).
2. In the terminal, type whoami /user and press Enter. Take note of the long string of characters (your SID, or Security Identifier) that appears. You’ll need it in a moment.
3. Press Win + R, type regedit into the box, and hit Enter to open the Registry Editor.
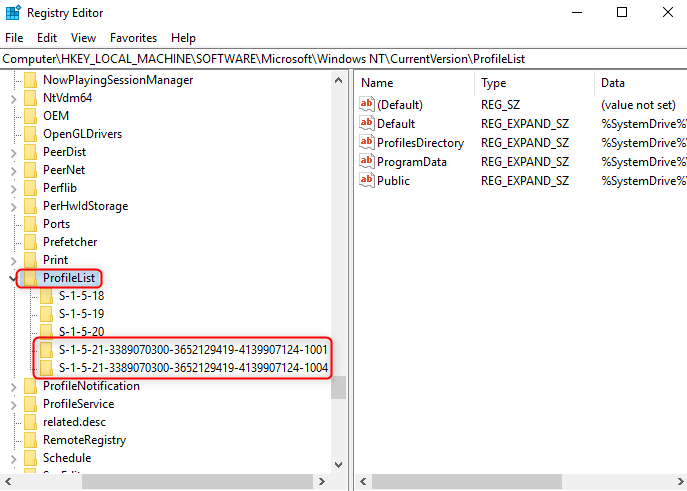
4. Navigate to this specific key in the left-hand pane: HKEY_LOCAL_MACHINE\SOFTWARE\Microsoft\Windows NT\CurrentVersion\ProfileList
5. Under ProfileList, you’ll see several folders named with SIDs. Look for the SID that matches the one you noted earlier. You will likely find two versions: one with a .bak at the end, and one without.
* The key without .bak is the temporary profile you’re currently logged into.
* The key with .bak is your original, correct profile.
6. You need to swap them. First, right-click the key without.bak and rename it by adding .tmp to the end. Next, right-click the key with.bak and rename it by removing the .bak extension.
7. Now, select the corrected key (the one you just removed .bak from). In the right-hand pane, find and double-click the ProfileImagePath value. Make sure it points to your correct user folder (e.g., C:\Users\YourName). If not, correct it.
8. In the same key, double-click the State value and change its data to 0. Click OK.
9. Close the Registry Editor and restart your computer.
When you log back in, Windows should now load your original user profile. This method is highly effective when the profile data itself was never deleted, just disconnected.
Bonus: Creating a Fresh Start When You Can’t Recover the Old User Profile
If your old profile is beyond repair, the best path forward is to create a new one and move your recovered files into it. This gives you a clean, stable environment to work from while ensuring you don’t lose your important data.
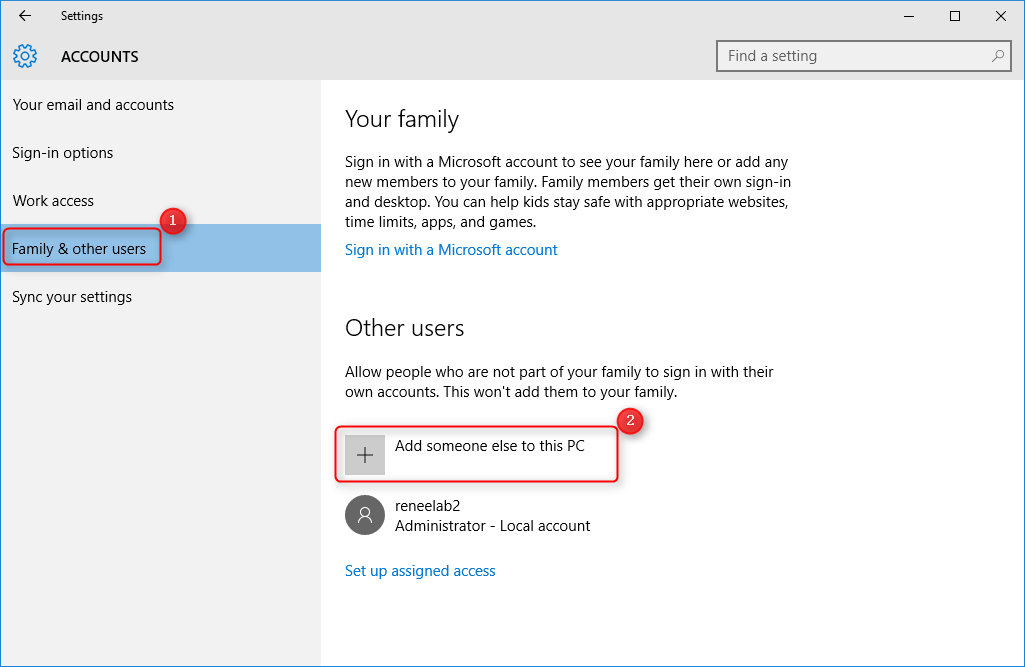
1. Press Win + I to open Settings. Go to Accounts > Family Other users.
2. Click the Add account button (or Add someone else to this PC).
3. Windows will prompt you to use a Microsoft account. If you prefer a local account, click I don’t have this person’s sign-in information, followed by Add a user without a Microsoft account.
4. Enter a username and password for the new account and click Next.
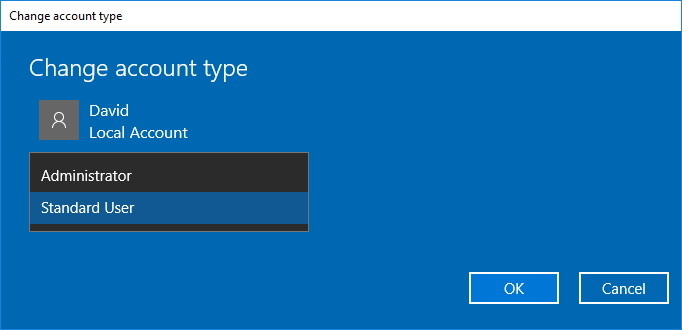
5. Back on the Other users screen, click on the new account you just created and select Change account type. Set it to Administrator to give it full permissions, then click OK.
Now you can log out of your current account and log into the new one. Once you’re in, open File Explorer and copy the files you recovered using Renee PassNow (or other methods) into the corresponding folders (Documents, Pictures, etc.) of your new profile. This way, you can continue working with your important data in the new profile.
Final Thoughts on How to Successfully Recover a User Profile
While it’s often possible to recover a user profile or at least its files, success is never guaranteed, especially on SSDs or if a lot of time has passed.
This is why prevention is always the best strategy. Take a few minutes today to set up proactive measures: make sure System Restore is enabled, turn on File History, and most importantly, get into the habit of backing up your critical data to an external drive or a cloud service. A little preparation now can save you a world of trouble later.
Renee Passnow – Professional Windows Password Remover
Remove Windows Login Password 3 steps for whole password remove process.
Enable/Create Administrator One click for creating new administrator and enable the disabled account.
Widely Use New version supports UEFI boot model, which can be used on more computers, laptops and even surfaces.
Multifuctional Data transfer, data recovery, bootable problem recovery can be run without system.
Highly compatible Windows 11/10/8.1/8/7/XP/Vista.
Remove Login Password Support Windows 11/10/8.1/8/7/XP/Vista.
Enable/Create Administrator One click for creating new administrator and enable the disabled account.
Easy to use No need of any professional knowledge or password reset disk.


 How to Recover User Profile: Step-by-Step Methods
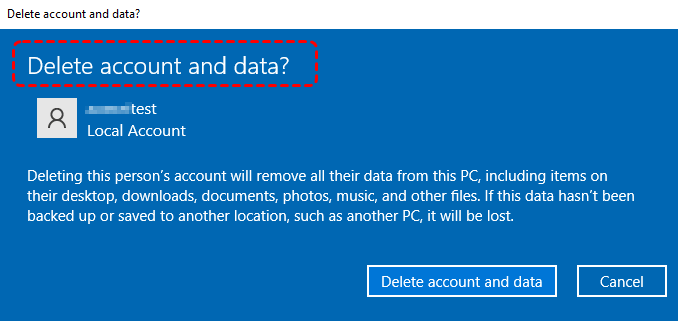


User Comments
Leave a Comment