author avatar
    Senior Product Manager
 

Summary
Unlocking your laptop just got easier with these 5 simple methods to reset your password without any hassle. From accessing the built-in administrator account to using installation media, this guide has got you covered. Make sure to keep your laptop passwords secure and try out these methods next time you forget your password.


It’s a common scenario that many laptop users have faced – being locked out of your computer because you have forgotten the password. This can happen due to a number of reasons, such as changing your password frequently or simply being forgetful. Whatever the case may be, being unable to access your own laptop can be frustrating and nerve-wracking. But fear not, as there are ways to reset your laptop without a password. In this chapter, we will explore the first method – removing the password entirely by accessing the built-in administrator account. Keep reading to learn how you can regain access to your laptop in no time.

Method 1: Removing the password entirely by accessing the built-in administrator account

Have you ever been locked out of your laptop because you forgot your password? It can happen to anyone and can be quite frustrating. However, there is a way to reset your laptop without needing your password. By accessing the built-in administrator account, you can remove the password entirely and regain access to your laptop. In this chapter, we will guide you through the process of resetting your laptop without a password using this method.
Tips:If you can not see the Administrator account or Windows says your Administrator need a password, please refer to the Method 2.
Accessing the built-in administrator account
The built-in administrator account is a hidden account that is created when you first set up your laptop. This account has unrestricted access to the computer and does not require a password to log in. To access this account, you will need to start your laptop in Safe Mode.
Starting in Safe Mode
To start your laptop in Safe Mode, please refer the table below:
Windows VersionEnter Safe Mode Method
Windows 10On the Windows sign-in screen/ press and hold the Shift key while selecting Power > Restart/ then follow the on-screen instructions
Windows 10Press Windows logo key + R/ type msconfig in the Open box/ select OK/ go to the Boot tab/ and clear the Safe boot checkbox
Windows 8/8.1Access Advanced Startup Options by holding down the Shift key and selecting Restart/ or use the Settings menu to access the Advanced Startup Options menu. From there/ select Troubleshoot > Advanced Startup Options > Startup Settings > Restart. Once restarted/ select a Safe Mode option by pressing 4 or 5 (or F4 or F5)
Windows 7Use the System Configuration utility by searching for msconfig/ selecting the Boot tab/ and selecting Safe Boot under Boot options. Then restart the computer
Windows XPPower on the computer and repeatedly press the F8 key until the Advanced Options Menu appears. Select Safe Mode and press Enter. Alternatively/ select Start > Run/ type msconfig/ select the Boot.INI tab/ select /SAFEBOOT under Boot Options/ and then select Restart
Removing the password
Once you have successfully started your laptop in Safe Mode, you can now access the built-in administrator account. Log in to this account and go to the Control Panel. From there, go to “User Accounts” and select your account. Then, click on “Remove password” and follow the prompts to confirm the removal of your password.
Restarting your laptop
After removing the password, you can now restart your laptop. Make sure to start it up normally and not in Safe Mode. You will now be able to log in to your account without needing a password. However, it is recommended that you set a new password to keep your laptop secure.
Resetting your laptop without a password is possible by accessing the built-in administrator account. This method is useful for those who have forgotten their password or have been locked out of their laptop. Remember to set a new password after removing the old one to keep your laptop secure. If you encounter any issues, seek help from a professional or contact the laptop manufacturer for assistance. We hope this article has helped you regain access to your laptop without needing a password.

Method 2: Using Renee PassNow to reset the laptop password, then factory reset the laptop

If you have forgotten your laptop password and are unable to access the built-in administrator account to remove the password, you can still reset your laptop by using a third-party software such as Renee PassNow. Please make sure to back up any important files before proceeding with this method.
Tips:If your account is Microsoft Account, Renee PassNow will convert this account to Local account. After resetting login password, you need to connect your account to your Microsoft Account again.
To reset your Windows password using Renee PassNow, follow these steps:
Step 1: Download and Install Renee PassNow
Start by downloading Renee PassNow from the official website and install it on a different computer that you can access. You can choose the appropriate version based on your computer’s operating system.
Renee PassNow – Professional Windows System Rescue Tool

Remove Windows Login Password 3 steps for whole password remove process.

Recover the files Recover the deleted files without Windows system.

Transfer the data Transfer the important files of the computer with system.

Fix Windows startup error Fix various Windows startup failures or crashes.

Erase disk Completely erase disk files which will not be restored.

Remove Windows Login Password 3 steps for whole password remove process.

Recover the files Recover the deleted files without Windows system.

Transfer the data Transfer the important files of the computer with system.

Free TrialFree TrialNow 2000 people have downloaded!
Step 2: Create a Bootable USB or CD/DVD
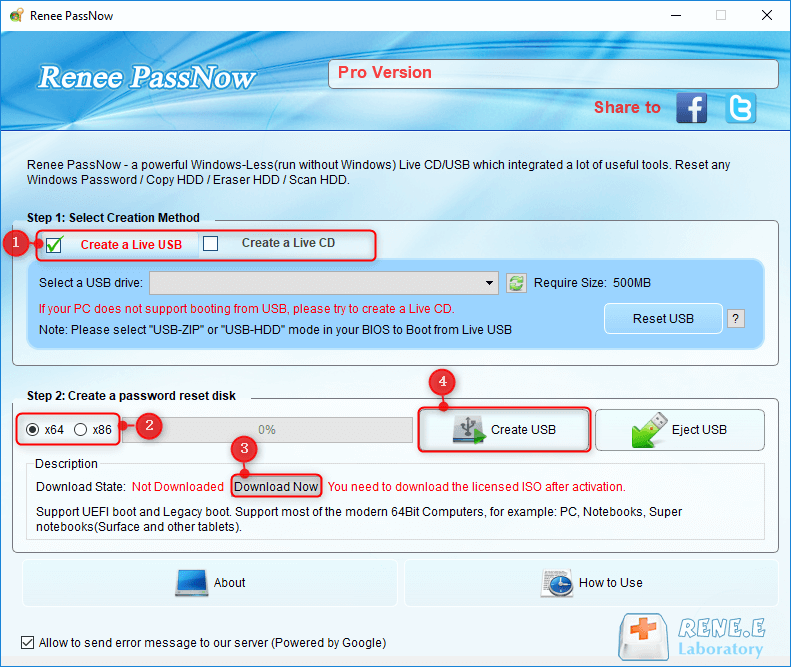
Launch Renee PassNow and insert a USB flash drive or blank CD/DVD into the computer. Select the option to create a bootable media. Follow the on-screen instructions to complete the process.
Create New Windows 10 Password Reset Disk with Renee PassNow
Step 3: Boot the Locked Server from the Bootable Media
Insert the bootable USB or CD/DVD into the locked Windows computer. Restart the computer and enter the BIOS settings by pressing the appropriate key (usually F2 or Delete). Configure the boot order to prioritize the bootable media.
Common Server:
Server TypeEnter boot menu method
DELLPress the F12 key repeatedly before the Dell logo appears on the screen.
HPPress the F9 key multiple times when the HP logo is displayed.
Common Computers:
BIOS NameEnter boot menu method
ASRockDEL or F2
ASUSDEL or F2 for PCs/ DEL or F2 for Motherboards
AcerDEL or F2
DellF12 or F2
ECSDEL
Gigabyte / AorusDEL or F2
Lenovo (Consumer Laptops)F2 or Fn + F2
Lenovo (Desktops)F1
Lenovo (ThinkPads)Enter then F1
MSIDEL
Microsoft Surface TabletsPress and hold Power and Volume Up buttons
Origin PCF2
SamsungF2
ToshibaF2
ZotacDEL
HPEsc/ F9 for `Boot Menu`/ Esc/ F10/ Storage tab/ Boot Order/ Legacy Boot Sources
INTELF10
Boot the target PC with the created password reset USB/CD/DVD.
Step 4: Select password reset function
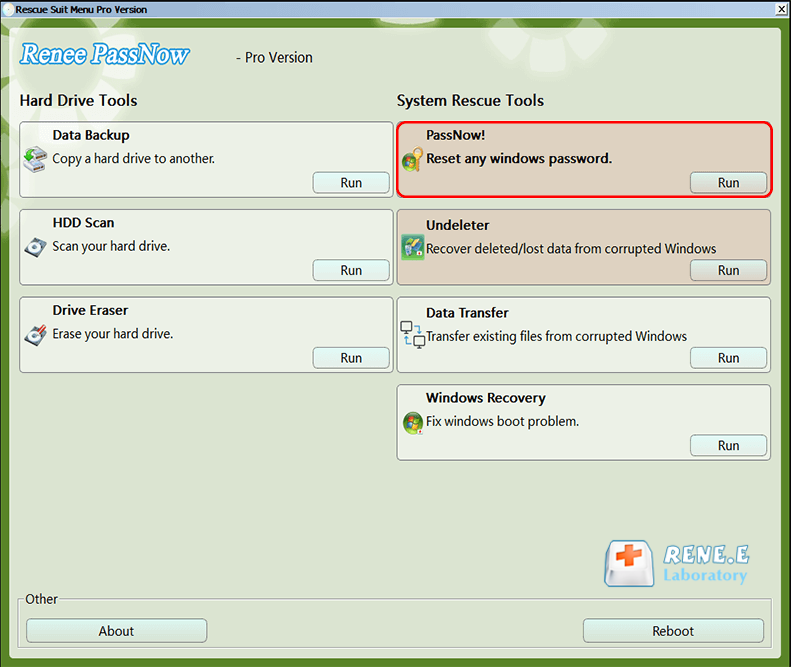
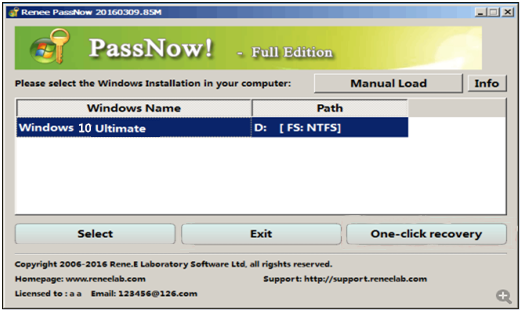
After successfully booting from the bootable media, Renee PassNow will load. Select “PassNow!” function after booting from the new created Windows password reset disk.
reset laptop without password
Step 5: Resetting the Password
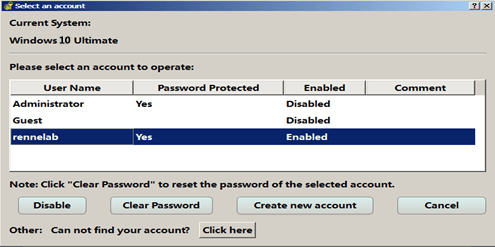
Choose the user account for which you want to reset the password. Then, click on the “Clear Password” button. Renee PassNow will remove or reset the password for the selected user account.
Select target Windows system in the list
Select target user account in the list
Step 6: Reboot the PC
Once the password is reset, remove the bootable media from the PC and restart the computer. You will now be able to log in to Windows Account without a password.
By using Renee PassNow, you can easily reset your laptop password and perform a factory reset, allowing you to regain access to your laptop. Just make sure to follow the instructions carefully and back up any important data beforehand.
Pros:
  • Can reset laptop password without data loss
  • Can convert Microsoft account to Local account
  • Provides other features like creating a backup and wiping out data

Cons:

  • Requires a separate computer with internet access and a USB drive
  • Paid version required for additional features

Method 3: Using Installation Media to Reset Laptop Password

Resetting a laptop password can be a daunting task, especially if you do not have access to the current password. However, there are several methods you can use to reset your laptop password without the need for the old password. One such method is using installation media, such as a Windows installation disk or USB drive, to reset the laptop password. This method is relatively simple and effective, but it may require some technical knowledge and preparation beforehand.
Before starting the password reset process, make sure you have a Windows installation disk or USB drive that is compatible with your laptop’s operating system version. You will also need a working computer with internet access and a blank disk or USB drive to create the installation media.
Step 1: First, you need to create a Windows installation disk or USB drive. If you already have one, you can skip to Step 3. To create a Windows installation disk, insert a blank CD or DVD into your computer’s disk drive. Then, go to the Windows website and download the Media Creation Tool. Follow the instructions to create a Windows installation disk. If you prefer to use a USB drive, insert a blank USB into your computer and run the Media Creation Tool to create a bootable USB drive.
If you do not have a Windows Installation media, you may download Windows Installation Creation Tools here:
Windows VersionDownload LinkRequirement
Windows 7https://learn.microsoft.com/lifecycle/products/windows-7PC with a working Internet connection/ a blank USB flash drive or DVD with at least 8 GB of available storage space/ a product key
Windows 8/8.1https://www.microsoft.com/software-download/windows8Same to above
Windows 10https://www.microsoft.com/software-download/windows10Same to above
Windows 11https://www.microsoft.com/software-download/windows11Same to above
Step 2: Once you have created the installation media, insert it into your locked laptop’s disk drive or USB port and restart your laptop. As your laptop is booting up, you may need to access the boot menu by pressing a specific key on your keyboard (usually F12 or Esc). Select the installation media from the boot menu and press Enter.
Step 3: Next, the Windows installation process will begin. Follow the on-screen instructions until you reach the option to “Install now.” Click on this option and then select “Repair your computer.
Step 4: In the System Recovery Options menu, select “Troubleshoot” and then “Command Prompt.” This will open a command prompt window.
Step 5: In the command prompt, type

copy c:\windows\system32\sethc.exe c:\

and press Enter. This will create a backup of the Sticky Keys utility, which we will later replace with Command Prompt.
Step 6: Next, type

copy c:\windows\system32\cmd.exe c:\windows\system32\sethc.exe

and press Enter. This will replace the Sticky Keys utility with Command Prompt.
Step 7: Close the command prompt window and click on “Continue” in the System Recovery Options menu.
Step 8: Once your laptop has restarted, press the “Shift” key five times to open the Command Prompt window. Type

net user "username" *

, replacing “username” with your account’s username, and press Enter. This will set your account’s password to blank.
Step 9: Close the Command Prompt window and log in to your account without a password. Once you have successfully logged in, go to Control Panel > User Accounts > Manage Another Account and select your account. Click on “Change the password” and create a new password for your account.
Step 10: You have successfully reset your laptop password without the need for the old password. Remember to replace the Sticky Keys utility with the backup you created in Step 5 to revert the changes.
Using installation media to reset your laptop password can be a useful method when you do not have access to the old password. However, it is crucial to have a backup of your important files before attempting this method, as it may cause data loss. Additionally, it is always recommended to create a password reset disk or use a reputable third-party software, such as Renee PassNow, to reset your laptop password.
Pros:
  • Relatively simple and effective method
  • Does not require the old password
  • Can be used when you do not have access to the old password

Cons:

  • Requires technical knowledge and preparation beforehand
  • May cause data loss if not backed up properly
  • Alternative methods like password reset disk or third-party software are recommended

Method 4: Utilizing Recovery Partitions on the Laptop to Reset the Password

If you have a recovery partition on your laptop, you can use it to reset the password. Recovery partitions are essentially reserved sections of your hard drive that contain the necessary files to restore your laptop to factory settings.
Dell:
To factory reset a Dell laptop using the recovery partition, restart the laptop and repeatedly press the F8 key until the Advanced Boot Options menu appears. Select “Repair Your Computer” and choose the language preferences. Then, click on “Dell Factory Image Restore” to initiate the factory reset process.
Asus:
Asus laptops have a built-in recovery partition that allows for factory resetting. Turn off the device and then press and hold the F9 key while turning it back on. Keep holding the F9 key until the Asus Recovery partition is launched. Select the language and click “Next.” Then, choose the “Restore Factory Settings” option and follow the prompts to complete the factory reset. More detailed instructions can be found on Asus’ support page here.
Lenovo ThinkPad:
Factory resetting a Lenovo ThinkPad laptop requires turning off the device and pressing the F11 key repeatedly during startup. This will open the Lenovo Recovery partition. Choose the “Restore Your System” option and click “Next.” Follow the on-screen instructions to proceed with the factory reset process. Lenovo provides a step-by-step guide on their support page here.
Acer:
Acer laptops can be factory reset by turning off the device and then pressing and holding the Alt and F10 keys simultaneously while turning it back on. This will launch the Acer Recovery Management utility. Select “Restore System to Factory Default” and click “Next” to initiate the factory reset.
Apple:
MacBooks and other Apple laptops have a different method for factory resetting. Restart your laptop and hold down the Command and R keys until the Apple logo appears. This will boot your laptop into macOS Recovery. From there, select “Disk Utility” and click “Continue.” Choose your startup disk and click “Erase.” Once the erase process is complete, exit Disk Utility and select “Reinstall macOS” to perform a factory reset. For more information, you can refer to Apple’s support page here.
MSI:
MSI laptops often have a recovery partition that allows for easy factory resetting. Turn off the laptop and press the F3 key multiple times during startup. This will bring up the MSI Recovery Manager. Choose the “System Recovery” option and follow the on-screen instructions to initiate the factory reset. More detailed instructions can be found on MSI’s support page or user manual.
Surface:
Factory resetting a Microsoft Surface laptop can be done by shutting down the device and then pressing and holding the Volume Up button. While still holding the Volume Up button, press the Power button to turn on the laptop. Release the Volume Up button when the Surface logo appears. Select “Troubleshoot” and then “Reset this PC” to perform the factory reset. Microsoft provides more detailed instructions here.
HP:
HP laptops have a built-in recovery partition that allows for factory resetting. Power off the laptop and press the F11 key repeatedly during startup. This will open the HP Recovery Manager. Select “System Recovery” and follow the prompts to begin the factory reset process. More detailed instructions can be found on HP’s support page here.
Advent:
To perform a factory reset on an Advent laptop, restart your computer and immediately start tapping the F8 or F10 key. This will bring up the recovery tools on your hard drive. Follow the on-screen prompts to restore your computer to its original factory settings.
Brand NameHow to Enter Recovery Partition
DellRestart the laptop and repeatedly press the F8 key until the Advanced Boot Options menu appears. Select ‘Repair Your Computer’ and choose the language preferences. Then/ click on ‘Dell Factory Image Restore’ to initiate the factory reset process.
AsusTurn off the device and then press and hold the F9 key while turning it back on. Keep holding the F9 key until the Asus Recovery partition is launched. Select the language and click ‘Next.’ Then/ choose the ‘Restore Factory Settings’ option and follow the prompts to complete the factory reset.
Lenovo ThinkPadTurn off the device and press the F11 key repeatedly during startup. This will open the Lenovo Recovery partition. Choose the ‘Restore Your System’ option and click ‘Next.’ Follow the on-screen instructions to proceed with the factory reset process.
AcerTurn off the device and then press and hold the Alt and F10 keys simultaneously while turning it back on. This will launch the Acer Recovery Management utility. Select ‘Restore System to Factory Default’ and click ‘Next’ to initiate the factory reset.
AppleRestart your laptop and hold down the Command and R keys until the Apple logo appears. This will boot your laptop into macOS Recovery. From there/ select ‘Disk Utility’ and click ‘Continue.’ Choose your startup disk and click ‘Erase.’ Once the erase process is complete/ exit Disk Utility and select ‘Reinstall macOS’ to perform a factory reset.
MSITurn off the laptop and press the F3 key multiple times during startup. This will bring up the MSI Recovery Manager. Choose the ‘System Recovery’ option and follow the on-screen instructions to initiate the factory reset.
SurfaceShut down the device and then press and hold the Volume Up button. While still holding the Volume Up button/ press the Power button to turn on the laptop. Release the Volume Up button when the Surface logo appears. Select ‘Troubleshoot’ and then ‘Reset this PC’ to perform the factory reset.
HPPower off the laptop and press the F11 key repeatedly during startup. This will open the HP Recovery Manager. Select ‘System Recovery’ and follow the prompts to begin the factory reset process.
AdventRestart your computer and immediately start tapping the F8 or F10 key. This will bring up the recovery tools on your hard drive. Follow the on-screen prompts to restore your computer to its original factory settings.
In conclusion, utilizing the recovery partition on your laptop is a convenient and effective method to reset your password without the use of installation media or external programs. However, it may not be available on all laptops, and creating a new recovery partition can be risky. It is always recommended to seek professional help if you are unsure about any of these methods.

Advantages and Limitations of Each Method

Method Nameadvantageslimitationsdata loss risks
Removing the password entirely by accessing the built-in administrator accountResetting laptop without needing a password/ regain access to laptopBuild-in administrator must be enabled| Requires starting laptop in Safe Mode/ recommended to set a new password for security-
Using Renee PassNow to reset the laptop password/ then factory reset the laptopResetting laptop password/ does not require technical knowledge--
Using Installation Media to Reset Laptop PasswordResetting laptop passwordMay require technical knowledge and preparation/ potential data loss if not backed upPotential data loss if not backed up
Utilizing Recovery Partitions on the Laptop to Reset the PasswordFactory resetting laptop/ restoring to factory settingsMay erase all personal data and settings/ need to back up important filesMay erase all personal data and settings
Each method may work differently for different operating systems. For example, Method 1 and 2 only work for Windows operating systems, while Method 3 and 4 is compatible with all operating systems. It is important to research and make sure the chosen method will work for your specific operating system.
Overall, each method has its own advantages and limitations when it comes to resetting a laptop without a password. It is important to carefully consider these factors and choose the method that best suits your needs and is compatible with your operating system. Remember to regularly back up your important files to prevent any potential data loss.

Conclusion

In conclusion, there are various methods to reset a laptop password, each with its own advantages and limitations. By accessing the built-in administrator account, users can remove the password entirely but risk losing data. Using third-party software like Renee PassNow allows for password reset and factory reset, but may not work with all operating systems. Installation media and recovery partitions are other options, but also come with the possibility of data loss. Ultimately, the best method will depend on the user’s situation and preference. Remember to always create a password reset disk or regularly backup important data to avoid being locked out of your laptop. With these options, unlocking your laptop and resetting your password doesn’t have to be a difficult task.