

How to Reset a Sony VAIO Laptop to Factory Settings — Even If You Forgot the Password

Summary
Learn how to reset Sony VAIO laptop to factory settings with this trusted guide. Follow easy steps to resolve issues, protect personal data, and revive your VAIO.


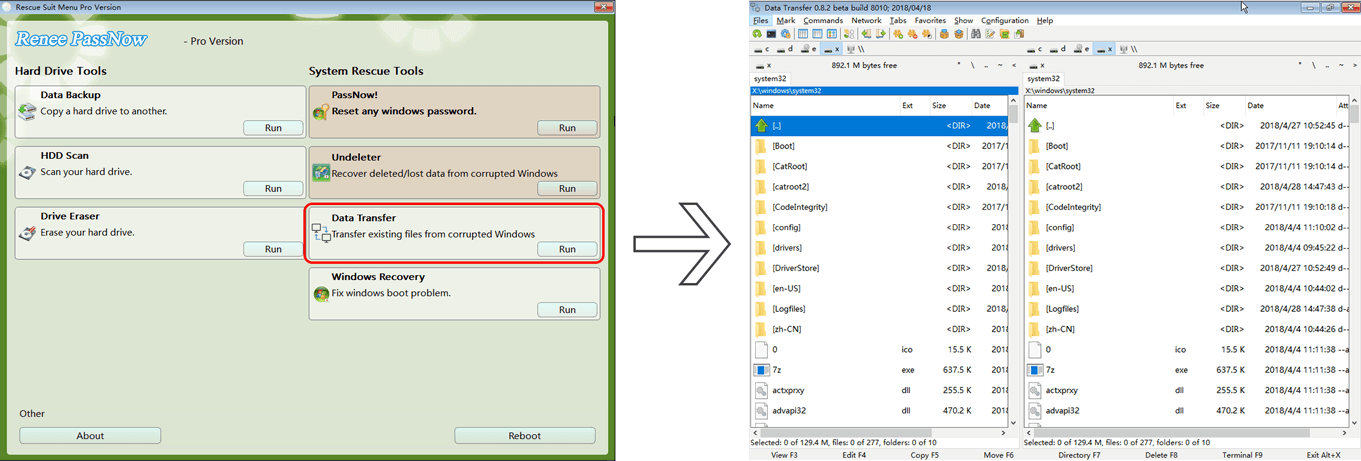

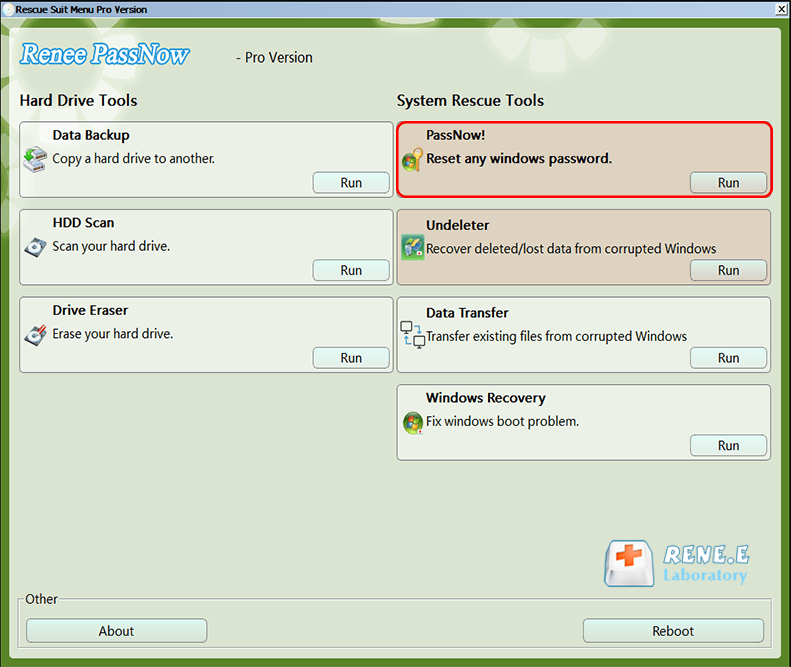
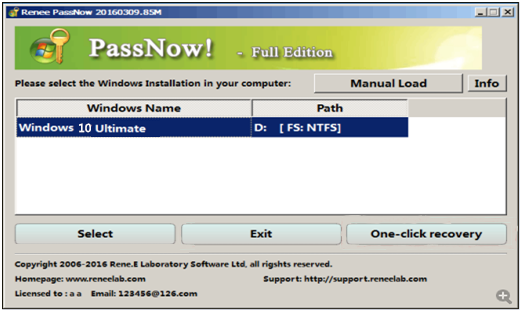
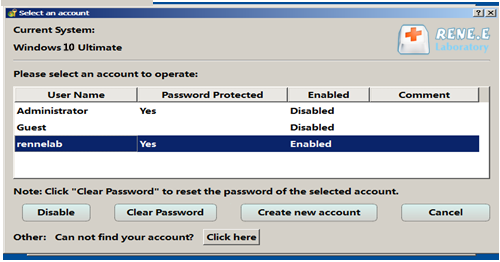
Remove Windows Login Password 3 steps for whole password remove process.
Recover the files Recover the deleted files without Windows system.
Transfer the data Transfer the important files of the computer with system.
Multifuctional Data transfer, data recovery, bootable problem recovery can be run without system.
Highly compatible Windows 11/10/8.1/8/7/XP/Vista. UEFI boot.
Remove Login Password Support Windows 11/10/8.1/8/7/XP/Vista. UEFI boot.
Recover the files Recover the deleted files without Windows system.
Transfer the data Transfer the important files of the computer with system.


| Device Type | Boot Menu Access |
|---|---|
Sony VAIO | Press F2 for BIOS, F10 for Recovery, or Assist button (while powered off) for VAIO Care Rescue Mode |
DELL | Press F12 repeatedly |
HP | Press F9 repeatedly |
ASUS | Press DEL or F2 |
Acer | Press DEL or F2 |
Lenovo | Press F2 or Fn + F2 |
| Method | Supported VAIO Models (System Versions) | How to Access | Requires Original Windows Account/Password? |
|---|---|---|---|
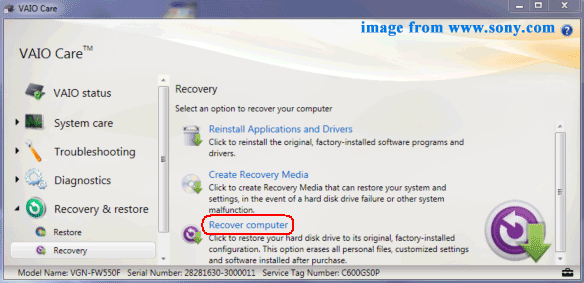
VAIO Care | Windows 7, 8, 8.1 | Open VAIO Care, go to Recovery & Restore > Recover Computer > Factory Condition. If laptop won’t boot, press ASSIST at startup for Rescue Mode. | Yes, unless using ASSIST button. If locked out, use Renee PassNow. |
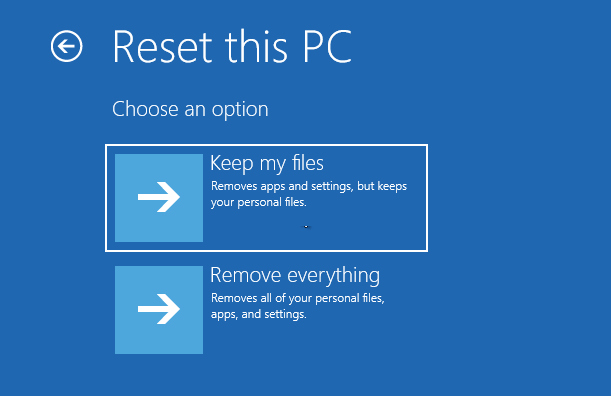
Windows Reset Feature | Windows 10, 11 | Open Settings > Update & Security (Win 10) or System > Recovery (Win 11) > Reset this PC. If laptop won’t boot, force Windows Recovery Environment via repeated power cycles. | Yes, unless via Recovery Environment. If locked out, use Renee PassNow. |
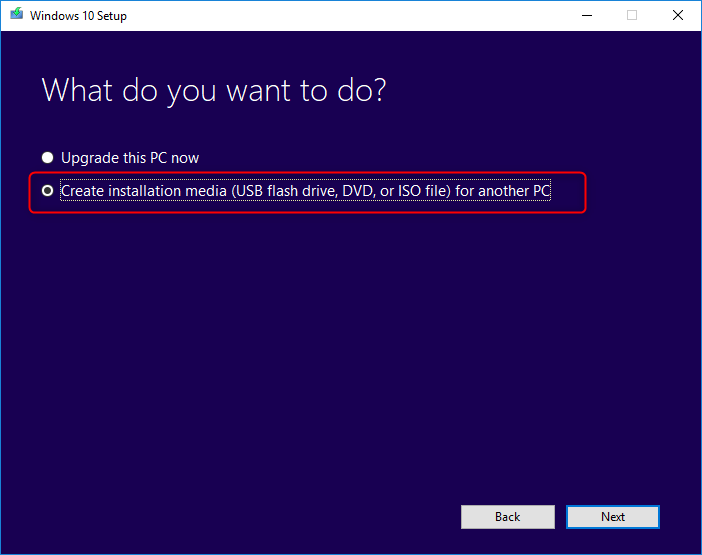
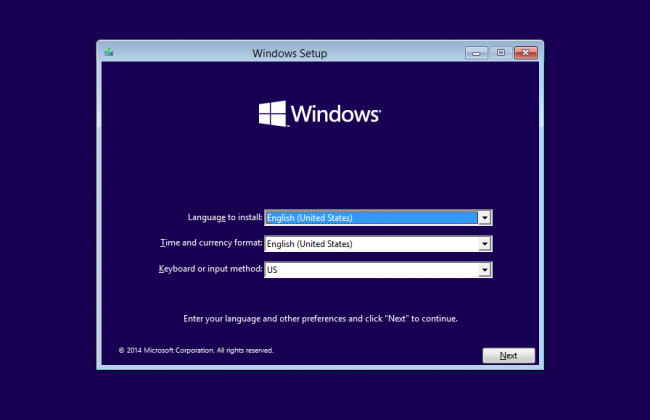
Bootable USB Drive | All Windows versions | Create bootable USB with Microsoft’s Media Creation Tool. Boot VAIO, press F2 for BIOS, set USB as first boot device, and follow Windows Setup for Custom install. | No, account/password not required. Product key may be needed (can skip). |
Command Prompt | Windows 10, 11 | Open Command Prompt as admin, run systemreset, and choose reset option. | Yes, requires admin access. If locked out, use Renee PassNow. |
Steps to Reset via VAIO Care:
Notes:

Step 1: Create a Bootable USB Drive
Step 2: Reinstall Windows

systemreset

Will a factory reset remove all viruses from my Sony VAIO laptop?
Can I reset my Sony VAIO without a recovery partition?
How long does it take to reset a Sony VAIO laptop to factory settings?
What should I do if my Sony VAIO fails to reset?
Can I recover files after a factory reset?

Remove Windows Login Password 3 steps for whole password remove process.
Enable/Create Administrator One click for creating new administrator and enable the disabled account.
Widely Use New version supports UEFI boot model, which can be used on more computers, laptops and even surfaces.
Multifuctional Data transfer, data recovery, bootable problem recovery can be run without system.
Highly compatible Windows 11/10/8.1/8/7/XP/Vista.
Remove Login Password Support Windows 11/10/8.1/8/7/XP/Vista.
Enable/Create Administrator One click for creating new administrator and enable the disabled account.
Easy to use No need of any professional knowledge or password reset disk.
Relate Links :
The Ultimate Guide to Cracking Laptop Passwords with a USB Drive

04-12-2023
Ashley S. Miller : Discover the top methods for cracking laptop passwords with a USB drive in this ultimate guide. From factory...
Factory Resetting Windows 7 Without Password: A Step-by-Step Guide

13-10-2023
Amanda J. Brook : Struggling to factory reset your Windows 7 PC without a password? Look no further! In this article, we...


User Comments
Leave a Comment