author avatar
    Technology Manager of Test Dept.
 

Summary
Learn how to fix the problem that the computer stuck on preparing automatic repair. This article provides insight into possible causes and solutions. Besides, you can backup the important files before the repairing.


Stuck on preparing automatic repair

I. Why is there an error that the PC stuck on preparing automatic repair?

Automatic Repair is a Windows built-in feature designed to help users fix errors and crashes that occur during system startup. However, when the computer affects the normal operation of this function due to some faults, there will be an error showing Preparing automatic repair when the computer is turned on. After this error occurs, users will not be able to normally access all programs, services, files, etc. in the device.
preparing automatic repair on Windows 10
The error “preparing automatic repair” is always displayed on Windows startup, which is usually caused by the following reasons:
Reason 1: System files are damaged or deleted by mistake
Reason 2: The downloaded/installed software or plug-ins and drivers are not compatible with the system.
Reason 3: The disk is damaged due to a sudden power failure or shutdown of the computer or other reasons.
Reason 4: The system has been attacked by malware or viruses.
After learning about the “Preparing automatic repair” error, you can try the methods in the third part to solve the current problem. But we need to remind everyone that before repairing the fault, in order to ensure the safety of important data in the device, it is recommended that you perform data backup in advance to prevent unnecessary losses.

II. Before repairing the fault, use Renee PassNow for data backup

1. What is Renee PassNow?

Renee PassNow is a professional system rescue software, which can help Windows users clear Windows account passwords, create new administrator accounts; restore disk/memory card data, recover data after hard disk formatting; transfer disk files; erase or scan Disk files, etc. In addition, this software also supports repairing Windows system problems, such as: repairing MBR boot records, DBR error parameters, 0xc00000e, Windows system startup failure, and some problems that cause black screen or blue screen, etc. As a system rescue tool with various functions, it is perfectly compatible with multiple systems including Windows 10/8.1/8/7/XP/Vista, and can meet the system rescue needs of different users.
Hot Topic - ADsRenee PassNow – 3 Steps to transfer data from the crashed system

Easy to use 3 steps to transfer the files.

Transfer the files Transfer the important files of the computer without system.

Preview the files Preview the files while transferring the data.

Multifuctional Data recovery, Windows password reset, bootable problem recovery can be run without system.

Highly compatible Windows 10/8.1/8/7/XP/Vista. Also supports UEFI boot mode.

Easy to use 3 steps to transfer the files.

Transfer the files Transfer the important files of the computer without system.

Preview the files Preview the files while transferring the data.

Free TrialFree TrialNow 2000 people have downloaded!

2. How to use Renee PassNow for data backup?

Before fixing the problem that Windows keeps showing “preparing automatic repair” when booting, you can create a startup disk through Renee PassNow, then start the computer through the startup disk, and then use the function of this software to back up data. Specific steps are as follows:
Step 1: Download and install Renee PassNow on other computers that can log in and run normally, then connect the U disk to the PC, run Renee PassNow, and then check in “Step 1: Select creation method” (Create a Live USB) option. (Note: Before performing this operation, please make sure that the important files in the U disk have been saved in other locations, because the operation process will delete all the data in the U disk.)
Step 2: Next, select (x64) or (x86) according to the system type, click the (Download Now) button to download the ISO file, click the (Create a Live USB) button after the file is downloaded, and click the (Eject USB) button.
use renee passnow to create usb to reset passnword
Step 3: Connect the created boot device to the computer that needs to transfer data, turn on the computer, and then the shortcut key to enter the BIOS will be displayed on the computer screen (the display time of this interface is very short, maybe only one or two seconds), click continuously BIOS shortcut key to enter the BIOS setting interface, and then set the boot U disk as the first in the boot sequence in Boot Priority, then save the settings and restart the computer.
select boot order
Step 4: After booting the computer from the bootable USB flash drive and entering the application, select the option Data Backup. This option is equivalent to completely cloning the hard disk to other hard disks, so the hard disk capacity for saving backup files needs to be larger.
functions of Renee PassNow
Step 5: Select the hard disk to back up files in the source list, select the hard disk to save files in the destination list, and finally click the button clone and wait for the cloning to complete to successfully back up the computer files.
Select the drive
Step 6: If you only need to transfer some important files, the function Data Transfer will be more suitable for you.
Windows 10 recovery drive select data transfer function in Renee Passnow to sovle windows 10 won't boot from USB
Step 7: You can click on each disk drive letter (C/D/E/F, etc.) to find the files to be transferred. It is recommended that you transfer them to an external disk. The operation of transferring data is very simple. For example, if you want to transfer the data in the C drive to the G drive, you can first select the C drive on the upper left, select the G drive on the upper right, and then select the files in the C drive, and click the Copy function button in the middle. Disk data can be easily transferred. If there is a file you want to delete, you can also click the Delete button in the middle after selecting the file, but the deletion operation cannot be undone, please operate with caution.
data transfer in Renee Passnow
Kind tips If you find that files are lost during the process of backing up or transferring data, please select the option Undeleter on the main function interface to perform data recovery operations.
After backing up or transferring the important files in the computer, we can continue to use the following methods to solve the SrtTrail.txt error.

III. How to fix the problem that the PC stuck on preparing automatic repair?

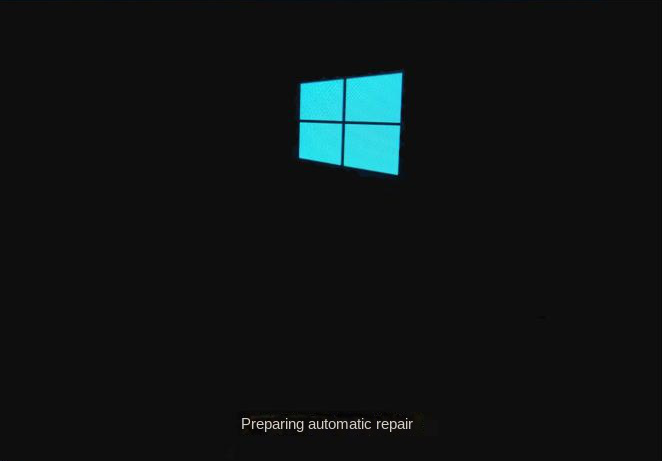
Under normal circumstances, when you encounter the problem that Windows keeps showing “preparing automatic repair” when booting, the easiest way is to try to force shutdown, and then restart normally to check whether the problem still exists. If this method cannot solve the current problem, it is recommended Read on to learn about other methods.

1. Enter safe mode

Safe Mode is a diagnostic mode of Windows. In safe mode, you can fix some system-related issues by uninstalling/updating incompatible software/drivers, deleting problematic files, cleaning viruses, etc. When Windows starts up with a black screen and always displays “Preparing automatic repair”, you can run the computer from the Windows installation disk and enter safe mode to solve the current problem. The specific operation steps are as follows:
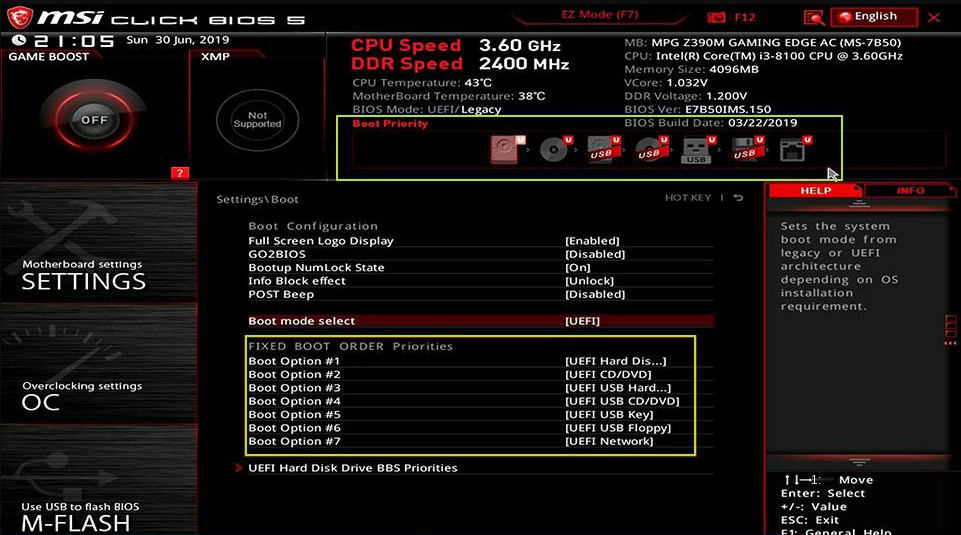
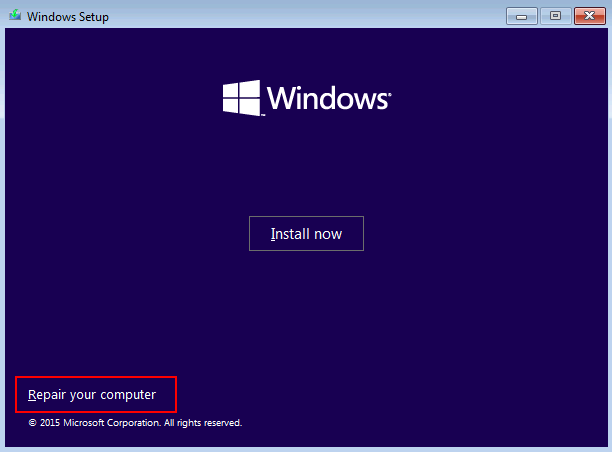
Step 1: Insert the Windows installation disk (DVD or U disk) into the computer. Continuously click F2 or F10 or DEL or ESC shortcut key (varies with the computer brand) to enter the BIOS setting interface when starting up, set the first boot sequence to the Windows installation disk, and then make the computer start from the installation disk, in the Windows installation program “Now Install” interface, select the option Repair your computer to enter the recovery environment.
Repair your computer
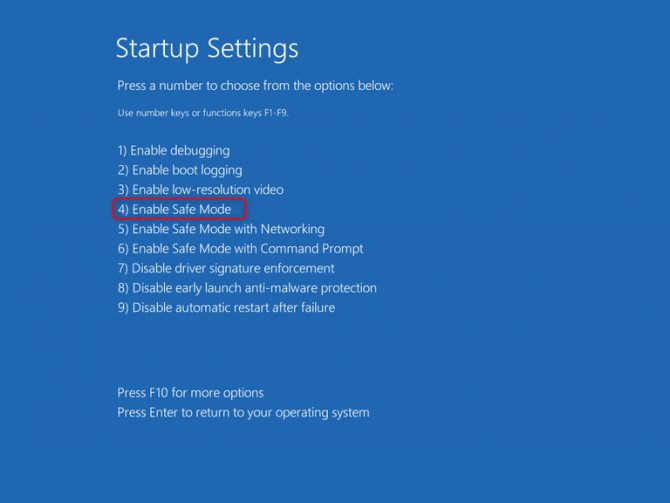
Step 2: After entering the recovery environment, select Troubleshooting > Advanced Options > Startup Settings. When the computer restarts, you can choose the desired safe mode by pressing the corresponding number. Here you can press 4 to enable safe mode.
press 4 to enable safe mode
Step 3: After the computer enters the safe mode, you can perform a series of routine repairs on the computer, such as:
●Run antivirus software to scan for and remove viruses.
●Delete problematic files that may cause “Prepare Automatic Repair” to get stuck. For example, an error occurs after receiving or downloading a file from an unknown source, you can try to delete the file.
●Uninstall suspicious software or drivers. Some users reported that the “preparing automatic repair” error occurred only after installing a third-party anti-virus software. After uninstalling, it can be turned on normally.
●Update hardware drivers.
● Run the SFC command to scan and repair system files. The operation method is to open the command prompt window, and enter the (SFC /scannow) command, and press the (Enter) key to execute the command.

2. Rebuild the BCD file

The Bootrec command can repair corrupt master boot record or boot configuration data (BCD) files. This method needs to enter the recovery environment to operate. Proceed as follows:
For steps to enter the recovery environment, follow the first step of method 1. Then follow the steps below.
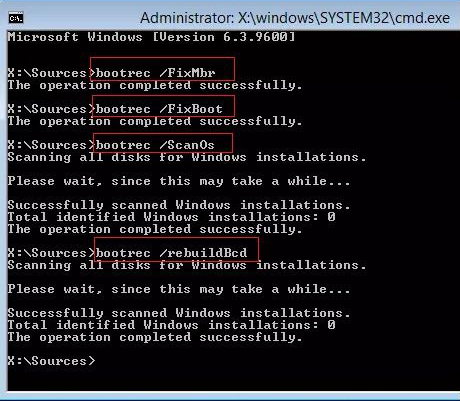
Step 1: After entering the recovery environment, select Troubleshooting > Advanced Options > Command Prompt.
command prompt
Step 2: In Command Prompt, enter the following command. Each time you enter a command, you need to press the Enter key. After the repair is complete, restart the computer to see if the problem is resolved.
bootrec /fixmbr
bootrec /fixboot
bootrec /scanos
bootrec /rebuildbcd
Type the bootrec command

3. Perform System Restore

If you created a Windows restore point before the “Preparing automatic repair” error appeared, then, you can perform a system restore to fix the current issue. The specific operation steps are as follows:
Step 1: Turn on the computer, when the computer brand logo appears, press and hold the power button to force shutdown, repeat more than 3 times, then allow the computer to fully start, select advanced option in the Automatic Repair interface, the computer will enter the Windows recovery environment middle.
automatic repair
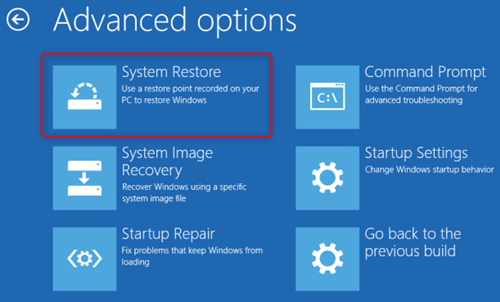
Step 2: When the screen displays to select an option, please click Troubleshooting – Advanced Options – System Restore in sequence.
select system restore in windows system to fix windows 10 error
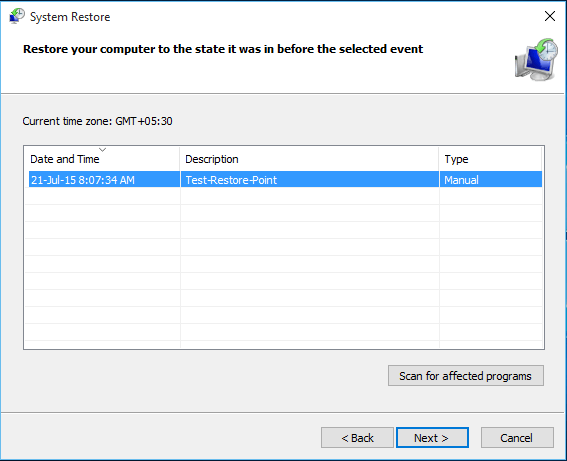
Step 3: Then, select a recent restore point before the error occurred to restore, click Next and wait for the restore process to complete.
select restore point to restore windows system

4. Reset the Windows system

If you have tried the above three methods and none of them work, you can also try to reset the Windows system to solve the current problem. The specific steps are as follows:
Step 1: Insert the Windows installation disk (DVD or U disk) into the computer, and press F2 or F10 or DEL or ESC keys continuously (there may be slight differences due to different computer brands) to enter the BIOS setting interface when starting up, and install the disk Set first in the boot order. Boot the computer from the Windows installation disk and click the option Repair Your Computer to enter the recovery environment.
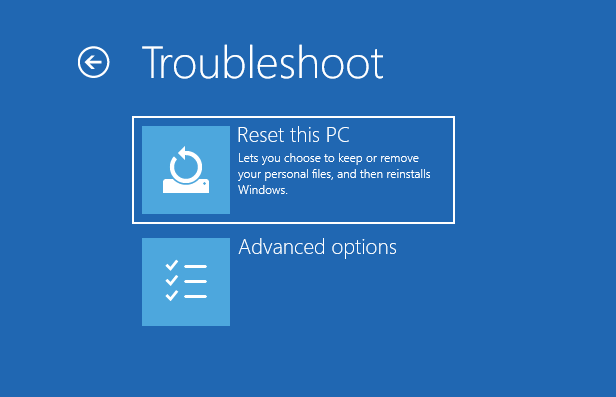
Step 2: Then when Choose an option appears, click Troubleshooting – Reset this PC in turn.
click to format windows computer or nec laptop
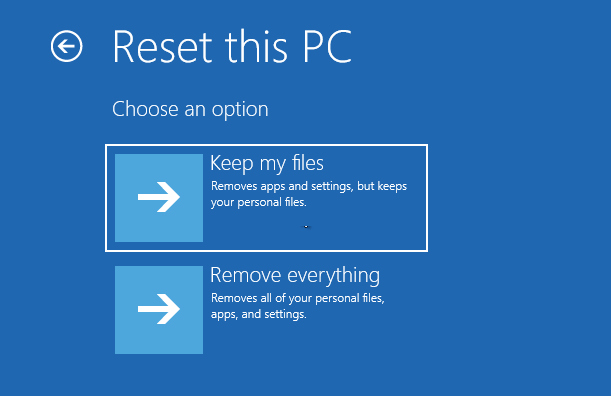
Step 3: Next select the option Keep my files.
reset PC to remove everything
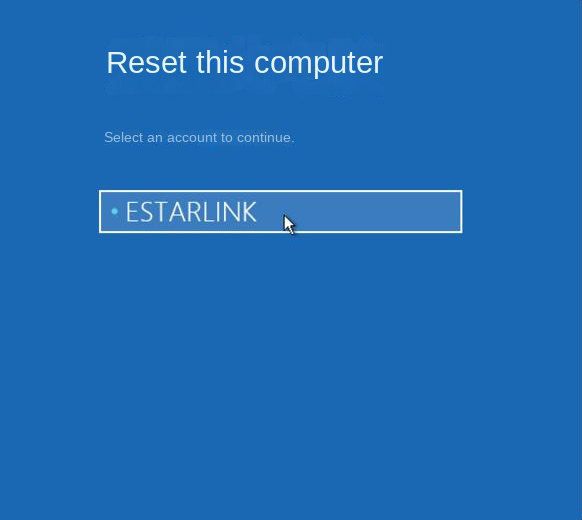
Step 4: After the computer restarts automatically, please click to select an “Account Name”. Then enter the account password (no need to enter if there is no password), click Continue.
select account
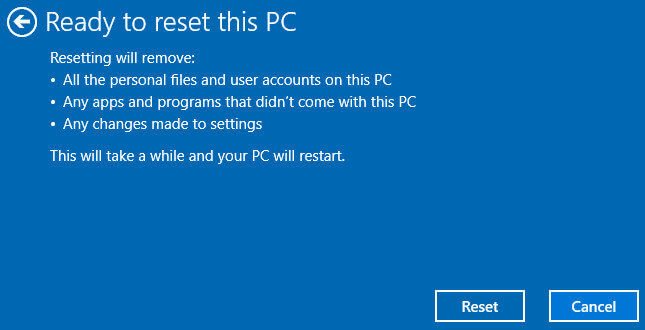
Step 5: After confirming the reset information, click Reset. The computer will automatically restart and initialize the system. This process may take a long time, please wait patiently.
confirm to reset this PC
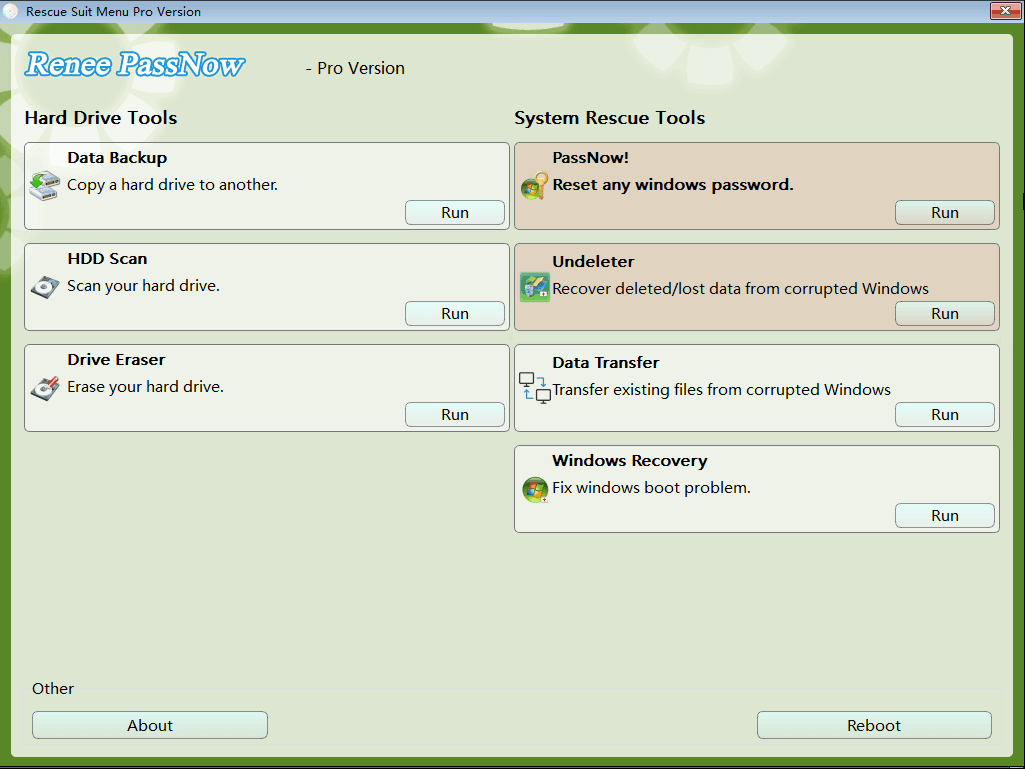
Kind tipsWhen none of the above methods can solve the problem, you may need to reinstall the Windows system. Before reinstalling the system, it is recommended to use Renee PassNow to transfer important data in the computer to avoid data loss.