author avatar
    Senior Program Developer
 

Summary
Learn how to fix the CLASSPNP.SYS blue screen error on Windows 10. Our expert-recommended methods make it easy to solve this tricky issue. Discover the solutions now.


classpnp sys

I. What is CLASSPNP.SYS, why does CLASSPNP.SYS error occur?

CLASSPNP.SYS is a Window SCSI class system file attached to the Windows operating system. Its function is to allow users to access the operating system smoothly. That is to say, when the CLASSPNP.SYS file error occurs, it will cause your computer to blue screen and cannot enter the system normally.
Under normal circumstances, the reasons for CLASSPNP.SYS errors may be as follows:
●Hardware failure
●BIOS configuration mode error
● CLASSPNP.SYS file is damaged
After understanding the possible reasons for CLASSPNP.SYS errors, in order to better protect your computer files, it is recommended that you transfer important data in advance before fixing the errors. If your computer hard disk saves very important files, but at this time you cannot transfer the files because Windows cannot be started, you can try to use Renee PassNow to transfer or restore important files in the computer without entering the Windows system. document. The following are the detailed operation steps.

II. Use Renee PassNow to transfer or recover important data

1. What is Renee PassNow?

Renee PassNow is a professional system rescue software, which can help Windows users clear Windows account passwords, create new administrator accounts; restore disk/memory card data, recover data after hard disk formatting; transfer disk files; erase or scan Disk files, etc. In addition, this software also supports repairing Windows system problems, such as: repairing MBR boot records, DBR error parameters, 0xc00000e, Windows system startup failure, and some problems that cause black screen or blue screen, etc. As a system rescue tool with various functions, it is perfectly compatible with multiple systems including Windows 10/8.1/8/7/XP/Vista, and can meet the system rescue needs of different users.
Hot Topic - ADsRenee PassNow – 3 Steps to transfer data from the crashed system

Easy to use 3 steps to transfer the files.

Transfer the files Transfer the important files of the computer without system.

Preview the files Preview the files while transferring the data.

Multifuctional Data recovery, Windows password reset, bootable problem recovery can be run without system.

Highly compatible Windows 10/8.1/8/7/XP/Vista. Also supports UEFI boot mode.

Easy to use 3 steps to transfer the files.

Transfer the files Transfer the important files of the computer without system.

Preview the files Preview the files while transferring the data.

Free TrialFree TrialNow 2000 people have downloaded!

2. How to use Renee Passnow to transfer or restore data?

When your computer cannot enter the system normally due to a blue screen failure, you can create a startup disk through Renee Passnow, then start the computer through the startup disk, and then use the functions provided by the software to transfer or restore data. Specific steps are as follows:
Step 1: Download and install Renee PassNow on other computers that can log in and run normally, then connect the U disk to the PC, run Renee PassNow, and then check in “Step 1: Select creation method” (Create a Live USB) option. (Note: Before performing this operation, please make sure that the important files in the U disk have been saved in other locations, because the operation process will delete all the data in the U disk.)
Step 2: Next, select (x64) or (x86) according to the system type, click the (Download Now) button to download the ISO file, click the (Create a Live USB) button after the file is downloaded, and click the (Eject USB) button.
use renee passnow to create usb to reset passnword
Step 3: Connect the created boot device to the computer that needs to transfer data, turn on the computer, and then the shortcut key to enter the BIOS will be displayed on the computer screen (the display time of this interface is very short, maybe only one or two seconds), click continuously BIOS shortcut key to enter the BIOS setting interface, and then set the boot U disk as the first in the boot sequence in Boot Priority, then save the settings and restart the computer.
select boot order
Step 4: Wait for a while, after Renee PassNow is loaded, select (Data Transfer). If you need to transfer the data of the entire hard disk, you can select the (Data Backup) option.
Windows 10 recovery drive select data transfer function in Renee Passnow to sovle windows 10 won't boot from USB
Step 5: You can click on each disk drive letter (C/D/E/F, etc.) to check whether important files are lost. If not, it is recommended that you transfer them to an external disk. The operation of transferring data is very simple. For example, if you want to transfer the data in the C drive to the G drive, you can first select the C drive on the upper left, select the G drive on the upper right, and then select the files in the C drive, and click the Copy function button in the middle. Disk data can be easily transferred. If there is a file you want to delete, you can also click the (Delete) button in the middle after selecting the file, but the deletion operation cannot be undone, please operate with caution.
data transfer in Renee Passnow
Step 6: If you find that there is data loss, please select the (Undeleter) option on the main interface of the function, and click the (Run) button.
data recovery function in Renee Passnow
Step 7: Select (Fast Partition Scan) to scan the target hard disk.
show undeleter functions through passnow
Step 8: After the scan is complete, select the file to be recovered, click the (Recover) button to execute the data recovery command, please save the file in another external disk, eject the U disk after the recovery is complete, and then perform other operations on the computer, such as maintenance , replace the hard disk or reinstall the system, etc.
The above are the detailed steps to restore and transfer data when you cannot enter the system. Let’s learn how to fix CLASSPNP.SYS errors.

III. How to Fix CLASSPNP.SYS Error in Windows 10?

1. Disconnect external hard disk/peripherals

Sometimes, the connection of peripheral devices can cause CLASSPNP.SYS errors to appear. At this time, you can try to disconnect all external hard disks and peripheral devices (USB mouse, external hard disk, Bluetooth wireless mouse adapter or radiator, etc.) to try to solve the current problem.

2. Enable safe mode to repair system files

Because CLASSPNP.SYS errors may prevent users from entering the system normally, you need to restart the computer in safe mode before executing the system file repair command. Safe mode is a special startup mode in Windows system, it can only start the basic files and drivers needed to run Windows, in this mode, we can easily repair some system errors. The specific steps to enter safe mode are as follows:
Step 1: Press and hold the Power key button for 10 seconds to shut down the computer. Next, press the power key again to start the computer.
Step 2: When you see that Windows has started and the brand logo appears, press and hold the power key for 10 seconds again to turn off the device.
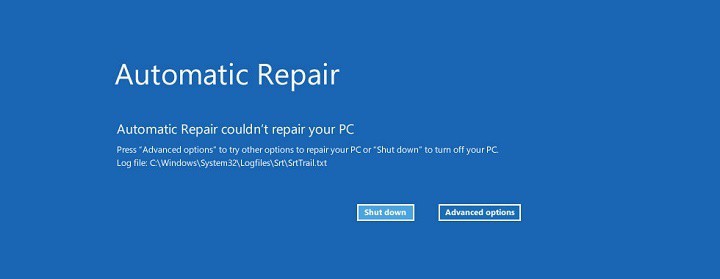
Step 3: Press the power button to start the computer, when the computer starts press and hold the power button for 10 seconds to turn off the device. Then start the computer again, this time allowing the computer to fully start. Select (Advanced Options) in the “Automatic Repair” interface. You will then enter the Windows recovery environment.
automatic repair
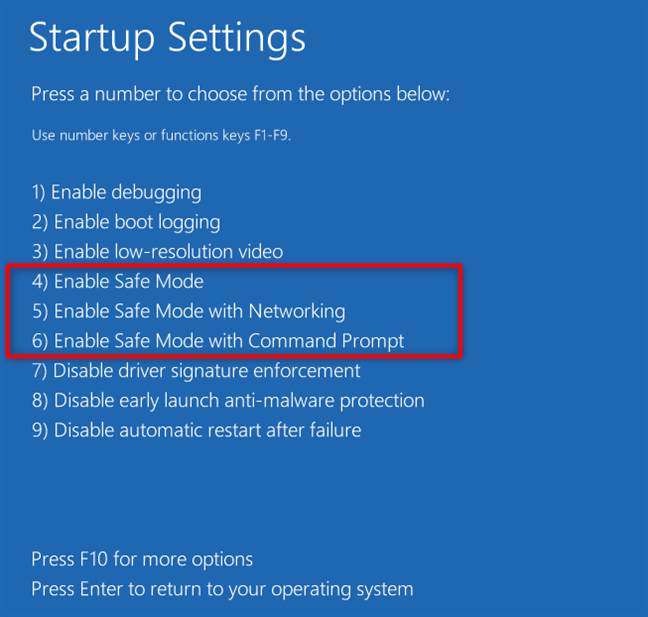
Step 4: Then the computer will ask you to choose an option, please select (Troubleshoot), and then select (Advanced Options>Startup Settings>Restart). When the computer restarts, select 5 or F5 to start Safe Mode with Networking.
startup settings windows 10 safe mode
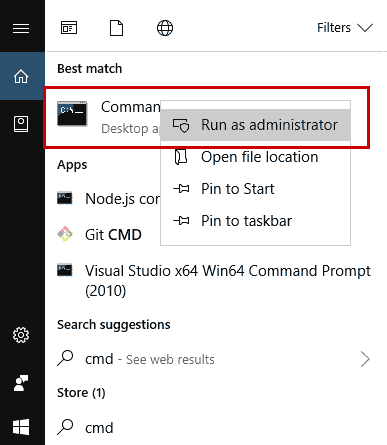
Step 5: After entering Safe Mode, search for (cmd) in the search box in the lower left corner, right-click (Command Prompt) and select the (Run as Administrator) option.
run cmd
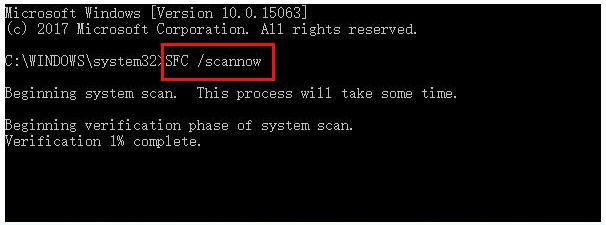
Step 6: In the opened command prompt window, enter the command (SFC /scannow) and press the (Enter) key. sfc /scannow is a commonly used command among all SFC commands. It can immediately scan all protected system files and repair the problems found. Next, SFC (System File Checker) performs a system scan and repairs problematic system files. After the repair is complete, restart the computer and check to see if the current problem is resolved.
Enter the SFC command

3. Restore the computer to the latest restore point before the error occurred

Usually, when your computer has a CLASSPNP.SYS error, you can also try to restore the computer to the restore point before the failure to solve the current problem. The specific steps are as follows:
Step 1: Turn on the computer, when the computer brand logo appears, press and hold the power button to force shutdown, repeat more than 3 times, then allow the computer to fully start, select (advanced options) in the “Automatic Repair” interface, the computer will enter the Windows recovery environment middle.
automatic repair
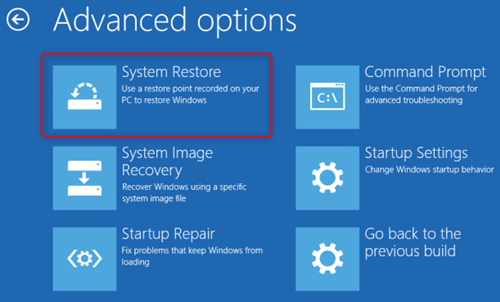
Step 2: When the screen displays to select an option, please click (Troubleshoot) – (Advanced Options) – (System Restore) in sequence.
select system restore in windows system to fix windows 10 error
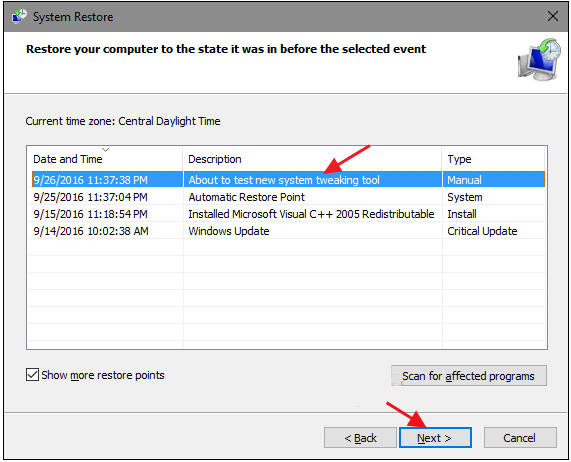
Step 3: Then, select a recent restore point before the error occurred to restore, click (Next) and wait for the restore process to complete.
select the restore point

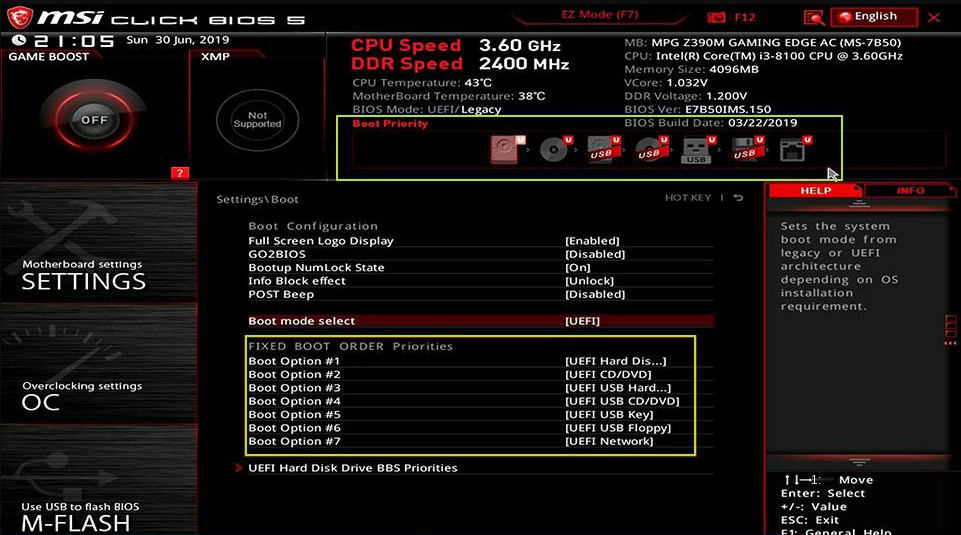
4. Change the BIOS configuration mode

When the BIOS configuration mode is wrong, it will also lead to the CLASSPNP.SYS error. At this time, you need to manually change the BIOS configuration mode. The specific operation steps are as follows:
Step 1: Restart the computer, press F1 or F2 or DEL or Esc key continuously and quickly (it varies with the brand of the computer and motherboard, you can check the prompt that appears when starting up) to enter the BIOS interface.
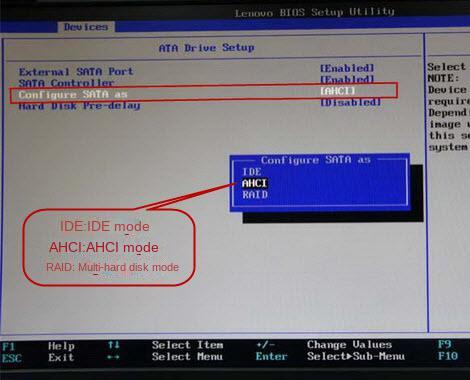
Step 2: Take the following figure as an example, select (Devices>ATA Drives Setup>Configure SATA as), and then change (ACHI) to (IDE) compatibility mode. Press (F10) to save setting changes. Finally, restart the computer to see if the current problem is resolved.
Change the SATA Controller MODE Option setting
If none of the above methods can solve the problem, it is recommended that you update Windows or perform an update through the (Upgrade this PC now) option of the Windows Media Creation Tool.