

Resolving unmountable_boot_volume Issues Using Built-In and Advanced Methods

Summary
This article provides a technical overview of the unmountable_boot_volume error in Windows systems, outlining common causes such as file system corruption, boot record damage, and hardware configuration issues. It reviews solution categories including data recovery tools, built-in startup repair, command-line recovery methods, and hardware-level checks across multiple Windows versions.

| Windows Version | Common Causes | Typical Symptoms | Data Recovery Likelihood | System Repair Likelihood |
|---|---|---|---|---|
Windows XP / 7 | • File system corruption | • Blue Screen of Death (BSOD) | High when using bootable recovery media or external drive access | Moderate — Recovery Console or manual repair may succeed |
Windows 10 / 11 | • Bad sectors on system drive | • Automatic Repair loop | Very High using modern graphical recovery tools or WinPE‑based software | High if system file corruption is limited and hardware is healthy |

Remove Windows Login Password 3 steps for whole password remove process.
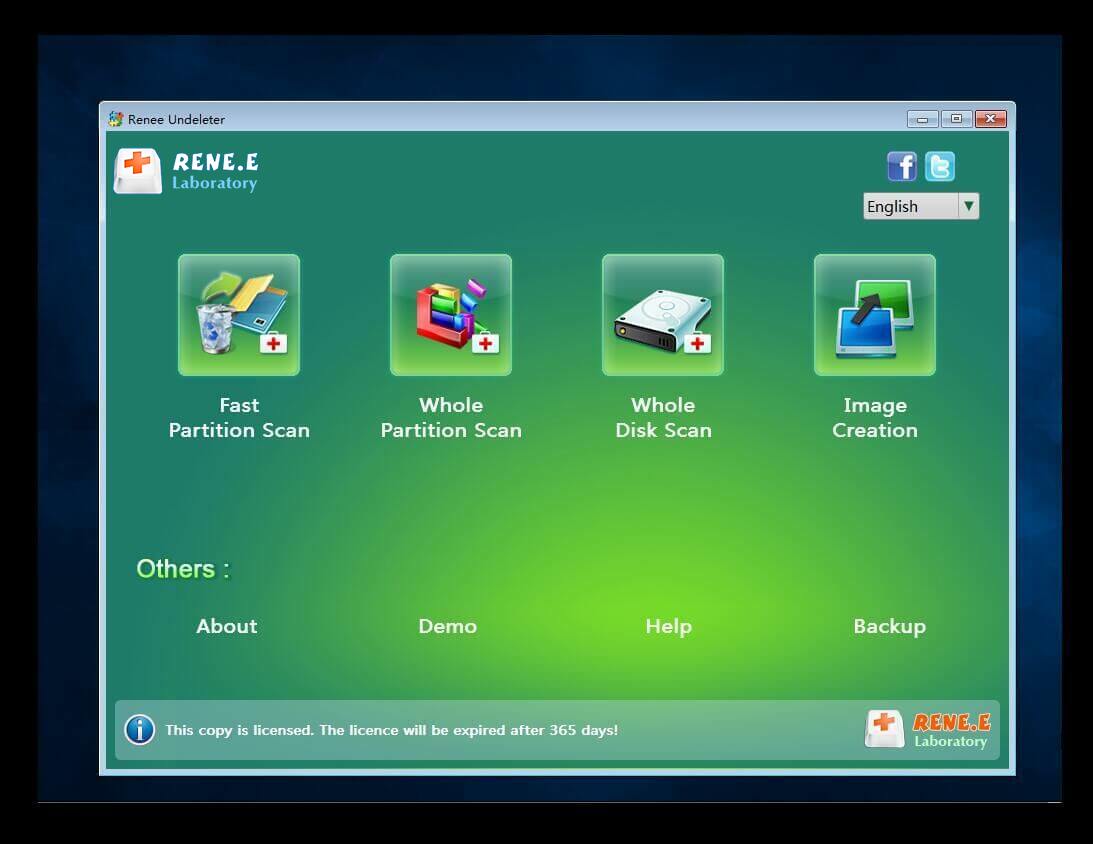
Recover the files Recover the deleted files without Windows system.
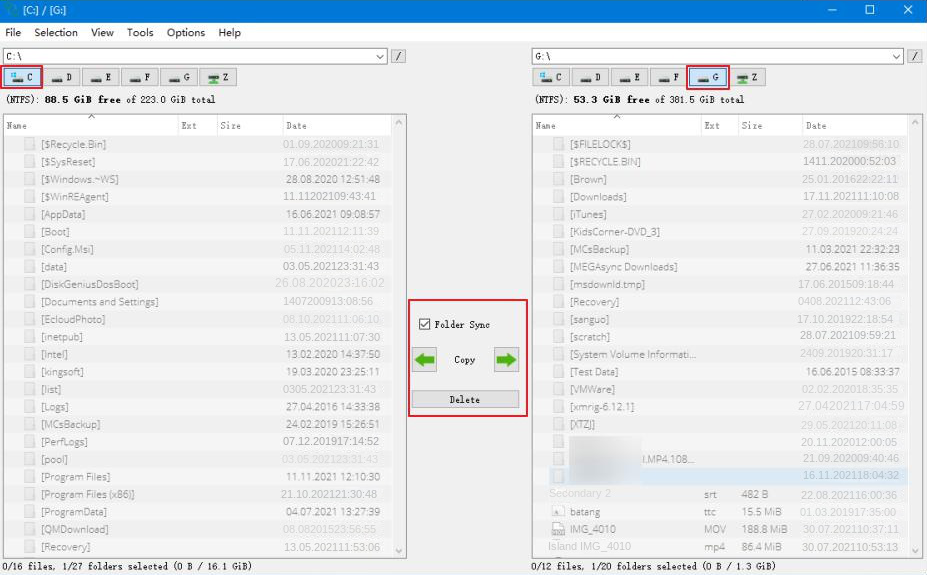
Transfer the data Transfer the important files of the computer with system.
Fix Windows startup error Fix various Windows startup failures or crashes.
Erase disk Completely erase disk files which will not be restored.
Remove Windows Login Password 3 steps for whole password remove process.
Recover the files Recover the deleted files without Windows system.
Transfer the data Transfer the important files of the computer without system.
Free TrialFree TrialNow 2000 people have downloaded!Follow these steps:


| Server Type | Enter boot menu method |
|---|---|
DELL | Press the F12 key repeatedly before the Dell logo appears on the screen. |
HP | Press the F9 key multiple times when the HP logo is displayed. |
| BIOS Name | Enter boot menu method |
|---|---|
ASRock | DEL or F2 |
ASUS | DEL or F2 for PCs/ DEL or F2 for Motherboards |
Acer | DEL or F2 |
Dell | F12 or F2 |
ECS | DEL |
Gigabyte / Aorus | DEL or F2 |
Lenovo (Consumer Laptops) | F2 or Fn + F2 |
Lenovo (Desktops) | F1 |
Lenovo (ThinkPads) | Enter then F1 |
MSI | DEL |
Microsoft Surface Tablets | Press and hold Power and Volume Up buttons |
Origin PC | F2 |
Samsung | F2 |
Toshiba | F2 |
Zotac | DEL |
HP | Esc/ F9 for |
INTEL | F10 |

| Location | What It Stores | Why It Matters |
|---|---|---|
C:\Users\YourUserName | All personal data and profile settings | This is the user’s home directory; nearly everything tied to the account lives here. |
C:\Users\YourUserName\Documents | Personal documents (Word, PDF, spreadsheets) | Default save location for most apps; main place for user‑created files. |
C:\Users\YourUserName\Pictures | Screenshots, photos, image libraries | Windows and many apps use this as the default image folder. |
C:\Users\YourUserName\Downloads | Browser and app downloads | Central place for downloaded files unless the user changes the default path. |
C:\Users\YourUserName\Desktop | Items shown on the desktop | Files appear visually on the desktop but are stored here. |
C:\Users\YourUserName\Videos | Videos, screen recordings, editor exports | Default location for video‑related apps and recording tools. |
C:\Users\YourUserName\Music | Music files, audio projects | Media players and audio apps save content here. |
C:\Users\YourUserName\AppData | User‑specific app data, caches, browser profiles | Hidden folder storing essential configuration and temporary files. |
C:\Users\Public | Shared files accessible to all users | Useful for documents or media meant to be shared across accounts. |


- Completely free and built-in
- No extra downloads needed
- Simple point-and-click interface
- Works offline
- Version-specific recovery tools included
Disadvantages:
- May fail on hardware problems
- Requires installation media for older systems
- Limited success on severe corruption
- Can take multiple attempts
- No direct data preview

For Windows 10/11
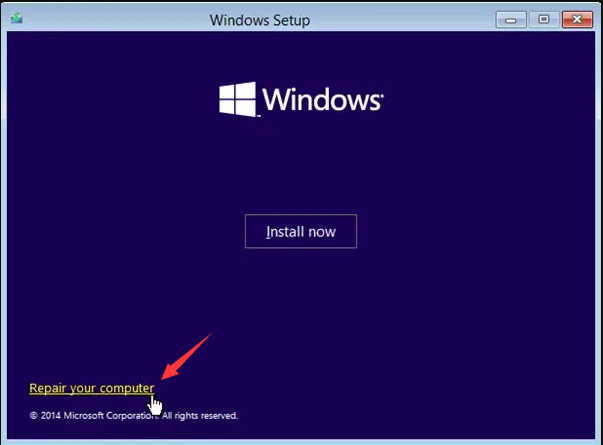
- Create or insert boot media: Use A Windows 10/11 installation USB (or a recovery USB).
- Boot from the USB Restart the PC and boot from the USB (you may need to pick it from the boot menu or change boot order in BIOS/UEFI).
- Open repair options On the Windows Setup screen, choose your language/keyboard, then click Next. Click Repair your computer (bottom-left).
For Windows XP/7
- Insert the disc
- Windows 7: Use the Windows 7 installation DVD or a System Repair Disc.
- Windows XP: Use the Windows XP installation CD (note: XP does not have the same “Startup Repair” wizard as newer Windows).
- Boot from the disc Restart and boot from CD/DVD (you may need to change boot order in BIOS).
- Choose the correct repair path
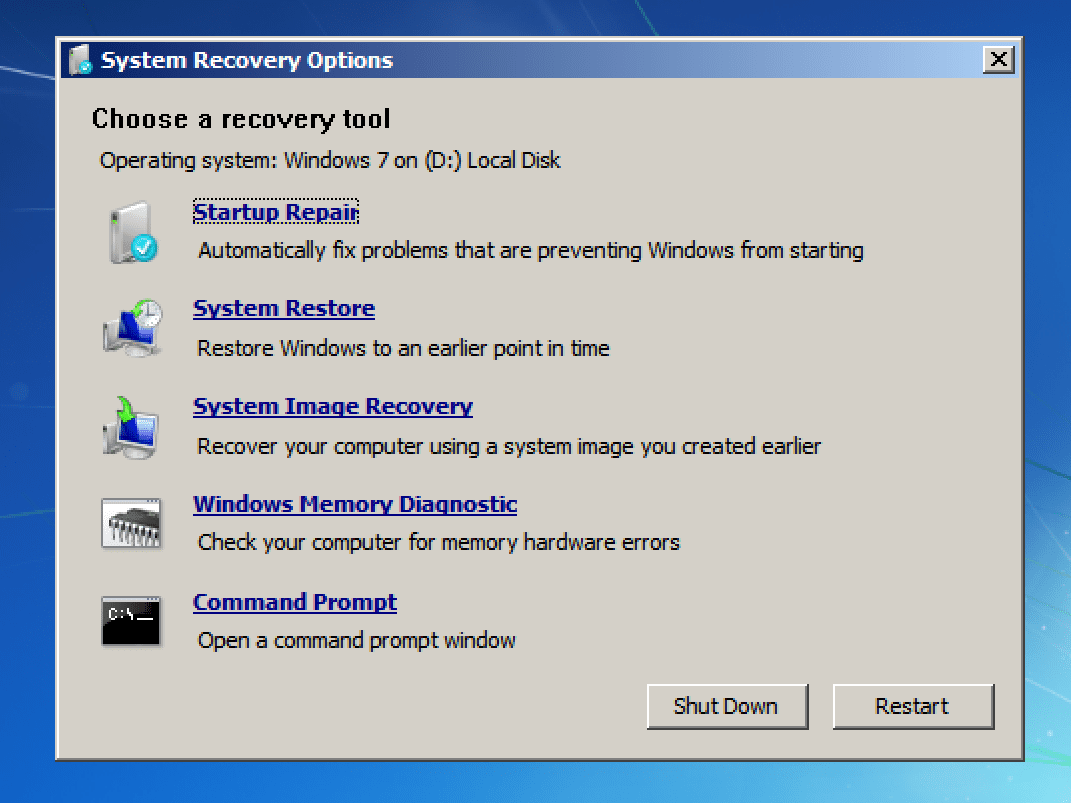
- Windows 7: Click Repair your computer, then select the Windows installation.
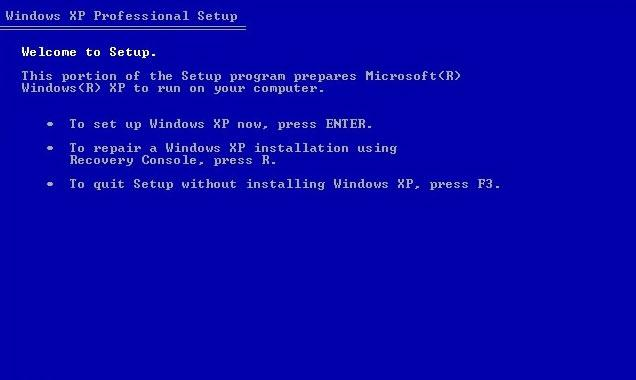
- Windows 7: Select Startup Repair from the System Recovery Options list.
- Windows XP: Use Recovery Console commands (covered in the next method/section if you have one).
Windows 10/11
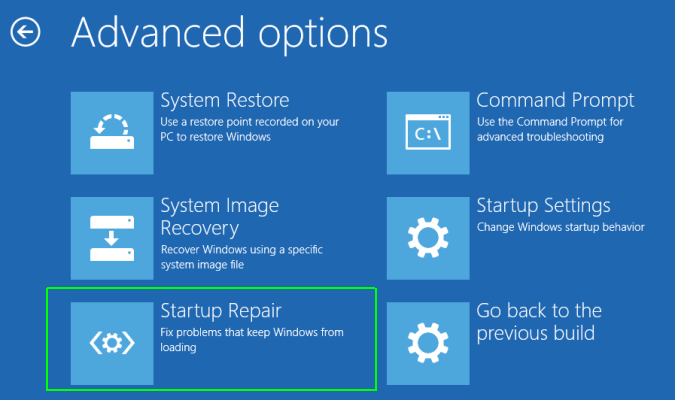
- Trigger WinRE Power on the PC and as soon as Windows starts loading, hold the power button to shut it off. Repeat 2–3 times.
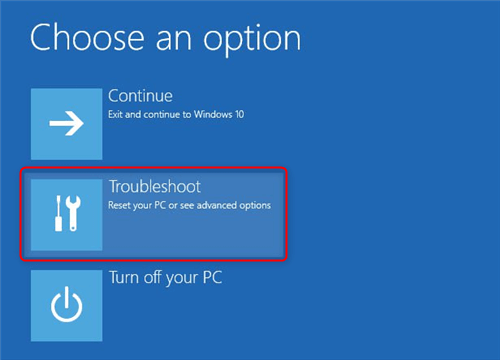
- Enter recovery menus You should see Preparing Automatic Repair or Automatic Repair. Select Advanced options.
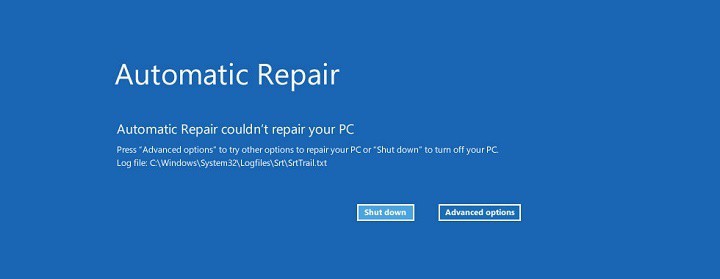
Windows XP/7
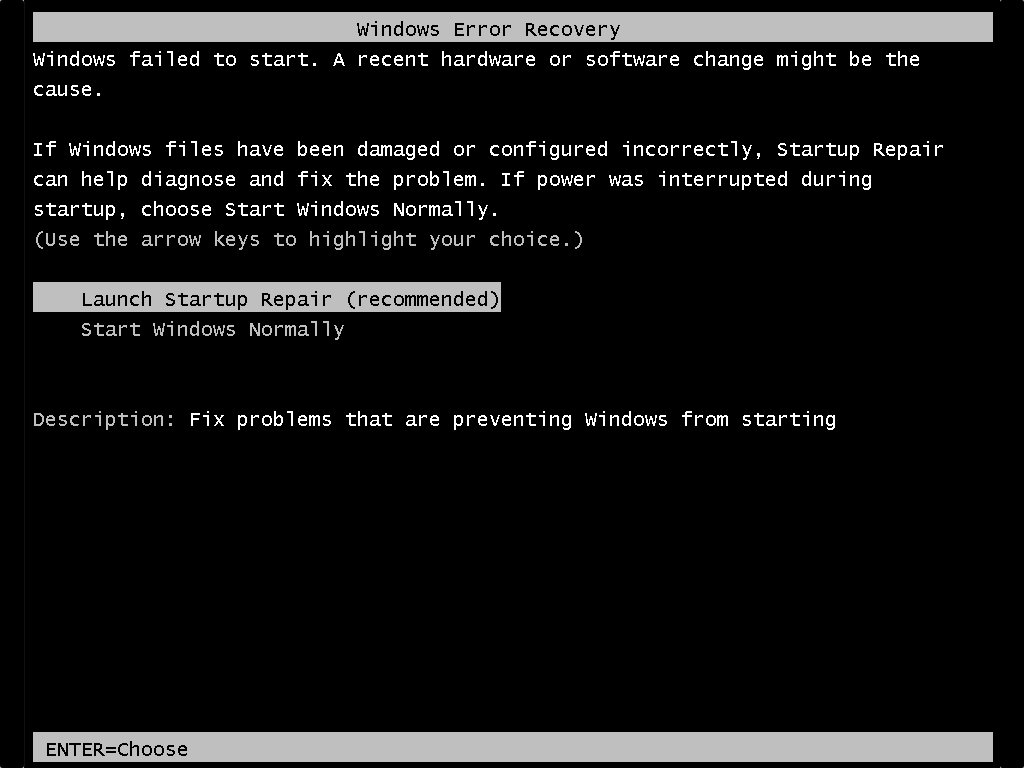
Capture the error details
SrtTrail.txt) and any error code.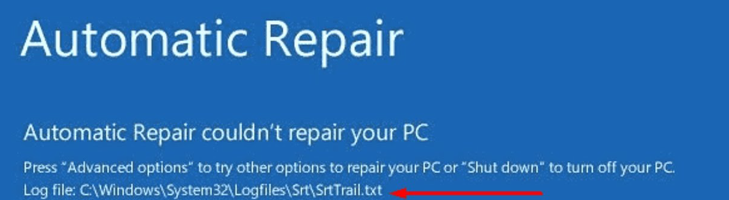
- Highly effective for corruption
- Free and built-in
- Precise control over fixes
- Works on both legacy and modern systems
- Can repair boot files directly
Disadvantages:
- Requires typing commands accurately
- Risk of data loss on failing drives
- More complex for beginners
- May need multiple commands
- Not ideal for hardware failure
Step-by-step usage instructions:
- Boot into the recovery environment (WinRE for 10/11 or Recovery Console for XP/7). Use the installation media you created in the last chapter.
- Open Command Prompt.

chkdsk C: /f /r (replace C: with your system drive) and wait for completion.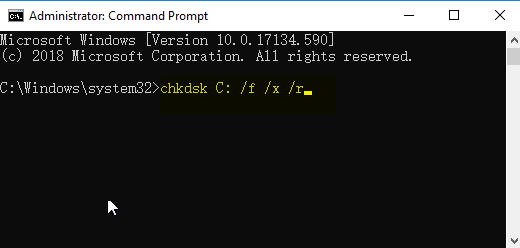
bootrec /fixmbrbootrec /fixbootbootrec /scanosbootrec /rebuildbcd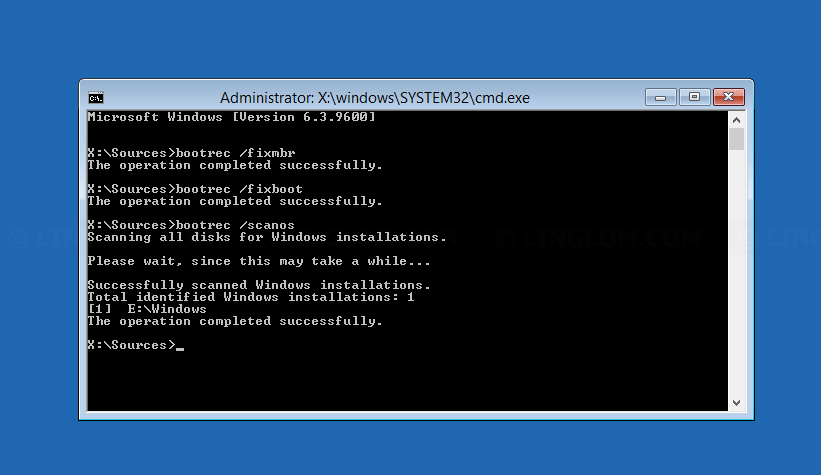
exit and reboot. These commands often bring the system back online when the unmountable_boot_volume issue stems from corrupted boot records or file system problems.Use this checklist:
- Power off and reseat all drive cables.
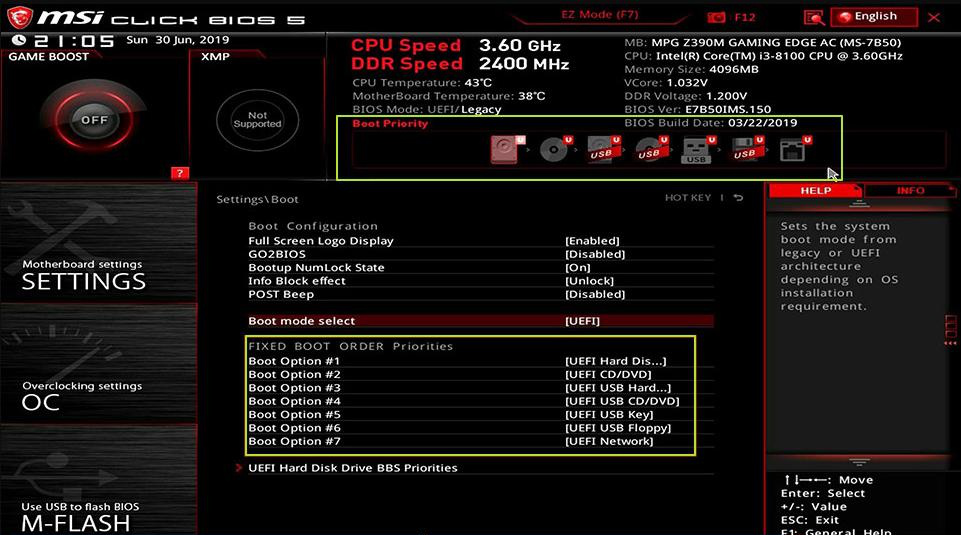
- Enter BIOS(usually Del or F2) and confirm SATA mode matches your Windows installation.
- Test the drive in another computer if possible.
- Reset BIOS to defaults if recent changes occurred.
| Approach | Difficulty Level | Risk to Data | Time Required | Best For |
|---|---|---|---|---|
Built-in Startup Repair | Beginner | Low | 15–30 min | Minor software issues |
Command-Line (CHKDSK/Bootrec) | Intermediate | Medium | 30–60 min | Corrupted boot files |
Renee PassNow (Data Recovery) | Beginner | Very Low | 20–45 min | Protecting files first |
Hardware/BIOS Checks | Intermediate | Low | 10–20 min | Driver or cable problems |
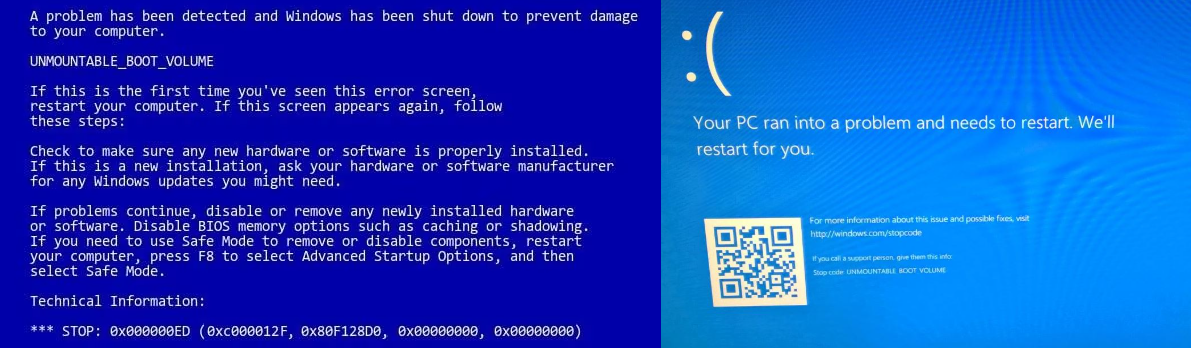
What exactly causes the unmountable_boot_volume error 0x000000ED?
Can I recover my files if the system shows unmountable boot volume?
Does the fix differ between Windows 7 and Windows 11?
Will running chkdsk delete my data?
Remove Windows Login Password 3 steps for whole password remove process.
Recover the files Recover the deleted files without Windows system.
Transfer the data Transfer the important files of the computer with system.
Fix Windows startup error Fix various Windows startup failures or crashes.
Erase disk Completely erase disk files which will not be restored.
Remove Windows Login Password 3 steps for whole password remove process.
Recover the files Recover the deleted files without Windows system.
Transfer the data Transfer the important files of the computer without system.
Free TrialFree TrialNow 2000 people have downloaded!How can I prevent the unmountable_boot_volume error in the future?
Is it safe to change SATA mode in BIOS to fix this error?
Remove Windows Login Password 3 steps for whole password remove process.
Enable/Create Administrator One click for creating new administrator and enable the disabled account.
Widely Use New version supports UEFI boot model, which can be used on more computers, laptops and even surfaces.
Multifuctional Data transfer, data recovery, bootable problem recovery can be run without system.
Highly compatible Windows 11/10/8.1/8/7/XP/Vista.
Remove Login Password Support Windows 11/10/8.1/8/7/XP/Vista.
Enable/Create Administrator One click for creating new administrator and enable the disabled account.
Easy to use No need of any professional knowledge or password reset disk.
Relate Links :
Fixing the Windows Won't Boot Error

26-07-2024
Jennifer Thatcher : Learn how to troubleshoot and resolve common startup issues on Windows. Discover effective solutions to tackle the system's...
Fix Windows 0xc0000098 Boot Error in 2025: Quick Causes & Proven Solutions
27-09-2025
John Weaver : 0xc0000098 is a common Windows boot error caused by BCD file corruption, disk cloning mistakes, or hardware issues....
Recover Data from Unmountable Boot Volume Error (0x000000ED): Safe Recovery Guide

08-04-2026
Amanda J. Brook : This article examines unmountable boot volume no boot data recovery scenarios where Windows systems fail to start due...
How to Fix The Error "BOOTMGR is Missing" on Your Computer?
22-01-2024
Jennifer Thatcher : Learn how to solve the error "BOOTMGR is missing" and access important files during system crashes with effective...


User Comments
Leave a Comment