

Recover Data from Unmountable Boot Volume Error (0x000000ED): Safe Recovery Guide

Summary
This article examines unmountable boot volume no boot data recovery scenarios where Windows systems fail to start due to boot volume errors. It outlines non-destructive data recovery approaches, including bootable recovery environments, built-in recovery tools, and external drive access methods, while comparing safety levels and technical requirements.

Table of contents
Common triggers include:
- Sudden power loss during read/write activity
- A failed or interrupted Windows update
- Improper shutdowns or forced restarts
- Early-stage HDD or SSD degradation
- Corrupted file system or boot-related structures
- Loose storage connections in some desktops or older laptops
| Cause of UNMOUNTABLE_BOOT_VOLUME | What it usually means | Data loss risk level | Initial handling recommendation | Sources |
|---|---|---|---|---|
File system corruption | Windows cannot reliably read the boot volume structure | Medium to High | Stop repeated boot attempts; recover files before running repair tools | Microsoft bug check reference, Microsoft troubleshooting guidance |
Failed or interrupted Windows update | System files or boot metadata may be incomplete or inconsistent | Medium | Prioritize file backup or recovery before rollback/rebuild steps | Microsoft Windows update troubleshooting docs, Microsoft community cases |
Sudden power loss or forced shutdown | In-progress writes may be interrupted, causing logical corruption | Medium to High | Avoid more restarts; use a read-first recovery approach | Microsoft support guidance on improper shutdown impacts, community reports |
HDD bad sectors or early mechanical failure | Storage surface or read heads may be struggling to read system areas | High | Minimize drive activity immediately; recover data first; consider professional help if noises appear | Microsoft |
SSD firmware issues or flash degradation | Critical metadata may become unreadable even if drive is still detected | Medium to High | Use bootable recovery or connect externally in read-focused mode; avoid heavy repair writes | Microsoft community reports, SSD vendor support articles |
Loose or unstable SATA/NVMe connection | Boot volume may be readable only intermittently | Low to Medium | Power off, check connection only if safe to do so, then recover data before repair | Microsoft community hardware troubleshooting threads |
Misconfigured BIOS/UEFI after hardware or firmware change | Correct boot drive may not mount properly at startup | Low | Verify drive detection first, then back up accessible files before making major repair changes | Microsoft boot troubleshooting docs |
- Microsoft Learn: Bug Check $0xED$:
UNMOUNTABLE_BOOT_VOLUME - Microsoft Support and Windows recovery documentation on startup and disk issues
- Microsoft Community threads on
UNMOUNTABLE_BOOT_VOLUME, failed updates, and disk detection behavior
chkdsk /r, bootrec, Startup Repair, or repeated reboot cycles. That is understandable, but it is not always the safest first move. If the problem is caused by more than simple boot corruption—especially if the drive has bad sectors or unstable hardware behavior—repair tools may place extra load on the disk and make recovery harder.C:\Users\username\ directory. This includes:- Home users trying to save photo libraries, videos, downloads, and personal documents(Typically found in:
C:\Users\username\Pictures,Videos,Documents,Downloads) - Students who need access to notes, assignments, research files, and school projects(Commonly stored in:
C:\Users\username\Documentsor application folders underC:\Users\username\AppData) - Office users with spreadsheets, invoices, PDFs, presentations, and client folders(Often located in:
C:\Users\username\Documents,Desktop, or synced folders likeC:\Users\username\OneDrive) - Small business owners trying to avoid the cost of emergency lab recovery(Business records are frequently saved in:
C:\Users\username\Documents, custom folders onC:orD:drives, or accounting software directories underC:\ProgramDataorAppData) - Users without a recent backup who need the highest possible chance of preserving irreplaceable files(Most personal data defaults to the system partition unless manually moved to another drive)
Key Risk Warnings
- HDD with noises → Stop immediately; seek professional help.
- SSD firmware issues → Avoid
chkdsk /r; use vendor tools. - Bad sectors → Do not repeat boot or repair scans.
- Simple file system corruption → Repair may help, but back up first.

Remove Windows Login Password 3 steps for whole password remove process.
Recover the files Recover the deleted files without Windows system.
Transfer the data Transfer the important files of the computer with system.
Multifuctional Data transfer, data recovery, bootable problem recovery can be run without system.
Highly compatible Windows 11/10/8.1/8/7/XP/Vista. UEFI boot.
Remove Login Password Support Windows 11/10/8.1/8/7/XP/Vista. UEFI boot.
Recover the files Recover the deleted files without Windows system.
Transfer the data Transfer the important files of the computer with system.
- Non-destructive approach focused on accessing and recovering data before repair
- Useful when the PC cannot boot into Windows
- Friendly workflow for non-technical users
- Supports both data transfer and file recovery
- Helps users secure files before trying repair commands, reset actions, or reinstalling Windows
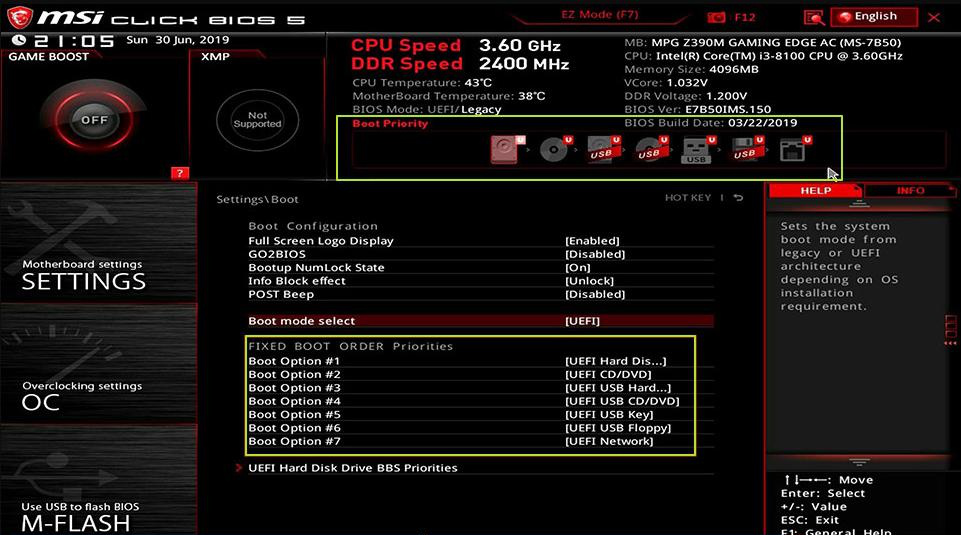
Follow these steps:


| Server Type | Enter boot menu method |
|---|---|
DELL | Press the F12 key repeatedly before the Dell logo appears on the screen. |
HP | Press the F9 key multiple times when the HP logo is displayed. |
| BIOS Name | Enter boot menu method |
|---|---|
ASRock | DEL or F2 |
ASUS | DEL or F2 for PCs/ DEL or F2 for Motherboards |
Acer | DEL or F2 |
Dell | F12 or F2 |
ECS | DEL |
Gigabyte / Aorus | DEL or F2 |
Lenovo (Consumer Laptops) | F2 or Fn + F2 |
Lenovo (Desktops) | F1 |
Lenovo (ThinkPads) | Enter then F1 |
MSI | DEL |
Microsoft Surface Tablets | Press and hold Power and Volume Up buttons |
Origin PC | F2 |
Samsung | F2 |
Toshiba | F2 |
Zotac | DEL |
HP | Esc/ F9 for |
INTEL | F10 |

C/D/E/F, etc.) to verify no important files are missing. If all files are accounted for, transfer them to an external disk for safety. To move data, select the source drive (e.g., C) on the upper left, then the destination drive (e.g., G) on the upper right. Choose the files from the source drive and click the “Copy” button in the middle to start the transfer. To delete a file, select it and press the “Delete” button, but remember this action is irreversible, so proceed with caution.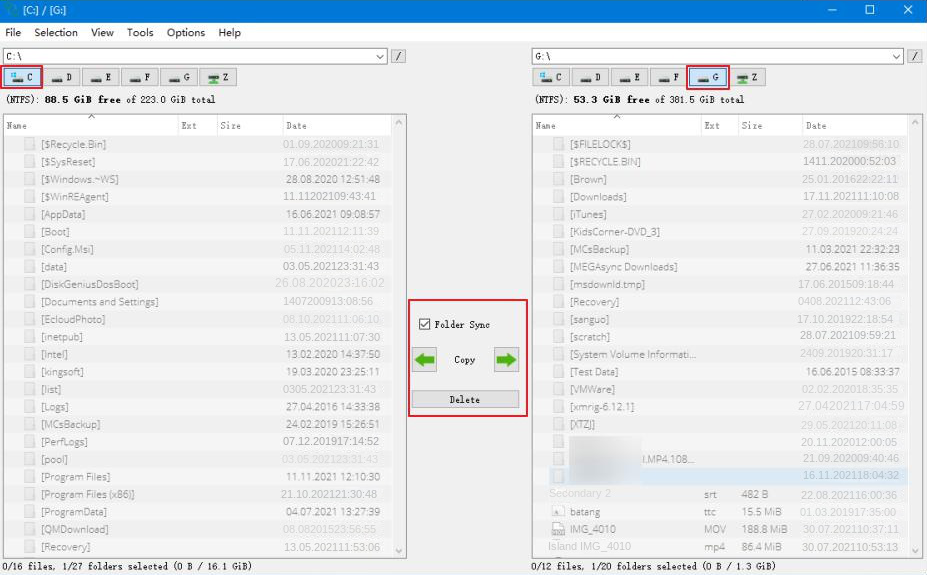
| Location | What It Stores | Why It Matters |
|---|---|---|
C:\Users\Yourusername | All personal data and profile settings | This is the user’s home directory; nearly everything tied to the account lives here. |
C:\Users\YourUserName\Documents | Personal documents (Word, PDF, spreadsheets) | Default save location for most apps; main place for user‑created files. |
C:\Users\Yourusername\Pictures | Screenshots, photos, image libraries | Windows and many apps use this as the default image folder. |
C:\Users\Yourusername\Downloads | Browser and app downloads | Central place for downloaded files unless the user changes the default path. |
C:\Users\Yourusername\Desktop | Items shown on the desktop | Files appear visually on the desktop but are stored here. |
C:\Users\Yourusername\Videos | Videos, screen recordings, editor exports | Default location for video‑related apps and recording tools. |
C:\Users\Yourusername\Music | Music files, audio projects | Media players and audio apps save content here. |
C:\Users\Yourusername\AppData | User‑specific app data, caches, browser profiles | Hidden folder storing essential configuration and temporary files. |
C:\Users\Public | Shared files accessible to all users | Useful for documents or media meant to be shared across accounts. |


Remove Windows Login Password 3 steps for whole password remove process.
Recover the files Recover the deleted files without Windows system.
Transfer the data Transfer the important files of the computer with system.
Fix Windows startup error Fix various Windows startup failures or crashes.
Erase disk Completely erase disk files which will not be restored.
Remove Windows Login Password 3 steps for whole password remove process.
Recover the files Recover the deleted files without Windows system.
Transfer the data Transfer the important files of the computer without system.
Free TrialFree TrialNow 2000 people have downloaded!UNMOUNTABLE_BOOT_VOLUME error is caused by logical corruption rather than serious hardware failure. In simple terms, if the drive still responds normally enough for WinRE to detect partitions, you may be able to copy key files to another USB drive or external disk without booting into Windows itself.Desktop, Documents, Pictures, and project directories. However, there are real limits. This method requires basic comfort with command-line navigation, drive-letter checking, and careful copy commands. It is also less forgiving than a guided recovery tool. If the disk is physically failing, heavy file-copy attempts may slow down, freeze, or trigger more read errors.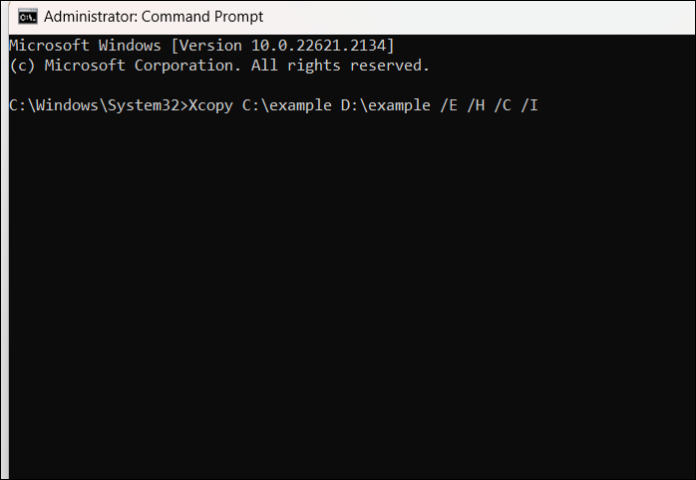
- Built into Windows recovery tools
- No need to open the computer
- Useful for quick copying of important folders
Disadvantages:
- Requires command-line comfort
- Less suitable for failing drives
- May not preserve full structure as easily for non-technical users
- Common path and permission errors can slow recovery
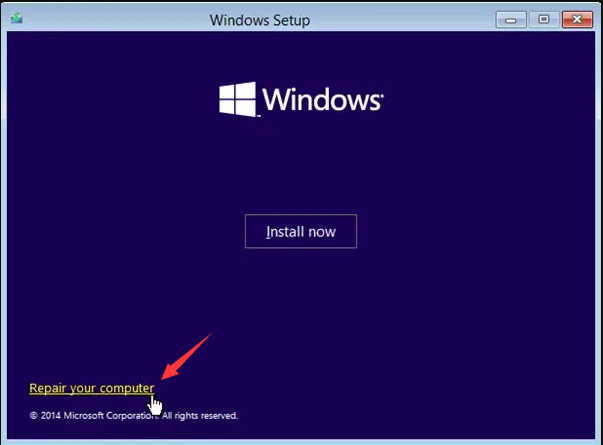
Create Windows Installation Media

Step-by-step usage instructions

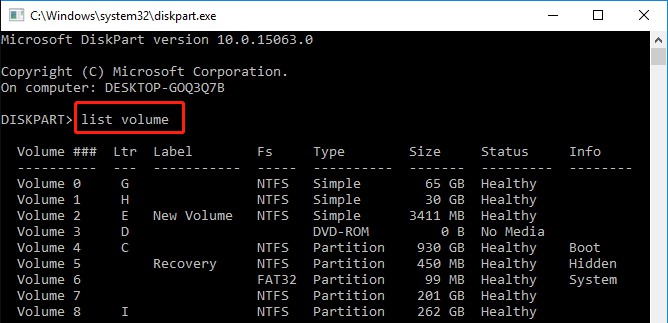
diskpartlist volumeexit
- User profile folders
- Desktop files
- Documents
- Pictures
- Work project folders
xcopy C:\Users\UserName\Documents D:\Backup\ /E /IC: = source drive (your files)D: = external USB drive/E= include subfolders/I= treat destination as a folder
New User Warning:
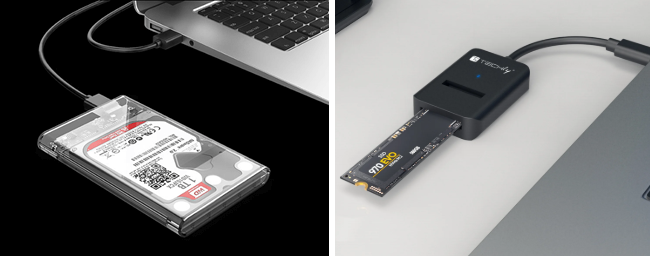
- Can provide direct access to files from another working PC
- Good for large file transfers
- Useful when original PC has boot issues but drive is still readable
Disadvantages:
- Requires opening the device or removing the drive
- Physical handling risks including static damage
- Laptop disassembly can be difficult
- Not suitable for drives with severe physical failure symptoms
| Method | Safety level | Estimated success rate in typical cases | Technical difficulty | Cost | Best suited user type | Notes / citations |
|---|---|---|---|---|---|---|
Renee PassNow bootable recovery | High | Moderate to High in logical corruption and boot-failure cases | Low to Medium | Paid tool | General users, non-technical users, users prioritizing safer guided recovery | Based on bootable recovery best practices and reduced dependence on damaged OS; aligned with common recovery workflow guidance |
WinRE Command Prompt file copy | Medium | Moderate when partition remains readable and corruption is limited | Medium | Free | Users comfortable with command line | Microsoft recovery environment supports manual access, but results depend heavily on readable file structure |
Connect drive as secondary to another PC | Medium to High | High when drive hardware is healthy and readable externally; low if hardware is failing | Medium to High | Low to Medium | DIY users comfortable with hardware handling | Commonly recommended in support communities when the issue is boot-related rather than due to total drive failure |
Can I run chkdsk /r before trying to recover my files?
chkdsk /r can be helpful for file system issues, but it also performs deeper disk activity and may stress a drive that already has bad sectors. If the disk is physically unstable, that can reduce recovery chances. For unmountable boot volume no boot data recovery, copy or recover critical data before running repair-heavy commands whenever possible.Is UNMOUNTABLE_BOOT_VOLUME always caused by a failing hard drive or SSD?
Can I recover data if the PC will not enter Safe Mode or Automatic Repair?
What files should I recover first?
- Personal documents
- Photos and videos
- Desktop and Downloads folders
- Work files and client folders
- Email archives such as PST/OST if used locally
- Accounting, design, code, or project data
- Browser exports, bookmarks, and application-specific data if important
What if the recovered files open, but some are damaged?
Should I reinstall Windows right away after copying my files?
Can I use another recovery tool instead of Renee PassNow?
Remove Windows Login Password 3 steps for whole password remove process.
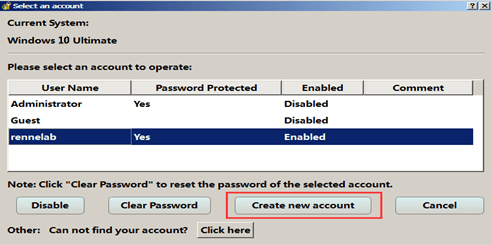
Enable/Create Administrator One click for creating new administrator and enable the disabled account.
Widely Use New version supports UEFI boot model, which can be used on more computers, laptops and even surfaces.
Multifuctional Data transfer, data recovery, bootable problem recovery can be run without system.
Highly compatible Windows 11/10/8.1/8/7/XP/Vista.
Remove Login Password Support Windows 11/10/8.1/8/7/XP/Vista.
Enable/Create Administrator One click for creating new administrator and enable the disabled account.
Easy to use No need of any professional knowledge or password reset disk.
Relate Links :
How to Solve Windows 7 Slow Startup Problem?

20-06-2019
Ashley S. Miller : If you find the Windows 7 slow startup, you may need to make some optimization for your computer....
Critical Process Died ntoskrnl.exe: How to Fix the BSOD Error in Windows 10/11

17-03-2026
Jennifer Thatcher : This article analyzes the critical_process_died ntoskrnl exe Blue Screen of Death error in Windows environments. It outlines common...
Recover Files from Windows 11 Not Starting: Safe Data Rescue Guide

09-03-2026
John Weaver : This guide explains how to recover files from Windows 11 not starting by outlining software-based, built-in recovery, and...
[2026 Guide] How to Mirror Hard Drive to SSD in Windows 10/11?
03-02-2026
Jennifer Thatcher : Learn the best way to mirror hard drive to SSD in 2026 without reinstalling Windows. This authoritative guide...


User Comments
Leave a Comment