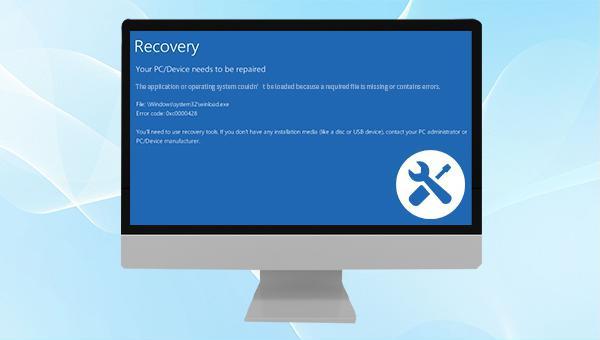
III. How to solve the loss or damage of winload.exe?
1. Perform startup repair
The Startup Repair feature in the Windows Recovery Environment can fix problems that prevent Windows from loading and replace missing or damaged files. Therefore, you can try to use the startup repair function to solve the problem that winload.exe is missing or damaged. Here are the detailed steps to perform a startup repair:
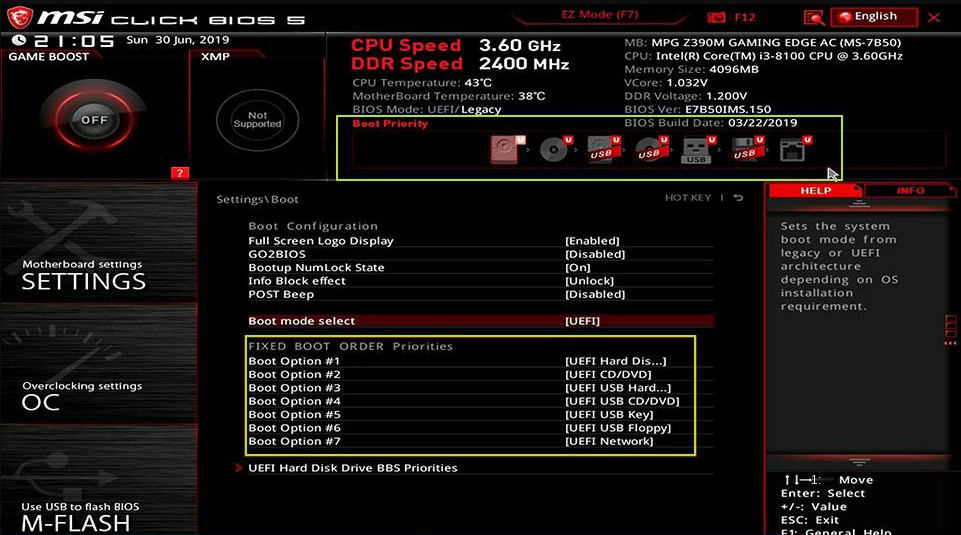
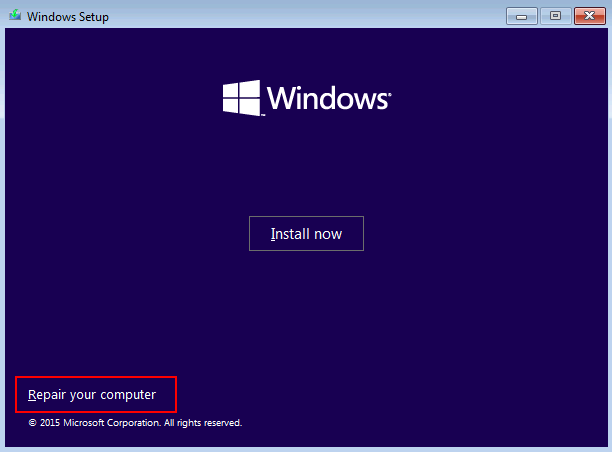
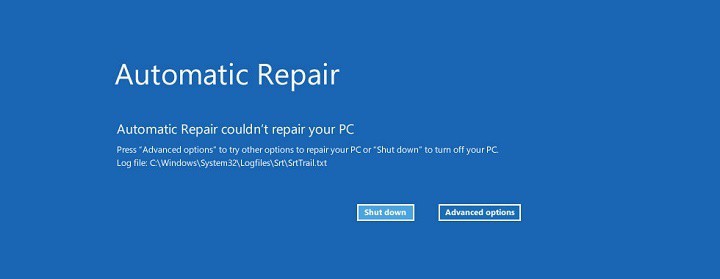
Step 1: Insert the Windows installation disk DVD or USB Drive into the computer, and press the F2 or F10 or DEL or ESC keys continuously (there may be slight differences due to different computer brands) to enter the BIOS setting interface when turning on the computer, and the installation disk Set first in the boot order. Boot the computer from the Windows installation disk and click the Repair your Computer option to enter the recovery environment. If you don’t have a Windows installation disk, you can also try to force restart the computer three times, and then select Advanced Options on the Automatic Repair interface to enter the recovery environment.
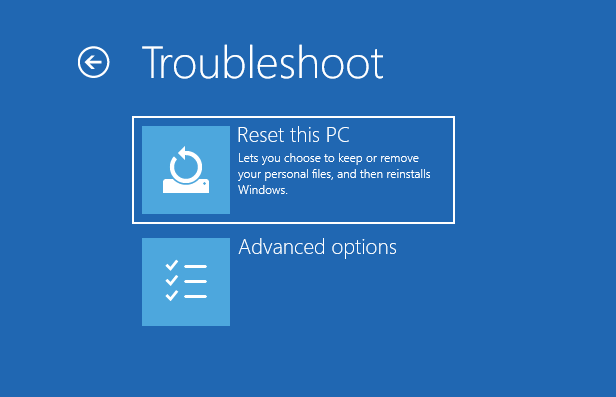
Step 2: After entering the recovery environment, select Troubleshooting – Advanced Options – Command Prompt.
2. Use the Bootrec command to rebuild the boot configuration data
The Bootrec command can repair damaged master boot records or boot configuration data files, which can help troubleshoot Windows startup problems. This method needs to enter the recovery environment and then operate. Proceed as follows:
Step 1: Press the power button to turn it on, and press and hold the power button when the startup logo appears to force shutdown. Repeat this step three times to allow the computer to start completely, select Advanced option on the Automatic Repair interface, and the computer will enter the Windows recovery environment. Or use the Windows installation disk to start the computer, you need to set the Windows installation disk as the first in the boot sequence in the BIOS settings, then save the settings and restart the computer, select the Repair your computer option in the Windows installation program Install Now interface to enter the recovery environment.
Step 2: After entering the recovery environment, select Troubleshooting – Advanced Options – Command Prompt.
Step 3: In the command prompt window that opens, type bootrec.exe /rebuildbcd and press the Enter key. On the command line, you may see it display “Total Windows installations identified: 1″ or “Total Windows installations identified: 0″. If the total number of Windows installations is 0, then skip to step 5.
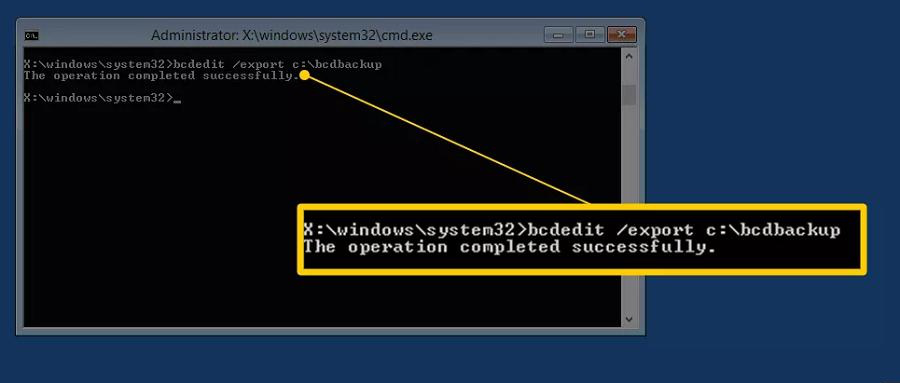
Step 4: When “Total Windows installations identified: 1″ appears, you must manually delete the BCD store before rebuilding can begin. At the command line, type bcdedit /export c:\bcdbackup and press the Enter key.
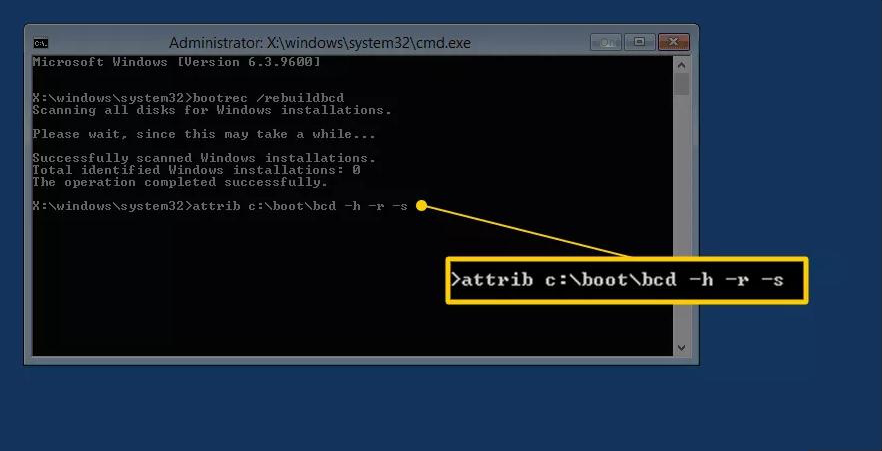
Step 5: Then you need to adjust several file properties stored by BCD so that it can be manipulated. Please enter attrib c:\boot\bcd -h -r -s (-h refers to removing hidden file attributes, -r refers to removing read-only file attributes, -s refers to clearing system file attributes), Then press the Enter key.
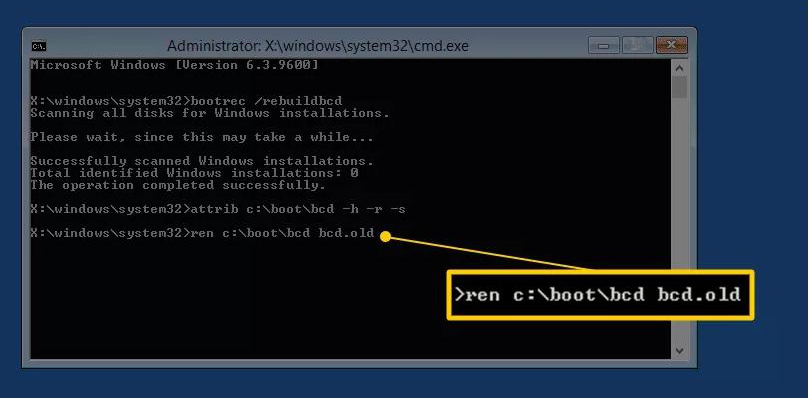
Step 6: Now you need to rename the BCD storage, please enter the ren c:\boot\bcd bcd.old command.
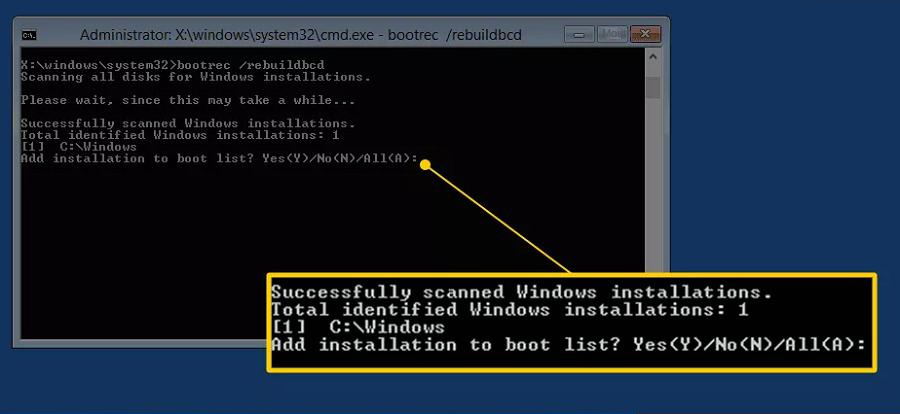
Step 7: Then type bootrec /rebuildbcd and press Enter to start rebuilding BCD. Then type Y and press Enter under the question “Add installation to boot list?”. Finally, just restart your computer.
If the above methods cannot solve the problem, you can consider reinstalling the system. Reinstalling the system can solve many Windows blue screen or startup problems, but this method may lose some data in the computer, so before reinstalling Windows 10, it is recommended that you refer to this article
the second part method to transfer important files from your computer. Next, we will reinstall Windows 10 through the reset computer function in the Windows recovery environment. The specific steps are as follows:
Step 1: First enter the Windows recovery environment. Below are two methods.
● Method 1: Power on the computer, then press and hold the power button to turn it off when the computer brand logo appears, repeat this step three times, then allow the computer to start completely, select Advanced option in the Automatic Repair interface, and the computer will enter Windows recovery environment.
● Method 2: Insert the Windows 10 installation disk (DVD or USB disk) into the computer. Continuously click F2 or F10 or DEL or ESC shortcut keys (varies with the computer brand) to enter the BIOS setting interface when starting up, set the first boot sequence to the Windows installation disk, and then save the settings to make the computer start from the installation disk and install Windows. Select the Repair Your Computer option on the program’s Install Now interface to enter the recovery environment.
Step 2: Then when “Choose an option” appears, click Troubleshooting – Reset this PC in turn. The Reset This PC feature allows users to keep or delete personal files and then reinstall Windows.
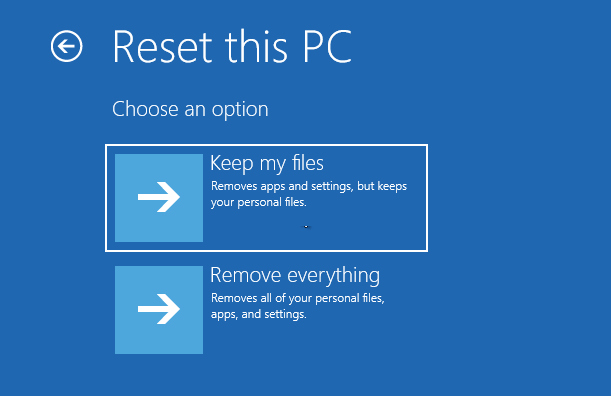
Step 3: Next select Keep my files or Remove everything. Select Erase All Content if you plan to sell or give away the device, as this will overwrite all data on the drive and there is little chance of future data recovery.
Step 4: After the computer restarts automatically, please click to select an Account Name. Then enter the account password (no need to enter if there is no password), click Continue.
Step 5: After confirming the reset information, click (Reset). The computer will automatically restart and initialize the system. This process may take a long time, please wait patiently.
Kind tipsReinstalling the Windows 10 system can also perform a new installation through the Windows installation media, but before the installation, it is recommended that you back up important files in the computer to avoid losing important data. Use Renee PassNow to transfer, backup, and restore data without being able to enter the Windows system, check this article
the second part.