author avatar
    Senior Program Developer
Last update by William Davis at 19 November 2026

Summary
This comprehensive guide details the technical procedures to resize partition after cloning to larger SSD using native Windows utilities and third-party partition managers. It outlines diagnostic steps for identifying unallocated space, addresses blocked partition layouts, and provides structured solutions for extending the system drive safely.


After cloning a smaller system drive to a larger SSD, you might notice that Windows still reports the old C: size—despite the larger SSD. This happens because the clone keeps the original partition layout. This guide shows you how to resize partition after cloning to larger SSD, using built-in Windows tools or a generic partition tool when the free space is blocked. You’ll also find a checklist for confirming success and an FAQ covering common layout and boot questions. Read on to identify the method that matches your Disk Management view.
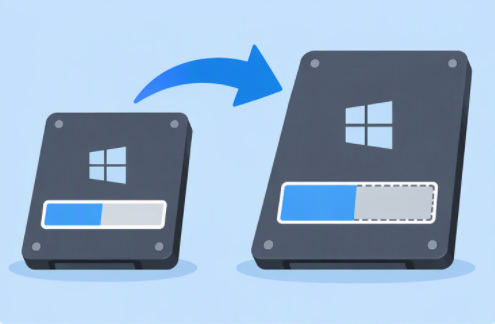
resize partition after cloning

Why your larger SSD still shows the old partition size after cloning

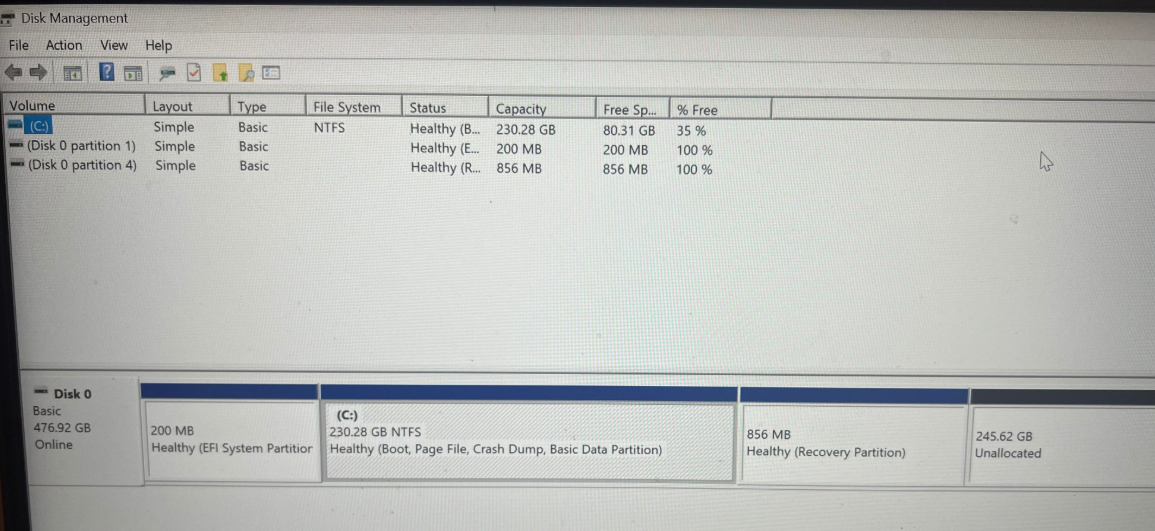
Suppose you clone a 512 GB system disk to a 1 TB SSD. The PC boots normally, but This PC still shows a 512 GB C: drive, and Disk Management displays the rest of the SSD as unallocated space. The cloning process worked, but the extra space hasn’t been added to C: yet.
unallocated space in disk after cloning not right after c drive
This is because cloning copies the source partition table and original partition sizes. The new SSD keeps the old layout until you add the unallocated space to C:.

Before making any changes, make absolutely sure Windows is running from the new SSD.

If Windows prompts you to “Initialize Disk” for the new SSD, do not initialize it—the clone already contains a partition table. Initializing will make existing partitions inaccessible.

Clone and Migrate Your OS to a New SSD Safely

Bootable OS Migration Creates a fully bootable copy of your system drive so you can start using your new SSD immediately without reinstalling Windows.

Support GPT and MBR Automatically adapt to the suitable partition format.

Support NTFS and FAT32 Redeploy various files in different file systems.

Back up quickly Back up files at up to 3,000MB/min.

Overall backup schedule Support system redeployment/system backup/partition backup/disk backup/disk clone.

Automatic 4K alignment Improve SSD performance

Support GPT and MBR Intelligently adapt to a partition format

Support NTFS and FAT32 Redeploy files in different file systems

Free TrialFree TrialNow 56337 people have downloaded!

Check your disk layout and pick a method that fits

Do not create a new volume or partition in the unallocated space—this will use up the free space, assign a second drive letter, and make extending C: much harder.
Layout in Disk Management Extend Volume status Safest method Risk

[C:] + [ Unallocated ]

Available ✅ (unallocated space immediately follows C:)

Disk Management → Extend Volume; diskpart as backup

Low

[C:] + [ Recovery ] + [ Unallocated ]

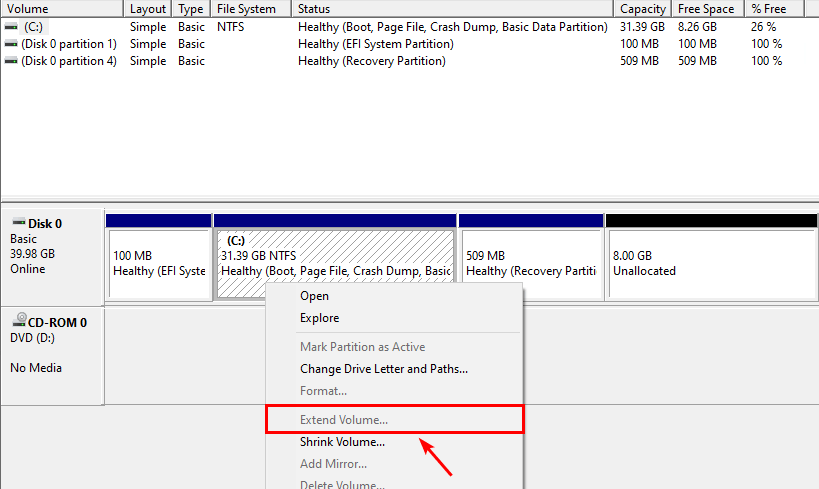
Greyed out (Recovery partition blocks contiguous space)

Remove Recovery partition, or use a partition manager to move Recovery to the far right, then extend C:

Medium

[C:] + [EFI, MSR, or OEM] + [ Unallocated ]

Greyed out (system-reserved partition blocks contiguous space)

Professional assistance, or advanced cloning software that can rebuild the partition layout; do not move or delete EFI/MSR/OEM partitions

High ⚠️

Unallocated space before C:, or multiple partitions between C: and the unallocated space

Greyed out (unallocated space is not adjacent to C:)

Re-clone with fit-to-disk enabled, or seek professional assistance

High ⚠️

The key rule: Extend Volume only works when the unallocated space is directly to the right of C: on the same disk.

If your old drive is still available and you haven’t saved anything new to the clone, redoing the clone with the clone tool’s “fit partitions to the full disk” or “resize to fit” option is often faster and safer than moving partitions after the fact. This is a secondary option, not the default for everyone.
Summary of methods, from simplest to most advanced:
- Disk Management — free, built-in, works only if free space is adjacent.
- diskpart — free, command-line, same adjacency rule.
- A generic third-party partition tool — can move a blocking partition; both free and paid options exist; no brand names.

This guide covers Windows 10 and Windows 11. Linux and dual-boot systems require a different approach, not covered here.

Start with Disk Management, and only move to another method if your layout blocks it.

How to resize the partition after cloning to a larger SSD

Routes A, B are alternative solutions based on your layout from the table above. Choose the one route that matches your setup and complete it—don’t attempt all three.

Before you begin

1. Keep the old drive untouched until you’ve confirmed the new SSD works. If the old drive has already been wiped or reformatted, make a full backup or disk image to an external drive first.

2. If BitLocker is enabled, make sure your recovery key is available (check your Microsoft account, Active Directory, or USB backup). Suspend BitLocker before any third-party partition move or delete, and re-enable it after resizing.

3. Use mains power: plug in your laptop, or use a UPS for a desktop. Never interrupt a partition move, resize, or delete—and don’t force a shutdown.

Moving or deleting the wrong partition can break Windows boot. Always double-check the label, drive letter, and size before confirming any operation.

Route A: Disk Management (unallocated space directly right of C:)

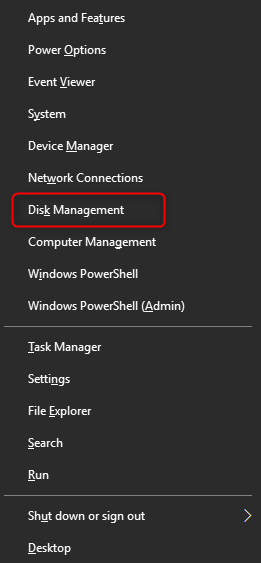
1. Open Disk Management: right-click Start and select Disk Management.
open windows disk management
2. Confirm that the disk number and total capacity match your new SSD.
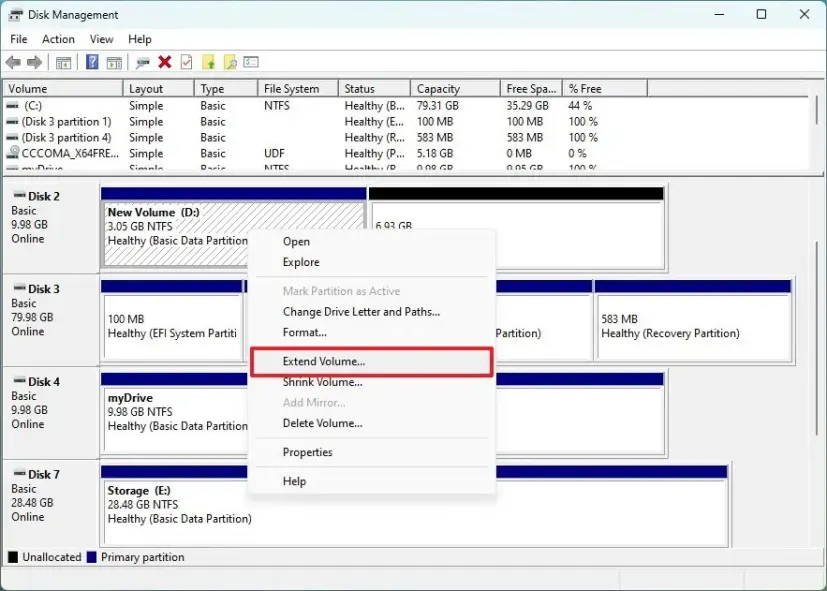
3. Right-click C:, select Extend Volume, click Next, accept the default (all adjacent unallocated space), and click Finish.
Extend Volume wizard in Windows Disk Management
4. Don’t touch any other volume. If Extend Volume is greyed out, skip to Route B—don’t force it.
5. Check the new C: size in This PC. A simple extend usually doesn’t require a reboot; moves or deletes may.

Route B: blocked layout (Extend Volume greyed out)

Use this route if the unallocated space isn’t immediately to the right of C:—typically because a Recovery partition or another system partition is in the way.
unallocated space the greyed-out Extend Volume
If a Recovery partition is between C: and the unallocated space:
1. Back up your important data first.
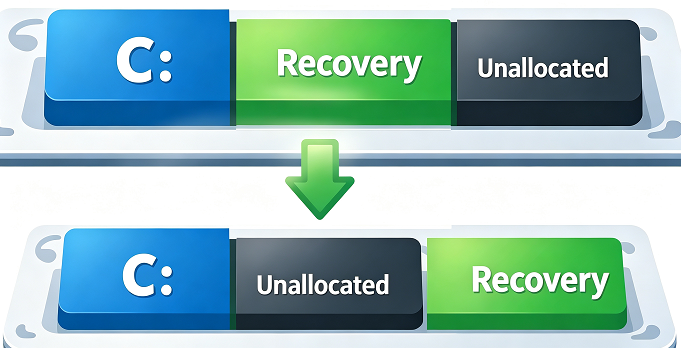
2. Use a generic partition tool to move the Recovery partition to the far right, making the unallocated space adjacent to C:.
Disk layout after cloning with recovery partition moved to the end
3. Extend C: using Disk Management, or the tool’s own resize function.
4. Reboot and confirm Windows starts before making any other changes.
Deleting the Recovery partition instead of moving it is only an option if you’re certain you don’t need Windows Recovery. Doing so will remove the Windows Recovery Environment (WinRE), and Reset this PC and advanced startup repair options may be affected. Moving is safer than deleting.
If the move fails and you still need the recovery environment, stop and seek professional help.
If an EFI, MSR, or OEM partition is in the way: never move or delete these with a basic tool—Windows may not boot. Stop and get help, or use a clone tool that can rebuild the partition layout (always back up first).
If unallocated space is before C: or separated by several partitions: a partition tool can move partitions, but this is an advanced case. Re-cloning with “fit-to-disk” is usually safer.
Linux and dual-boot tools are not covered in this guide.

Before: [C:] [Recovery] [unallocated]
After move: [C:] [unallocated] [Recovery]
After extend:[C: larger] [Recovery]

No branded product UI screenshots are used in this route.

After any partition move or delete, or if Windows prompts, reboot. Make sure Windows starts and your files open before making further changes. If Windows won’t boot, restore the old drive or your backup, then see the boot-failure FAQ entry.

Clone and Migrate Your OS to a New SSD Safely

Bootable OS Migration Creates a fully bootable copy of your system drive so you can start using your new SSD immediately without reinstalling Windows.

Support GPT and MBR Automatically adapt to the suitable partition format.

Support NTFS and FAT32 Redeploy various files in different file systems.

Back up quickly Back up files at up to 3,000MB/min.

Overall backup schedule Support system redeployment/system backup/partition backup/disk backup/disk clone.

Automatic 4K alignment Improve SSD performance

Support GPT and MBR Intelligently adapt to a partition format

Support NTFS and FAT32 Redeploy files in different file systems

Free TrialFree TrialNow 56337 people have downloaded!

Confirm the SSD now uses its full capacity

Check the entire drive—not just C::
- In Disk Management, the SSD should show its full capacity, the unallocated block should be gone or much smaller, and C: should reflect the new size.
- In This PC, C: should show the increased capacity and the expected free space.
- Boot the system: Windows should start without a Repair or chkdsk screen, and you should be able to open files from C: as usual.
Keep the old drive or your full backup for several days until you’re sure everything is working, then wipe or reuse it.
To avoid this next time, choose the clone tool’s “fit partitions to the entire disk” or “resize to fit” option, or drag the partition boundary in the clone wizard, so the new drive is ready at full size.
If unallocated space is still present or Extend Volume remains greyed out, don’t create a new partition in it. Review the layout section and the FAQ before trying another method.

FAQ

Why is Extend Volume greyed out after cloning to a larger SSD?

Extend Volume is greyed out because the unallocated space isn’t immediately to the right of C:. Typically, a Recovery, EFI/MSR/OEM, or another partition is in the way. Check the Disk Management map to confirm your layout before proceeding.

Can I delete the Recovery partition to extend C:?

You can, but you’ll lose WinRE, and some reset or repair features may be unavailable. Moving the Recovery partition is safer; always back up first, and only delete it if you’re sure you don’t need Windows Recovery.

Is it safe to resize the cloned system partition, and what backup should I make first?

It’s safe if you have a backup. Keep the old drive untouched if possible, and make a disk image of the clone before moving partitions. If BitLocker is on, have your recovery key ready and suspend BitLocker before making changes.

Does this work on Windows 10 and Windows 11, and with both NVMe and SATA SSDs?

Yes. The steps for Disk Management and diskpart are the same in Windows 10 and Windows 11. The SSD interface (NVMe or SATA) doesn’t affect the procedure.

What should I do if Windows won’t boot after resizing?

First, restore the old drive or your full backup. Then try Windows startup repair. Do not attempt further partition changes on the clone until the system is stable.
Renee Becca – Safe and Quick System Migration to SSD

Automatic 4K alignment Improves SSD performance during system migration.

Support GPT and MBR Automatically adapt to the suitable partition format.

Support NTFS and FAT32 Redeploy various files in different file systems.

Back up quickly Back up files at up to 3,000MB/min.

Overall backup schedule Support system redeployment/system backup/partition backup/disk backup/disk clone.

Automatic 4K alignment Improve SSD performance

Support GPT and MBR Intelligently adapt to a partition format

Support NTFS and FAT32 Redeploy files in different file systems

Free TrialFree TrialNow 56337 people have downloaded!

User Comments

Page 1

Leave a Comment


Your comment has been submitted and is awaiting moderation.