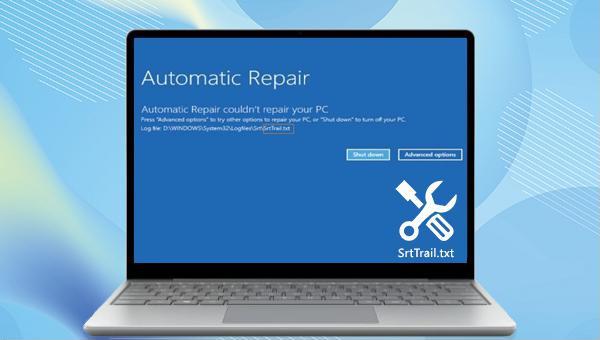
III. How to fix SrtTrail.txt blue screen error?
BCD (Boot Configuration Data) contains all the basic information that Windows needs to boot your computer. If this file is corrupted or missing, it may prevent Windows from loading properly, resulting in SrtTrail.txt blue screen errors. The Bootrec command can repair a damaged master boot record or boot configuration data file.
Before repairing BCD, we need to confirm whether the system is based on UEFI or Legacy.
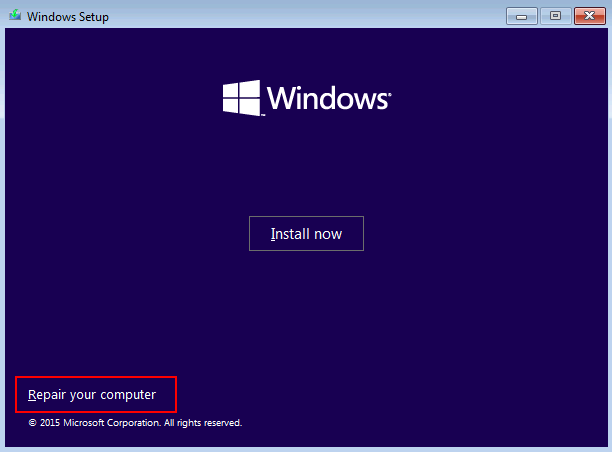
Step 1: Insert the Windows installation disk (DVD or U disk) into the computer, and press F2 or F10 or DEL or ESC keys continuously (there may be slight differences due to different computer brands) to enter the BIOS setting interface when starting up, and install the disk Set first in the boot order. Boot the computer from the Windows installation disk and click the option Repair Your Computer to enter the recovery environment.
Step 2: After entering the recovery environment, select Troubleshooting > Advanced Options > Command Prompt.
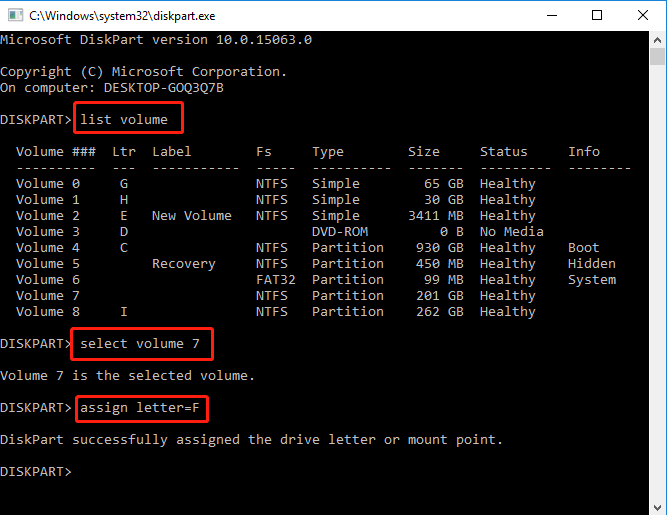
Step 3: Type diskpart in the command prompt and press Enter. Then type list volume and press Enter. If you see a FAT32 partition listed in the FS column, then you have a UEFI based system. If you don’t see a FAT32 partition, and all partitions are NTFS, then you have a Legacy BIOS based system.
If your system is UEFI based, please continue with the following steps:
① Please pay attention to the volume letter of the FAT32 partition and the drive letter of the operating system volume (for example, the FAT32 partition is located in volume 2, and the drive letter of the operating system volume is D). Then enter select volume 7 and press Enter to select the FAT32 partition, then enter assign letter=F (assign a drive letter F to this partition). Then enter exit and press Enter to exit diskpart.
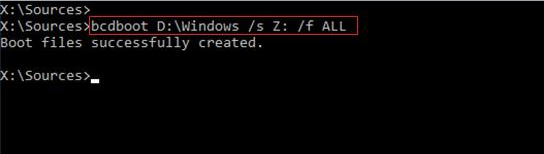
② Then enter bcdboot D:\Windows /s Z: /f ALL (wherein, D: is the drive letter of the operating system volume, which can be replaced according to the actual situation, and Z: is the FAT32 partition) and press Enter to execute the repair command, you can check the Microsoft official description of BCDBoot command line options for more information.
③ Type (exit) and press (Enter) to close the command prompt.
④ Shut down the computer, remove the Windows installation disk and restart the computer to check whether it can boot to Windows normally, if not, please try other methods.
If your system is based on Legacy BIOS, please continue with the following steps:
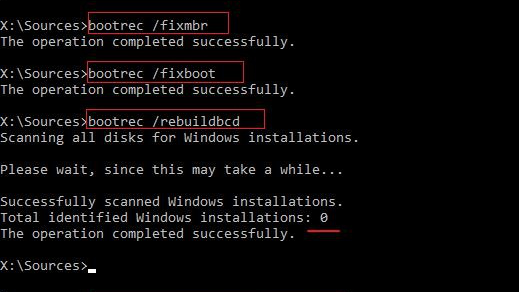
① After confirming that the system is based on Legacy BIOS, please type exit and press Enter to exit diskpart. Then enter the following commands, each time after entering a command, you need to press the key Enter.
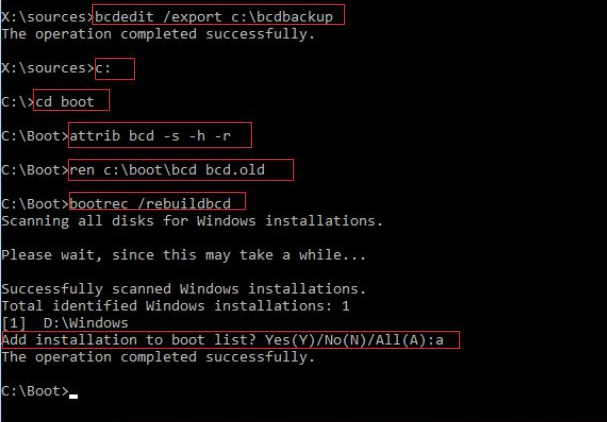
② If you receive “Total identified Windows installations=0″, enter the following commands in order and press Enter.
Note: If “Total identified Windows installations=1″, ignore this step and skip to the next step.
bcdedit /export C:\bcdbackup
③ When “Add installation to boot list? Yes(Y) /No(N) /All(A)” appears, please input A and press Enter.
④ Then close the command prompt and restart the computer to see if the problem is resolved.
2. Use SFC and DISM tools to repair system files
System File Checker (SFC) can find and repair corrupt or missing system files in the system files directory. DISM is an image tool officially produced by Microsoft, which is usually used to check and repair system image files, and detect and clean registry items. Specific steps are as follows:
Step 1: Insert the Windows installation disk (DVD or U disk) into the computer, and press F2 or F10 or DEL or ESC keys continuously (there may be slight differences due to different computer brands) to enter the BIOS setting interface when starting up, and install the disk Set first in the boot order. Boot the computer from the Windows installation disk and click the option Repair Your Computer to enter the recovery environment.
Step 2: After entering the recovery environment, select Troubleshooting > Advanced Options > Command Prompt.
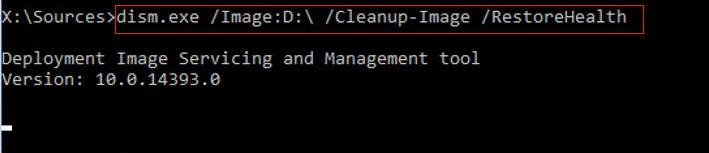
Step 3: Then type dism.exe /Image: D:\ /Cleanup-Image /Restorehealth and press Enter to repair the offline Windows image. Among them, D: is the drive letter of the system disk, and there is a space between the \ and / symbols.
Step 4: After the DISM command is executed, please enter sfc /scannow /offbootdir=d:\ /offwindir=d:\windows (d: is the drive letter of the operating system disk, and there is a space between the \ and / symbols) and press Enter. After the operation is complete, shut down the computer, remove the Windows installation disk, and restart the computer to check whether the system can start normally.
3. Run the chkdsk command to scan the hard disk
chkdsk is a command program for disk checking, which can be used to scan the integrity of the file system on the disk and repair file system errors. It also supports scanning sectors on the disk and trying to repair bad sectors. If there is a problem with the hard disk, it may also cause a blue screen error, so you can run the chkdsk command to scan the hard disk. The steps are as follows:
Step 1: Insert the Windows installation disk (DVD or U disk) into the computer, and press F2 or F10 or DEL or ESC keys continuously (there may be slight differences due to different computer brands) to enter the BIOS setting interface when starting up, and install the disk Set first in the boot order. Boot the computer from the Windows installation disk and click the option Repair Your Computer to enter the recovery environment.
Step 2: After entering the recovery environment, select Troubleshooting > Advanced Options > Command Prompt.
Step 3: Type diskpart in the command prompt and press Enter. Then type list volume and press Enter. Find the volume where the operating system is located and remember its drive letter. Type exit and press Enter to exit diskpart.
Step 4: Then enter the command chkdsk X: /r /f (X refers to the hard disk drive letter, which can be replaced with the drive letter of the system disk according to the actual situation; /r and /f are chkdsk parameters, and /r can search for bad sectors and restore readable information; /f will attempt to repair errors found on the disk), press Enter, and wait for the disk check to complete, which may take several hours. After the disk check completes, close the command prompt and shut down the computer. Remove the Windows installation disk and restart the computer to see if the problem is resolved.
4. Perform System Restore
Some system changes or registry corruption may also cause blue screen errors. If you have created a system restore point before, you can use the system restore function to restore the system to the state when no errors occurred to solve the blue screen problem.
Step 1: Insert the Windows installation disk (DVD or U disk) into the computer, and press F2 or F10 or DEL or ESC keys continuously (there may be slight differences due to different computer brands) to enter the BIOS setting interface when starting up, and install the disk Set first in the boot order. Boot the computer from the Windows installation disk and click the option Repair Your Computer to enter the recovery environment.
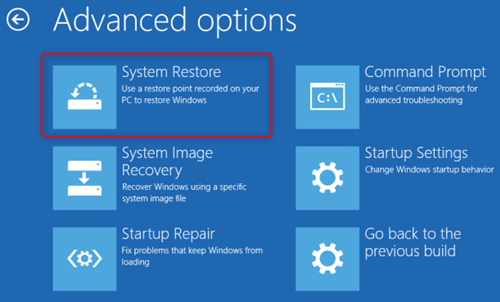
Step 2: When the screen displays to select an option, please click Troubleshooting – Advanced Options – System Restore in sequence.
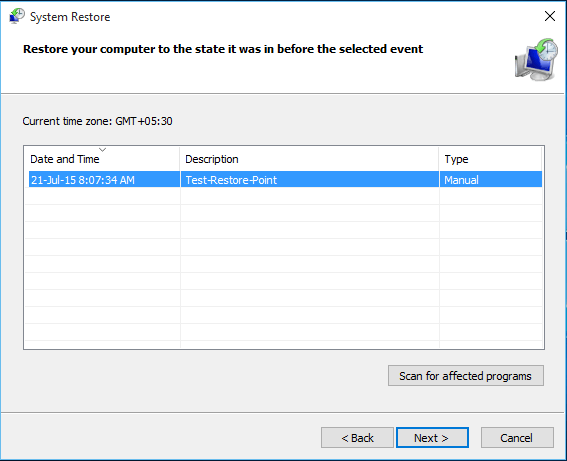
Step 3: Then, select a recent restore point before the error occurred to restore, click Next and wait for the restore process to complete.
The Reset This PC feature in Windows allows users to choose to keep personal files or delete personal files and then reinstall Windows. We can use the reset computer function to solve the blue screen error. Proceed as follows:
Step 1: Insert the Windows installation disk (DVD or U disk) into the computer, and press F2 or F10 or DEL or ESC keys continuously (there may be slight differences due to different computer brands) to enter the BIOS setting interface when starting up, and install the disk Set first in the boot order. Boot the computer from the Windows installation disk and click the option Repair Your Computer to enter the recovery environment.
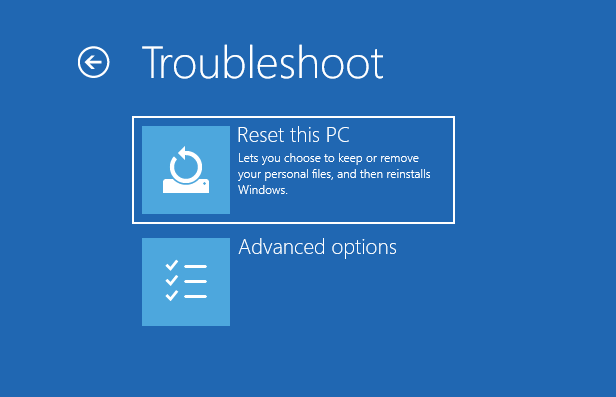
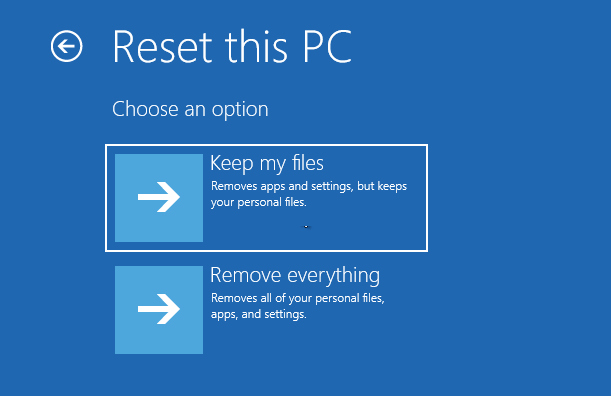
Step 2: Then when Choose an option appears, click Troubleshooting – Reset this PC in turn.
Step 3: Next select the option Keep my files.
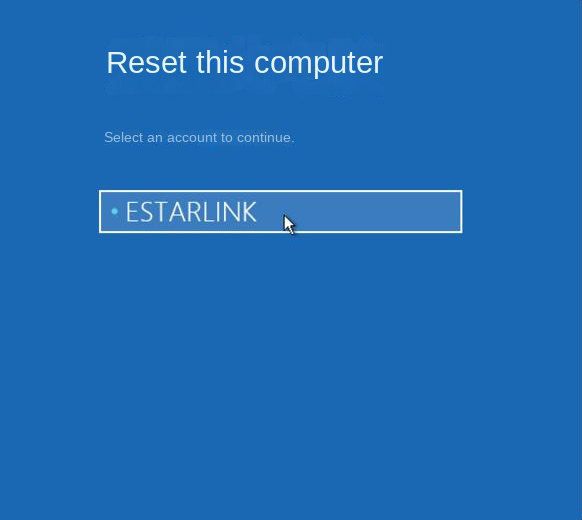
Step 4: After the computer restarts automatically, please click to select an “Account Name”. Then enter the account password (no need to enter if there is no password), click Continue.
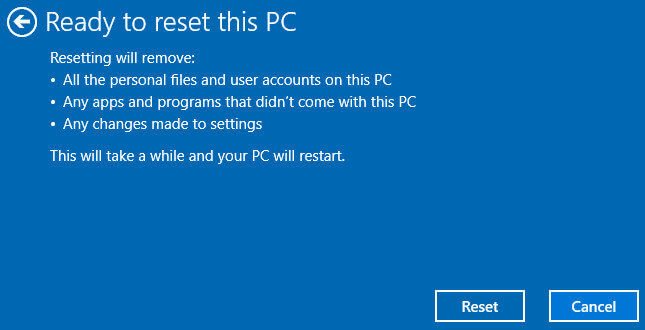
Step 5: After confirming the reset information, click Reset. The computer will automatically restart and initialize the system. This process may take a long time, please wait patiently.
If the above methods cannot solve the StrTrail.txt problem, you can also try to perform a new Windows installation, but before the system installation, it is recommended to use the method in the second part to back up or transfer important files.